
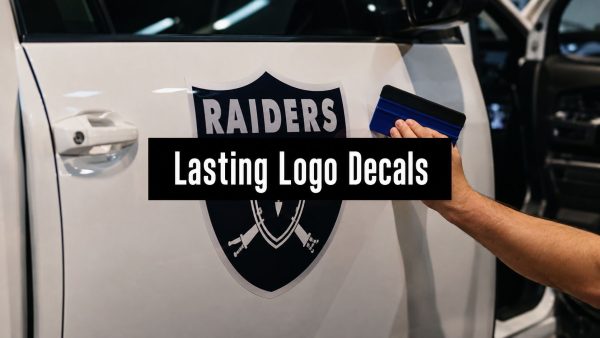
You're standing in a parking lot after the game, looking at a blank quarter panel, a rear window, or a tailgate that feels like wasted space. You want your team pride to show up fast, read cleanly from the next lane over, and still look good after rain, road salt, and a few automatic washes. That's exactly where team logo decals earn their keep, because a good one can turn an ordinary vehicle into something people recognize at a glance.
The catch is that most product pages stop at “upload your logo” and skip the decisions that matter. Material, finish, file quality, size, placement, and install technique all decide whether a decal looks sharp or turns into a wrinkled sticker that peels at the edges. A practical source for related options is custom decals, but the win is knowing what to order and how to use it on your own vehicle.
What You Actually Want From a Team Logo Decal
A good team logo decal does three jobs at once. It signals loyalty, it stays readable in motion, and it survives real-world use on a daily driver, work truck, or weekend rig. If a decal only looks good in the cart preview, it's not doing the job.
That's why the benchmark isn't how flashy the artwork looks on a screen. It's how the logo holds up on a bumper, window, hood, or door panel after sunlight, grime, and wash cycles. Sports branding has always depended on repeated use, and even in the NFL the average team has changed its logo 3.7 times over its history, with an average logo lifespan of just under 14 years. The Dallas Cowboys' logo, first used in 1964, is the league's oldest current logo, while the Washington franchise has had 8 different logos across its history, which shows that these marks are meant to last, but not stay frozen forever. NFL logo evolution
Start with the vehicle, not the art
The right decal for a tailgate is not always the right decal for a rear window. Curved glass, painted sheet metal, and textured trim all change how the design reads and how long it sticks. A truck that lives on the highway needs a different answer than a Jeep that sees trail dust or a carpool vehicle that spends every weekday in school pickup lines.
Practical rule: choose the use case first, then choose the design. If the logo can't survive the surface, the surface will win.
That's why this guide stays focused on the parts most listings skip. It covers choosing, customizing, sizing, placing, installing, and maintaining decals that are meant to survive weather, car washes, and daily driving. If you've only ever judged a decal by the thumbnail image, this is the stuff that separates a clean install from a short-lived one.
Choosing the Right Material and Finish
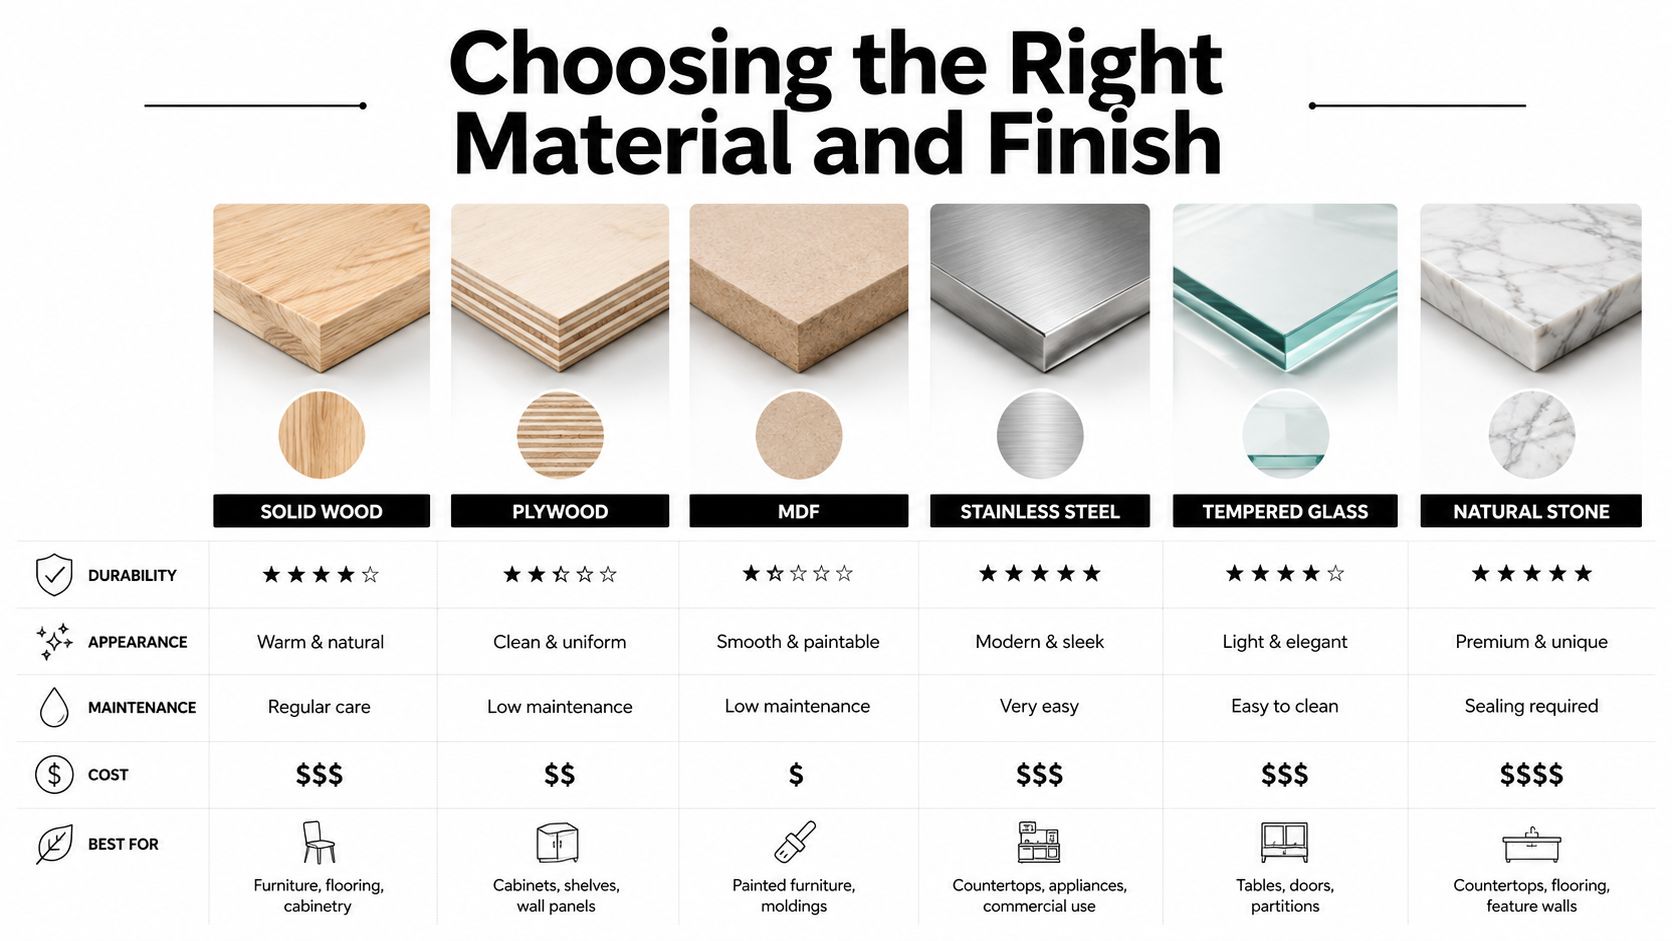
Material is the part most buyers feel after the fact. Glossy economy vinyl may look fine at checkout, but the difference shows up later, when edges start lifting, color starts dulling, or the film gets brittle from sun and temperature swings. For vehicle use, professional-grade Oracal vinyl rated for up to 7 years outdoors is a sensible baseline, and it's the kind of material expectation you want for a truck, Jeep, or commuter that sees road time.
The material choice also depends on how hard the surface works. Calendared vinyl is usually the simpler, budget-friendlier option for flat or gently curved panels. Cast vinyl is the better fit when the graphic needs to conform more naturally to curves, recesses, or trickier body lines. On a hood, rear quarter, or curved window, the more conformable film usually behaves better because it isn't fighting the shape as much.
Finish changes readability as much as appearance
Gloss tends to give the cleanest, most familiar sports look. It usually pops on darker paint and keeps the logo legible at a distance. Matte softens reflections, which can help on certain vehicles, but it also changes how aggressive the graphic feels in daylight.
A UV-resistant laminate matters when the decal will live outside and the vehicle gets parked in open sun. It adds another layer of protection against fade and wear. Reflective, metallic, and specialty finishes can be useful for fan graphics when visibility or style is the priority, but a standard gloss vinyl is still the smarter default for most team logos because it balances legibility, durability, and easy upkeep.
Practical rule: if the vehicle is a daily driver, choose the finish that makes the logo easiest to read from a few car lengths away, not the finish that looks most dramatic in a product photo.
Some sellers cut corners with cheaper films, but Custom Sticker Shop uses professional-grade Oracal vinyl rated for up to 7 years outdoors, manufactured in the USA. That matters less as a brag and more as a clue that the material is intended for real use instead of a quick seasonal sticker.
Getting Your Logo File Ready for Production
A decal can only be as clean as the file behind it. The screen preview can hide problems that become obvious the moment a printer, cutter, or installer handles the art. That's why the safest approach is to prepare a file as if the design has to survive being cut, weeded, transferred, and applied by hand.
The main rule is feature size. A professional decal design guide advises keeping positive linework at 0.3 to 0.4 mm minimum, reversing out gaps at about 0.4 mm, and making important elements about 2 mm or more for reliable readability and print-cut stability. Thin strokes, tiny gaps, and micro-details are the first things to fail because they can close during cutting, disappear in weeding, or tear during installation. Decal and nameplate design guide
Vector beats a pretty screenshot every time
If the logo is going on a vehicle, vector art is the safest format. That usually means EPS or PDF, because those files can scale without turning jagged. A low-resolution PNG can look fine on your phone and still fall apart when it's enlarged for glass or body-panel use.
One decal printer recommends EPS/PDF and asks for artwork at 300 dpi at 25% scale, 600 dpi at 10% scale, or at least 200 dpi at 50% scale. That's a strong hint that file quality should match final output size, not the way the image happens to look on a laptop screen. Sports sticker file specs
If you're working in Canva, Photoshop, or Illustrator, keep it simple. Use the cleanest source file you have, convert text to outlines, and test the design at the actual physical size before sending it off. A good brand shop or designer can help with this too, and best brand identity agencies are often a useful reference point if you need help turning a rough mark into production-ready artwork.
For buyers who just want to create something from scratch, an internal product path like this custom text decal option shows the same principle in action. Keep the design clean, keep the spacing intentional, and don't ask the cutter to rescue a file that was never built for cutting.
Sizing the Decal for Your Vehicle
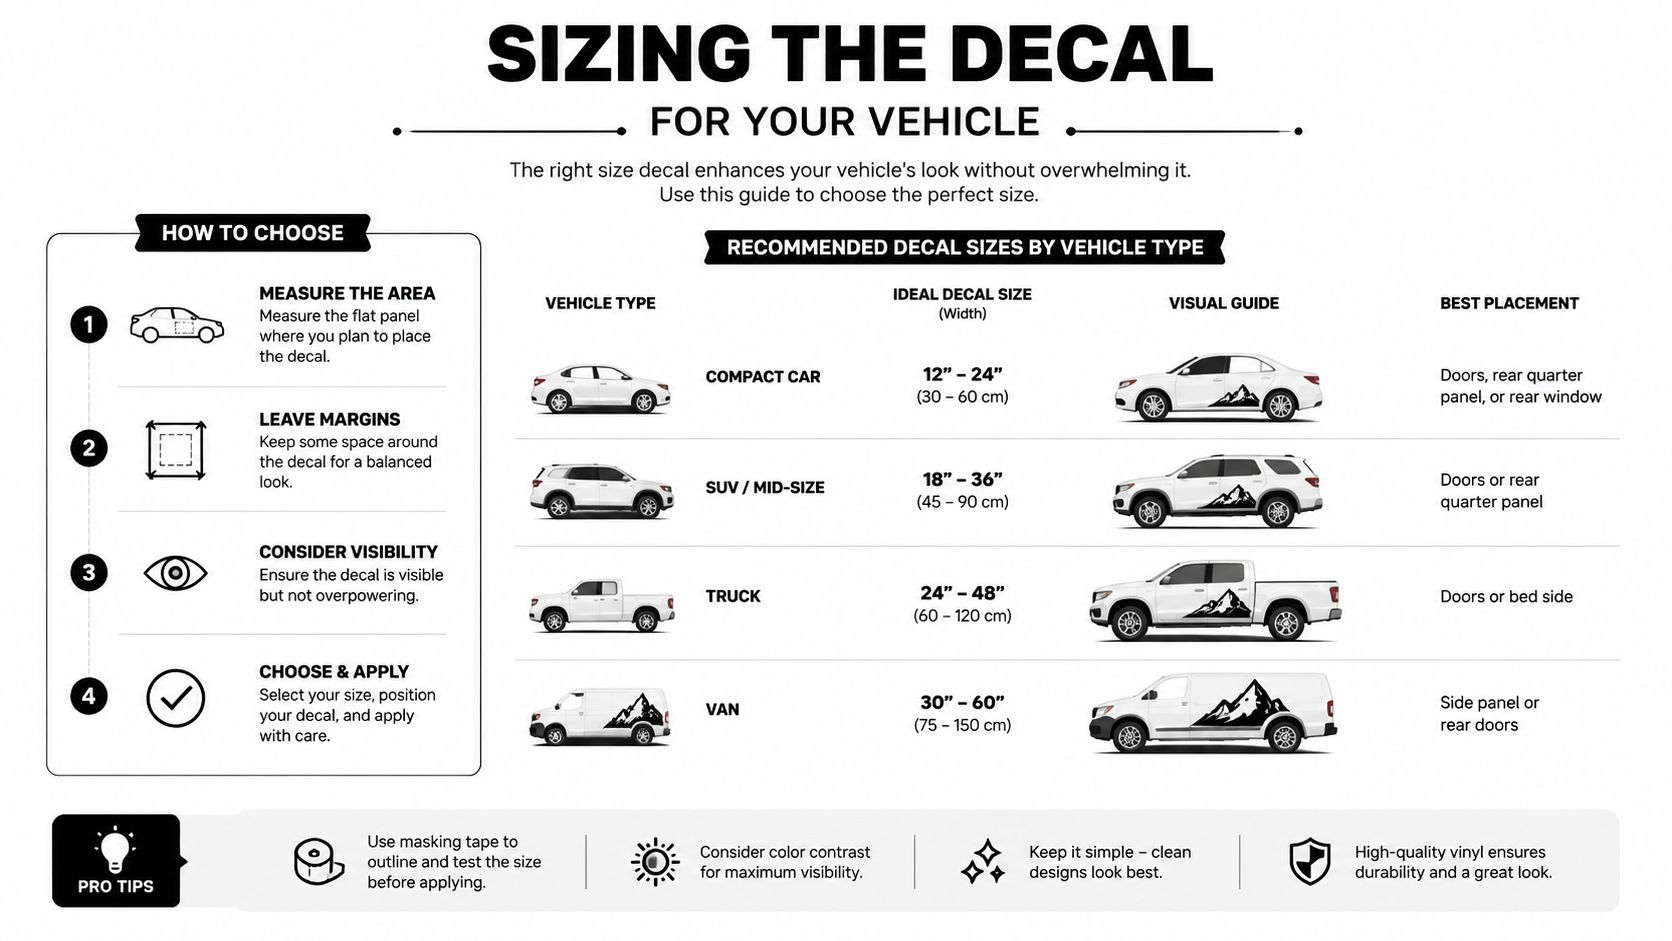
A decal that's too small doesn't just look timid. It becomes unreadable from the distance where people see it, which defeats the point on a side panel, rear glass, or hood. The clearest practical rule is simple, about 1 inch of design height for every 10 feet of viewing distance. Vehicle decal design tips
That rule changes everything. A rear-window logo meant for traffic behind you needs to read farther back than a side-panel logo seen while parked. A hood decal seen from above or in mirrors can be smaller than a tailgate graphic meant for drivers behind you at a stoplight.
Match size to the way people will actually see it
A detailed logo can look great at full size and still get muddy when it shrinks to 4 to 8 inches wide on curved glass or a fender. The tighter the curve and the smaller the size, the more likely details will disappear. Simplified versions often win on vehicles because clarity matters more than preserving every small line.
The same vehicle guidance recommends testing designs on light, dark, and mid-tone mockups before production, because contrast changes the way the logo reads. That matters more than people think. A logo that feels bold on white paper can vanish on a dark truck, and a dark logo can disappear on tinted glass.
For practical sizing, think in vehicle groups rather than exact vanity dimensions:
- Sedans, smaller rear windows and door panels usually need compact logos that still leave open space around the art.
- SUVs, larger rear glass and taller doors can carry bigger marks without crowding the surface.
- Full-size trucks, tailgates and rear doors can support wider graphics because the panels give the logo room to breathe.
- Jeep windows, especially rear and side glass, often work better with simplified shapes that stay readable against tint and curvature.
If you want a ready-made example of a larger text layout, this 22-inch window decal option is a useful reminder that width alone isn't the goal. The target is readability at the distance where the vehicle is seen.
Where to Place a Team Logo Decal for Maximum Visibility
Placement decides whether the decal gets noticed by people walking past the vehicle, drivers in the next lane, or someone looking in a mirror. The best zones are usually the front third of the side panels, the top half of rear doors or tailgates, and the centered high on the hood. Low placement is risky because it can disappear behind road grime or the shadow line from nearby vehicles. Vehicle branding placement guidance
Match the zone to the goal
A booster-club carpool vehicle usually benefits from side-panel placement because people approaching from the parking lot see the logo first. A fan truck or SUV supporter graphic often works better on the tailgate because drivers behind you get a clean rear view. Rear windows are a practical home for local-business style visibility, while the hood makes sense when mirror visibility or parked-event recognition matters.
The easiest way to avoid a bad call is to mock it up with masking tape before ordering. Tape the size on the vehicle, step back, and check it from the angle where people will see it. Eye-level testing catches mistakes that look obvious only after the transfer tape is already off.
| Use Case | Best Zone | Why It Works |
|---|---|---|
| Booster-club carpool | Front third of side panels | Easy to spot in parking lots and pickup lines |
| Fan truck or SUV supporter | Top half of rear doors or tailgate | Strong rear visibility at stops and in traffic |
| Local business style use | Rear window | Clean read from behind without crowding body lines |
| Show car or parked-event display | Centered high on the hood | Visible in mirrors and from above in tight spaces |
Place the decal where clean metal or glass stays visible most of the time, not where tires, mud, or parked cars block the view.
That last part matters because too many buyers place graphics where they personally like them, not where traffic can see them. The best zone is the one that serves the vehicle's real audience.
Installing the Decal Without Bubbles or Stretching
A clean install starts before the backing paper comes off. The surface needs to be clean, dry, and free of dust, and the work area should be shaded rather than baking hot in direct sun. A shaded install above 50°F is a safer target because temperature and dirt are the two biggest reasons decals fail at the start. If the vehicle is gritty or the panel is damp, the adhesive never gets a fair shot.
Custom Sticker Shop ships decals pre-spaced and transfer-taped, which makes the install more forgiving because the pieces stay aligned while you apply them. That still doesn't remove the need for patience. A rushed install can trap bubbles under the face film or stretch the vinyl out of shape.
A simple install flow that actually works
Start with a wipe-down using isopropyl alcohol or soapy water, then dry the surface completely. Hold the decal in place with masking tape, step back, and check the alignment before you commit. Once it looks right, lift the backing, squeegee from the center outward, and peel the transfer tape back at a sharp angle.
If the decal goes crooked, don't yank it harder and hope it straightens itself. Pull it back carefully while the adhesive is still forgiving, reset the tape line, and try again. The biggest first-timer mistake is stretching the vinyl while trying to force a correction, because that distortion usually shows up later as wrinkling or lift.
A few habits prevent most problems:
- Clean thoroughly: leftover film and dust ruin adhesion.
- Work slowly: speed causes bubbles and misalignment.
- Keep tension low: vinyl should lay, not be pulled into place.
- Peel carefully: a sharp-angle peel protects small details.
You'll often hear installers recommend waiting before washing, and that advice is right. Give the decal 24 to 48 hours to cure before the first car wash. If you want a windshield-specific format as a reference, this custom windshield banner option shows how transfer-ready graphics are usually handled for direct application.
Using Team Logos Legally Without a Cease-and-Desist
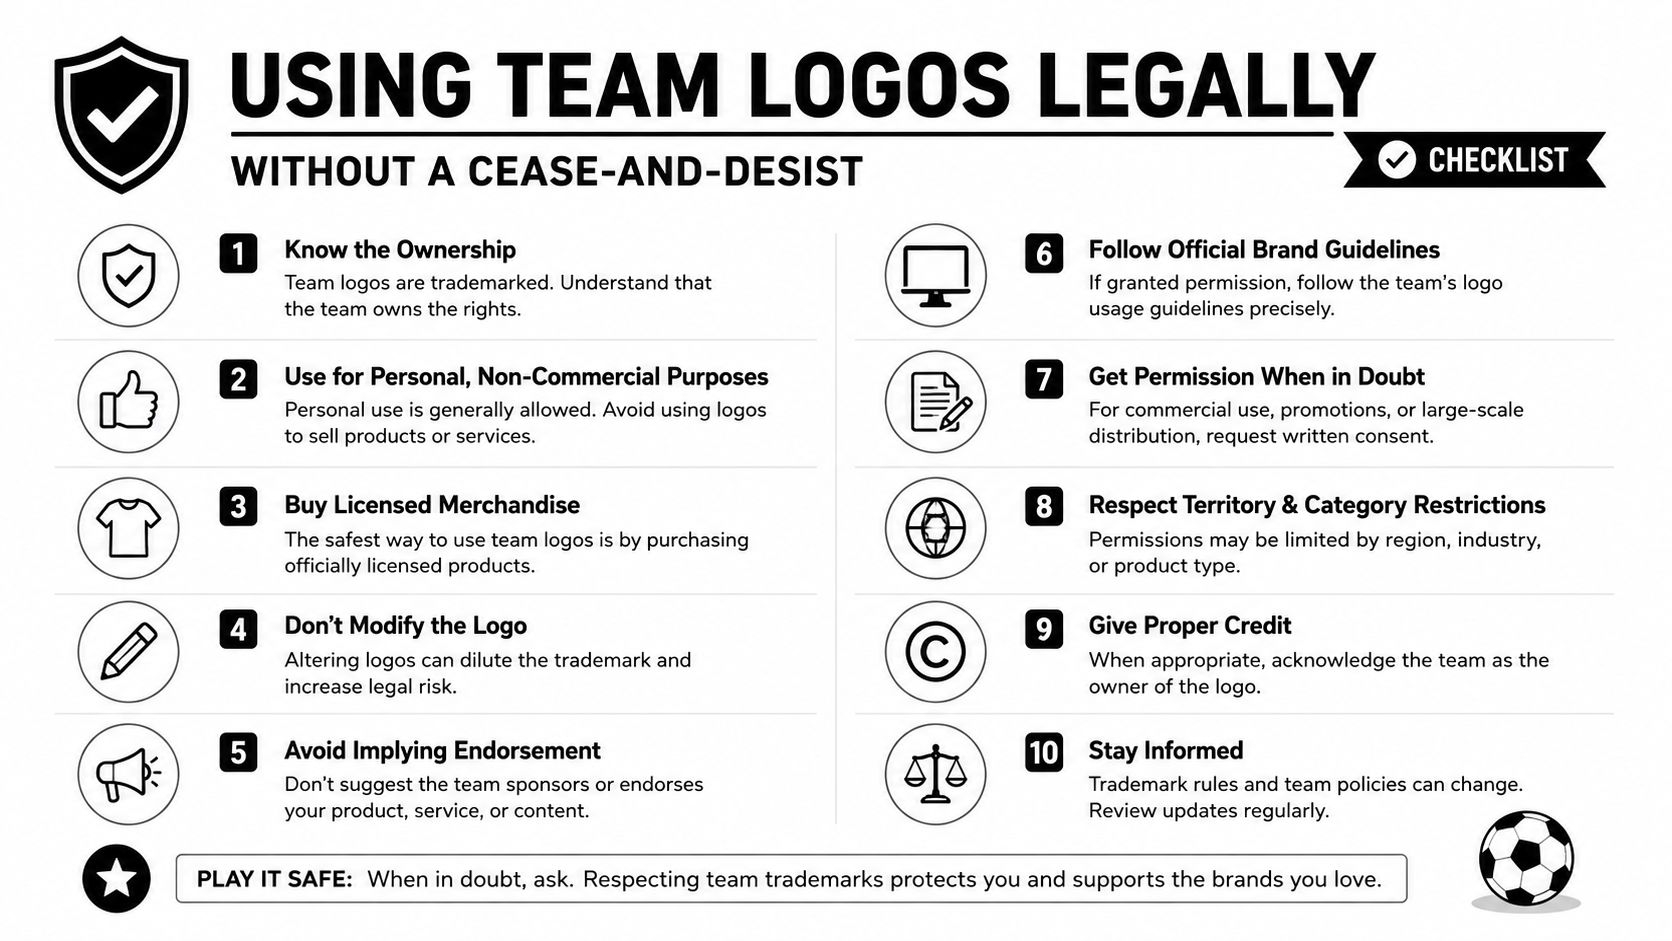
The legal line is simpler than you might think, but it gets ignored because fans assume any sports logo on a vehicle is harmless. Professional team logos, college marks, and NCAA or NFL identities are trademarked, and reproducing them for resale or mass distribution without permission can trigger takedowns or worse. Personal use on your own truck is a different situation from selling decals at a fundraiser, adding them to a carpool fleet, or using them as part of a small business display.
The safest path is to separate personal decoration from distribution. If the decal is going on your own vehicle and staying there, the risk profile is usually lower. If the logo is being sold, handed out, or used as part of a public promotion, written permission or a licensed source is the smart move.
Three ways to stay on the right side of the line
Licensed merchandise suppliers are the cleanest option when you want an official mark. Written approval from the team or university is another route, but you should get it before production, not after the order is already cut. A third option is to commission an original design that captures the spirit without copying the protected mark.
Custom family decals and stick-figure designs are usually much simpler because they don't borrow trademarked sports identities. If your goal is a name, a mascot vibe, or a family theme, an original layout is often easier than navigating permission for an official logo. That's the route many buyers should take when they want the look without the paperwork.
Maintenance matters after installation too. Hand washing is the safest routine, touchless car washes are usually acceptable, and brush car washes are hard on edges. Harsh cleaners can break down adhesives, so avoid strong solvents on the decal itself. After a hard winter, look for edge lift, fading from UV exposure, and adhesive failure from road salt. Replace the decal when the edges won't lay flat anymore, when the image has visibly faded, or when the graphic no longer matches the look you want on the vehicle.
Removing an old decal is straightforward if you're patient. Use heat to soften the adhesive, peel slowly, and clean the remaining residue with adhesive remover that's safe for paint. That lets you swap in a fresh design when the team changes its look or the decal finally wears out.
If you want a decal that's cut for real vehicles, not just for a preview box, Custom Sticker Shop builds transfer-taped vinyl graphics for windows, hoods, doors, and truck glass. Visit Custom Sticker Shop to choose a design that fits your vehicle, your team, and the way you drive.