
Your car might run great, look clean, and still blend into traffic like every other SUV, truck, Jeep, or sedan in the parking lot. That's usually the moment people start thinking about a decal. Not because they want to turn the whole vehicle into a rolling billboard, but because they want one detail that feels like theirs.
A good vinyl decal can do that fast. It can show off a hobby, honor military service, mark a family nickname, add a windshield banner, or give a plain rear window some attitude without changing the whole vehicle. That's why vinyl car sticker design keeps pulling in people who would never call themselves “car customizers.”
This isn't a niche corner of the market anymore. The personality car sticker market was valued at $4.2 billion in 2025 and is projected to reach $7.8 billion by 2034, growing at a 7.1% CAGR according to DataIntelo's personality car sticker market report. That kind of growth tells you decals have moved well beyond the old bumper sticker idea.
Custom vinyl also has deeper roots than commonly understood. Car sticker design traces back to the 1940s, when Forest P. Gill is widely credited with creating the first adhesive bumper sticker, and vinyl later replaced paper because it held up better outdoors. The production side goes back even earlier to the 1930s, when Stanton Avery developed the first self-adhesive label, according to this history of car decals.
Beyond the Bumper Sticker An Introduction
Most customers start with a rough idea, not a finished design. They know they want something on the back glass, the hood edge, the quarter window, or the windshield. They don't always know what size it should be, what material fits the job, or how to avoid making the car look cluttered.
That's where the process matters. Good vinyl car sticker design isn't just picking a cool graphic and clicking buy. It's choosing the right placement, the right vinyl, the right cut style, and the right file setup so the finished decal looks clean on a real vehicle.
What decals do well
Vinyl works best when the design has a job to do. Sometimes that job is visual. Sometimes it's personal.
- Personal expression: Off-road badges, fishing graphics, JDM text, race-inspired banners, and simple silhouette art all work because they say something quickly.
- Tribute graphics: Memorial decals, branch insignia, unit-inspired layouts, and service-support messages carry more weight when they're designed with restraint.
- Family and lifestyle themes: Names, pets, stick figures, camp scenes, and hobby decals are popular because they feel personal without needing a full wrap.
A lot of people browse collections before they know what they want. That's normal. A practical place to start is a catalog of custom car decals you can personalize, then narrow down style, size, and location from there.
Practical rule: If a decal only looks good enlarged on a screen, it probably won't look good reduced to the size of a rear window corner.
The difference between a good idea and a good result
Customers often focus on the artwork first. Shops focus on where the sticker will live. That's the right order in production because the vehicle decides a lot. A flat back glass gives you options that a curved bumper doesn't. A simple one-color cut decal behaves differently than a printed multi-color graphic. Newer vehicles add another layer because cameras, radar, and sensor areas can limit safe placement.
That mix of style, fit, and practicality is what separates a decal that lasts from one that starts peeling, bubbles during install, or blocks something important.
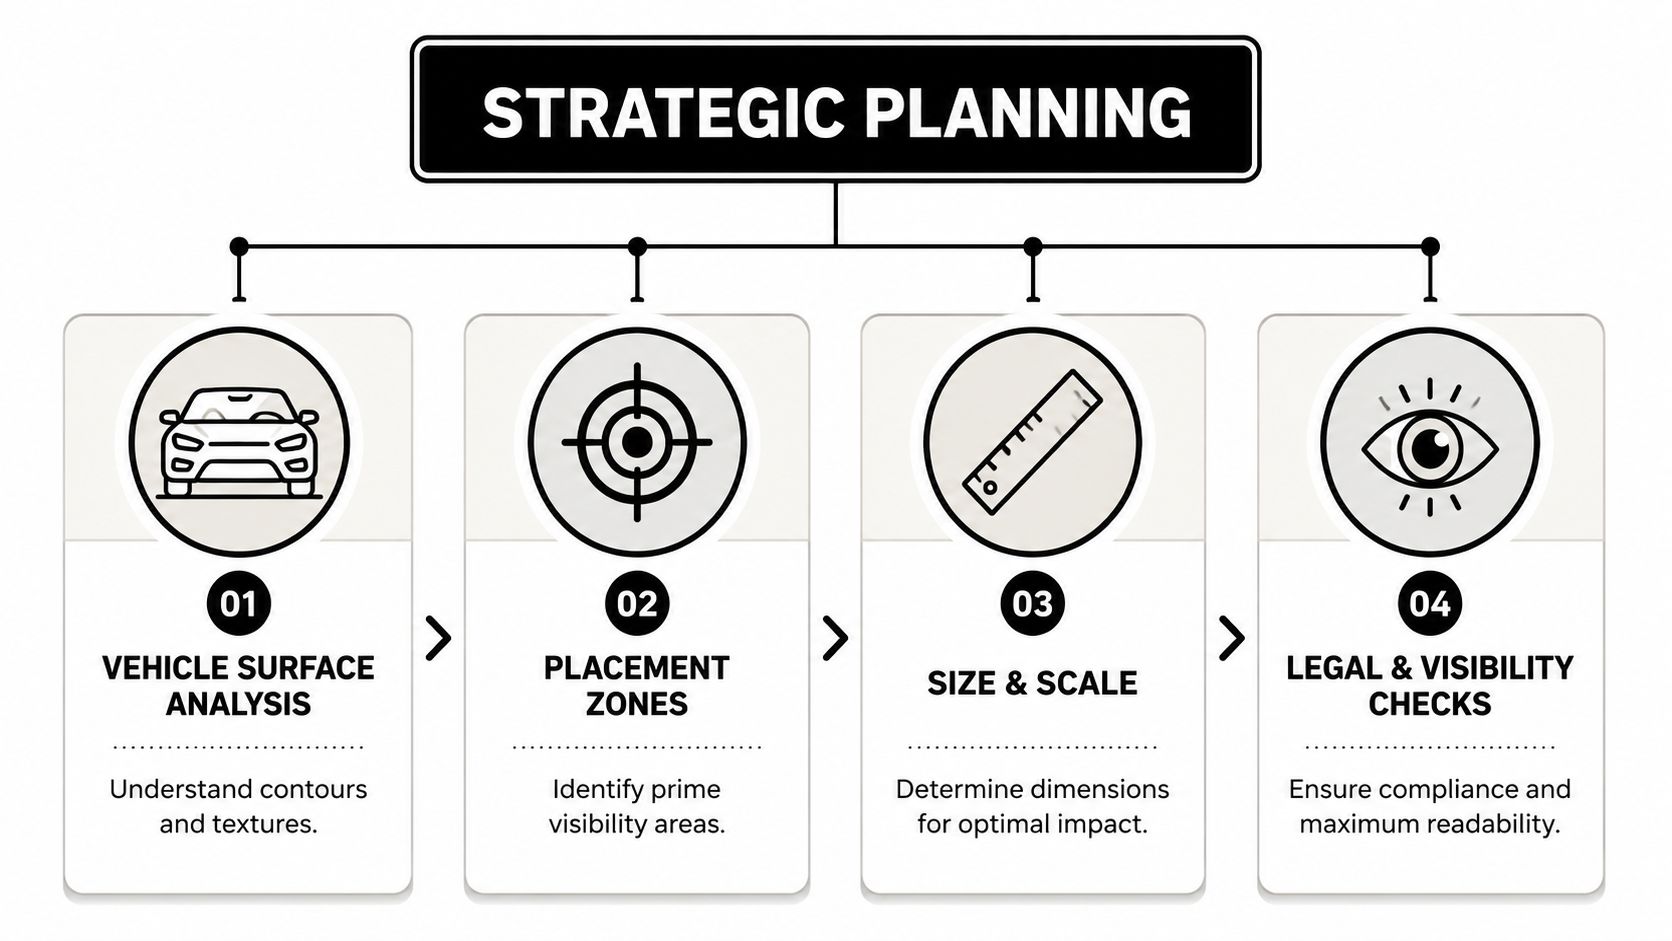
Strategic Planning Where Your Design Will Live
The fastest way to ruin a good decal is to treat placement like an afterthought. People still assume they can stick a design anywhere there's open space. On older vehicles, that was often just an aesthetic mistake. On newer ones, it can become a safety problem.
A critical issue in vinyl car sticker design is avoiding interference with modern ADAS hardware. Windshield cameras, radar, and related systems rely on unobstructed areas, and a poorly placed graphic can interfere with features such as lane-keeping assist or automatic emergency braking. That's why placement needs to start with the vehicle, not the artwork.
Measure first and trust photos second
Phone mockups help, but they can lie to you. Curved glass looks flatter in photos. Body lines disappear. Panel gaps get ignored. Before finalizing anything, stand at normal viewing distance and use painter's tape to mark the actual footprint on the vehicle.
Check these things before you commit:
- Sightlines: Sit in the driver's seat and look through every planned window area.
- Panel shape: Hoods, bumpers, and bedsides often have subtle curves that punish stiff material.
- Openings and seams: Don't place a design where door gaps, washer nozzles, trim edges, or handles interrupt the read.
- Wiper sweep: Rear-window graphics that enter the wiper path can wear unevenly.
For windshield graphics, it helps to start with a purpose-built format such as a custom text windshield banner decal, then size it around the glass shape and visible driver area rather than forcing a generic layout.
ADAS no-go zones
This part gets skipped far too often. Many modern vehicles have hardware mounted near the rearview mirror, behind the windshield, inside the grille, on the bumper cover, or in mirror housings. Decals placed over or too close to those zones can create problems you won't notice until a safety feature misbehaves.
Check the owner's manual before applying any decal near the windshield, grille, mirrors, or bumper corners. That's the first place automakers identify camera and sensor areas.
Use this rule set:
| Area | Better use | Avoid |
|---|---|---|
| Windshield upper band | Narrow banner below clear sensor zone | Covering camera housing or sensor field |
| Rear glass | Lower corners or partial coverage with clean visibility | Defroster-heavy zones or central rear view blockage |
| Front bumper | Decorative areas away from radar sections | Sensor covers, radar windows, parking sensor faces |
| Side mirrors | Usually leave them alone | Any camera-equipped mirror housing |
Think like the decal has to live there for years
Placement isn't just about what looks balanced on day one. It affects wash wear, edge lift, and how often the graphic gets touched. Door-edge areas, leading hood edges, and bumper corners take abuse. Flat side glass and smooth body panels are easier environments.
A design can be excellent and still belong somewhere else on the vehicle. That decision saves more failed installs than any fancy production trick.
Choosing the Right Vinyl and Colors
Material choice is where a lot of decal jobs go wrong. Two films can look nearly identical on the roll and behave completely differently on the car. If you're choosing between a cheaper film and a better one, the right answer depends on where the sticker goes, how long you want it to last, and what climate the vehicle lives in.
Nominal “7-year outdoor-rated vinyl” claims are only a baseline. Real-world durability depends on UV intensity, temperature swings, cleaning chemicals, and substrate prep. In harsh conditions, understanding the difference between cast and calendared vinyl matters a lot.
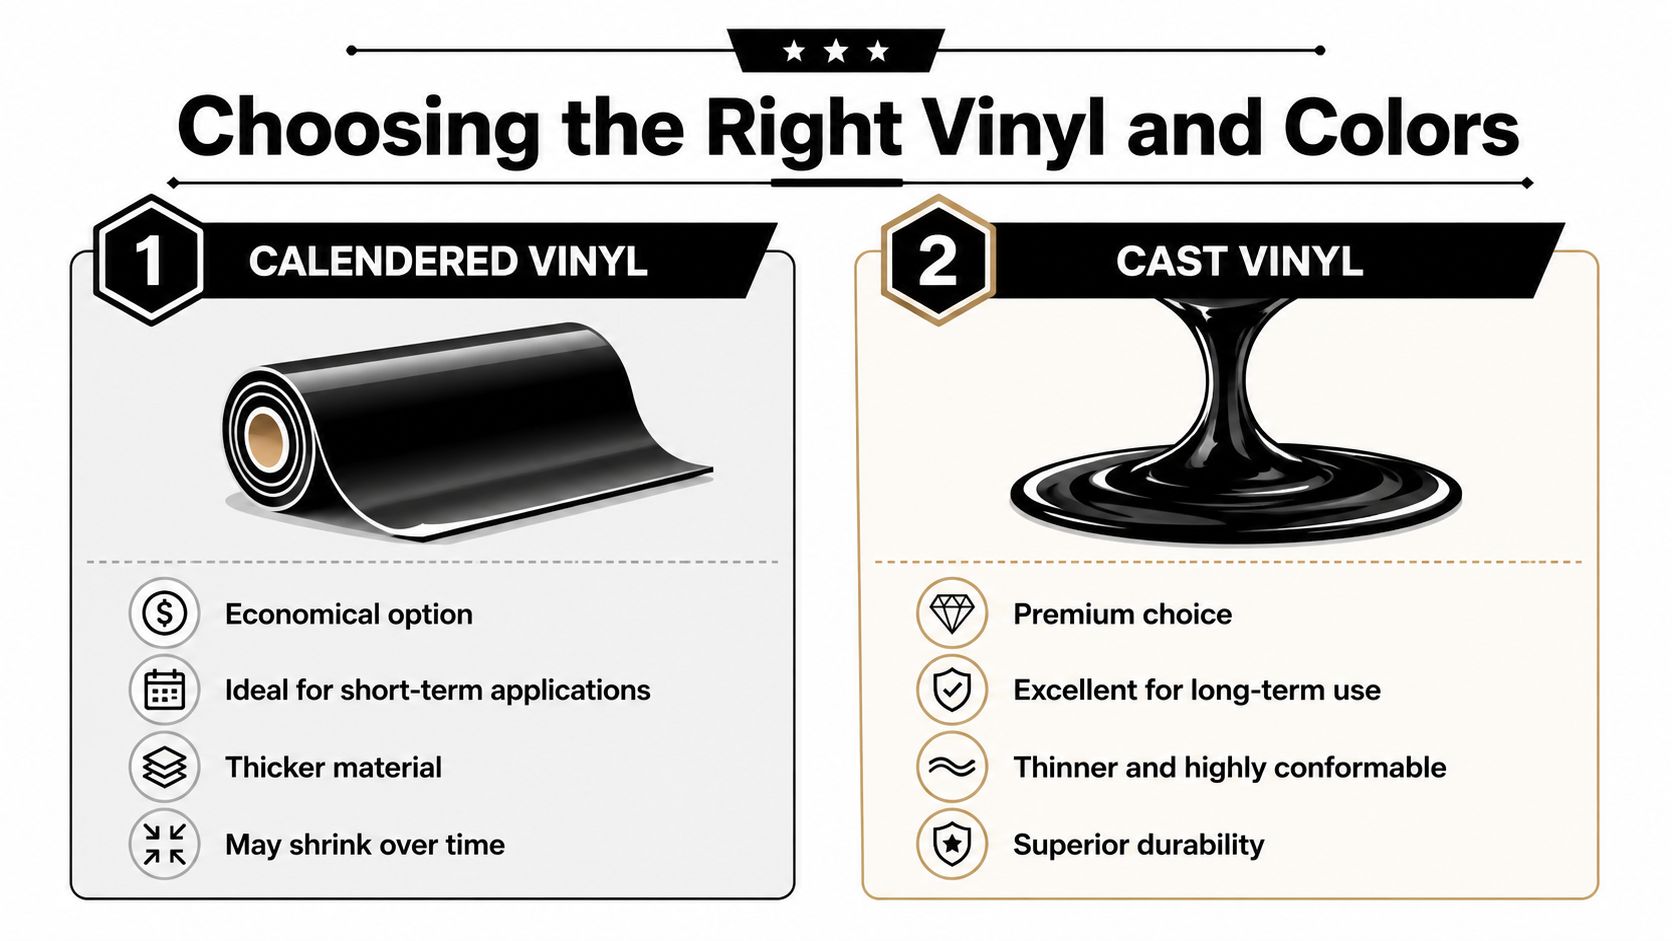
Calendared versus cast in plain English
Here's the shop-floor version.
| Vinyl type | Best fit | Watch for |
|---|---|---|
| Calendared | Flatter surfaces, shorter-term use, budget-conscious jobs | Can be less forgiving on curves and tougher environments |
| Cast | Long-term outdoor use, curves, contours, premium installs | Higher material cost |
Calendared vinyl has its place. For a rear window corner decal, simple text on side glass, or a clean flat-panel graphic, it can work well. But once the design has to move over compound curves, deep contours, or harsher weather, cast vinyl usually gives cleaner long-term results.
Climate changes the answer
A decal in mild conditions and a decal in brutal sun don't age the same way. Neither do decals on a garage-kept weekend truck versus a commuter that sees road salt, wash chemicals, and constant exposure.
What tends to shorten decal life:
- High UV exposure: Strong sun breaks down color and adhesive performance faster.
- Heat cycling: Hot days and cool nights stress edges and films.
- Salt and grime: Winter road treatment can be rough on lower-body placements.
- Aggressive washing: Brushes and pressure aimed at edges speed up failure.
A durability rating on the liner doesn't know whether your vehicle lives in Arizona sun, Canadian winter slush, or a tunnel wash every Saturday.
Color decisions that work on actual vehicles
People choose color emotionally, then discover the car itself changes everything. The same white decal can look crisp on black paint and disappear on silver glass reflections. Matte black can look sharp on white paint and nearly vanish on tinted rear glass at dusk.
A few practical rules help:
- Use contrast, not just favorite color. A decal has to separate from the paint and reflections around it.
- Match finish to the vehicle. Gloss often reads cleaner on glossy paint. Matte can look more subdued and modern.
- Expect screen mismatch. Colors on a phone aren't the same as cut vinyl in direct sun.
- Keep specialty finishes in perspective. Metallic and other attention-grabbing looks can be fun, but standard finishes are usually easier to live with visually.
If a customer is torn, I usually tell them to hold paper samples or taped mockups against the vehicle in daylight. That beats guessing every time.
The Creative Process Designing a Sticker You Love
Most solid decal ideas start with something personal and then get edited down. That's the part people don't expect. They think they need more detail, more text, more symbols. Usually they need less.
A sticker has to read fast, cut cleanly, and still look intentional when it's seen from an angle or through dirty glass.
Start with shape before detail
For cut vinyl, bold silhouettes win. Fine lines, tiny enclosed shapes, and overly distressed textures often look cool on a monitor and become a weeding headache in production. If the design depends on tiny fragments to make sense, it probably isn't right for a car decal.
Vector artwork earns its keep. Vectors scale cleanly, which makes them the standard for cut decals and many print workflows. Raster art can still be useful for printed stickers, but if you're building logos, text, or shape-based designs, vector is the cleanest path.
A simple design filter helps:
- Can you recognize it from several steps back?
- Will the smallest parts survive cutting and transfer?
- Does it still make sense in one color?
If the answer is no to any of those, simplify first.
Popular themes that translate well to vinyl
Certain styles keep working because they fit the medium.
- Jeep and off-road graphics: Mountain lines, topo-inspired shapes, trail phrases, claw-style accents, and clean hood or windshield text.
- Military tribute decals: Branch insignia, memorial layouts, service-related wording, subdued symbols, and respectful rank or unit-inspired graphics.
- Family decals: Stick figures, names, pets, sports gear, camping themes, and hobby add-ons that keep the design personal without becoming cluttered.
- JDM and tuner looks: Kanji-inspired text, rising sun motifs, drift-style banners, and minimal side-window graphics.
If you want to rough out concepts before committing to a final decal, this guide on generating AI t-shirt designs is useful for idea generation. The medium is different, but the brainstorming process for themes, composition, and typography carries over well.
Typography is where many decals fail
Fonts cause more trouble than customers realize. Thin scripts, extreme swashes, and distressed lettering can become fragile or unreadable once cut. A great decal font has character, but it also has enough body to survive weeding, transfer, and outdoor viewing.
Keep your wording short. Cars don't give you much reading time.
A few safe habits:
- Use thicker strokes for small text.
- Avoid fonts with tiny detached islands unless the design is printed.
- Test readability at actual size, not enlarged on screen.
- Don't stack too many type styles in one decal.
A quick install video can also help you design more realistically, because you'll spot what kinds of details are easy to place and what tends to fight the transfer tape.
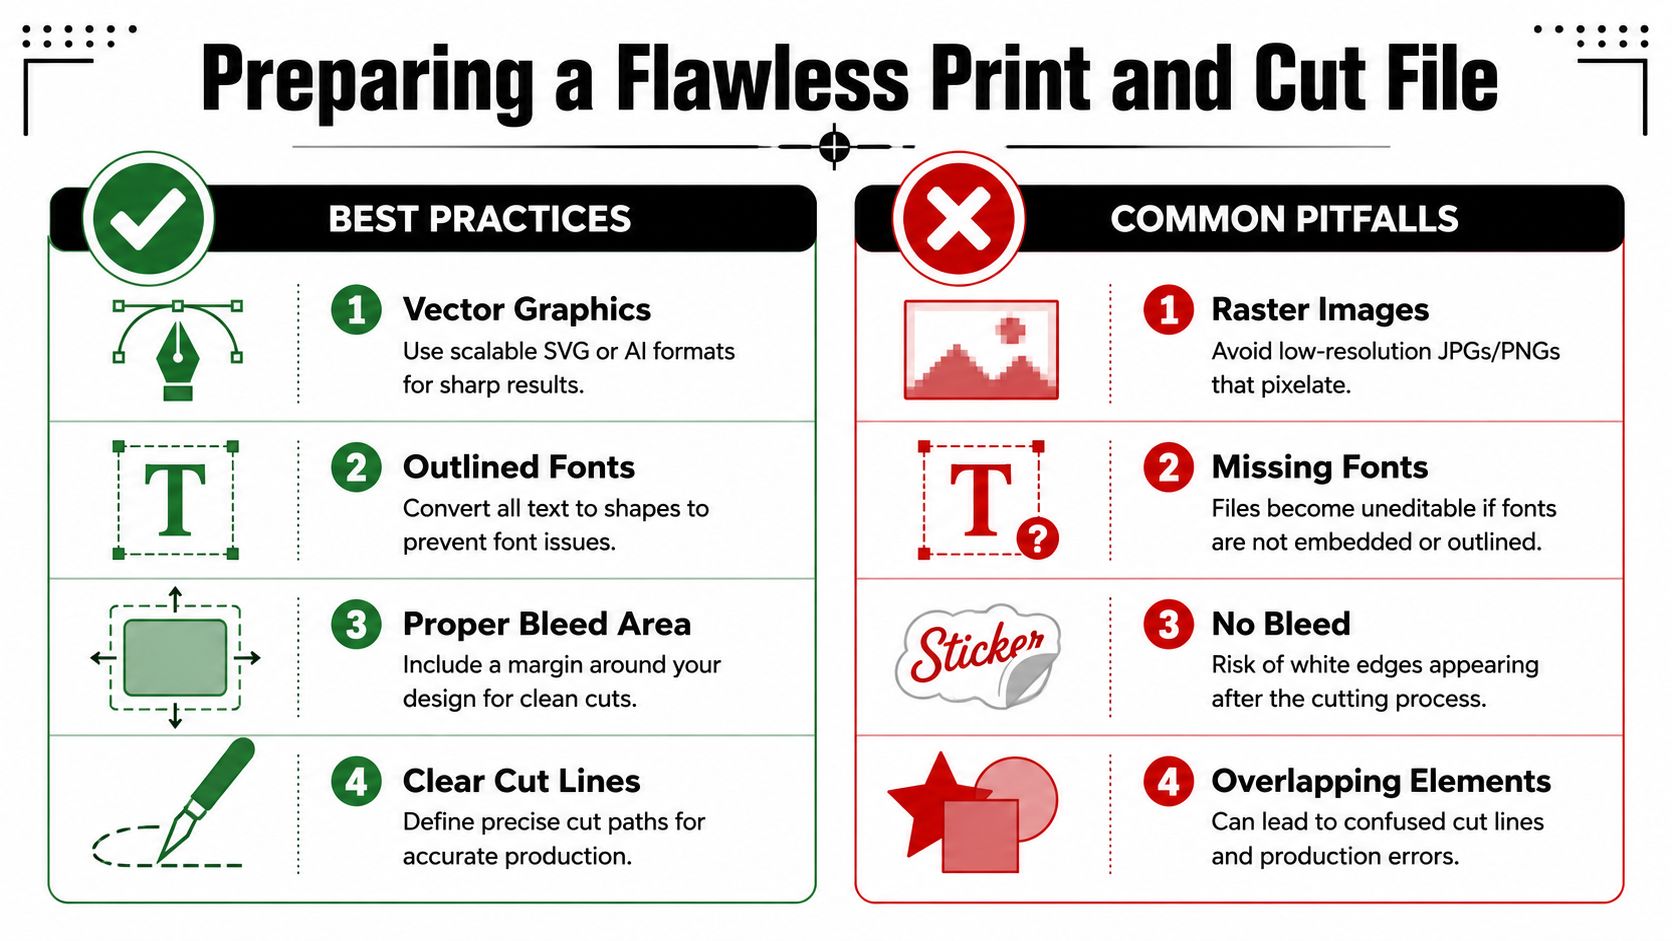
Preparing a Flawless Print and Cut File
At this stage, creative ideas either become production-ready or become a cleanup job for the shop. A file that looks fine on your screen can still be a problem if the resolution is low, the cut path is messy, or the text depends on fonts that won't travel with the file.
For print-ready sticker design, 300 dpi minimum is the common benchmark for sharp output at full size, and accurate cut contours matter just as much because they guide the cutter cleanly and reduce weeding issues. That guidance is covered clearly in CarStickers.com's design tips for sticker creators.
File types that save time
If the decal is cut vinyl, send a vector file when possible. AI, EPS, and SVG are the usual suspects. Those formats keep lines crisp and allow clean path editing. A low-resolution JPG might be enough to show the idea, but it's not a reliable production file for cut work.
For printed decals, raster can work if it's built correctly at full size and proper resolution. Just remember that enlarging a small web image doesn't create detail.
Useful checks before sending art:
- Outline your fonts: That prevents missing-font surprises.
- Remove stray points: Cutters can follow accidental bits of geometry.
- Close your paths: Open shapes can confuse contour cutting.
- Name cut layers clearly: It helps when art and cut line need to be separated.
Cut lines, bleed, and small-detail survival
The contour path is the map the cutter follows. If that map is jagged, doubled, overlapping, or too tight against the artwork, the final piece gets harder to weed and less forgiving in production.
For printed stickers, add bleed around the design so minor cutting variation doesn't leave a white halo. For cut vinyl, give tiny parts enough support so they don't distort during transfer.
If you're ordering custom wording and want to see how a production-oriented product is structured, a 9 inch wide custom text window decal sticker is a useful reference point for how text-based decals are sized and prepared for real-world use.
One other practical step gets overlooked all the time. Print the file on plain paper at actual size and tape it to the vehicle. That simple test catches spacing, proportion, and visibility issues before any vinyl gets cut.
Flawless Application and Long-Term Care
The install is where good design either lands cleanly or gets wrecked by impatience. The most failure-prone step for cut-vinyl decals is transfer and placement, which is why the sequence matters. Practical guidance recommends cleaning the surface with rubbing alcohol, drying it fully, hinging one edge with tape, then peeling the backing gradually while smoothing from the center outward with a squeegee. That process is outlined in Square Signs' guide to making and applying car decals.
A clean install starts before the decal touches the car
Don't apply over wax, dust, damp glass, or oily residue. Even a good adhesive struggles when contamination sits between the vinyl and the surface.
Use a simple setup:
- Clean the surface with rubbing alcohol. Remove wax, road film, and fingerprints.
- Dry it completely. Moisture causes trouble, especially at the edges.
- Tape the decal in place. Check level and spacing from normal viewing distance.
- Create a hinge on one side. That gives you control when the backing starts coming off.
The placement move that prevents most mistakes
Once the hinge is set, peel the backing gradually instead of trying to drop the whole decal at once. Use a squeegee with firm, overlapping strokes from the center outward. That pushes trapped air away from the graphic and lowers the chance of bubbles and edge lift.
Two details matter more than people think:
- Go slowly with transfer tape. Peel it back at a sharp angle, not straight out.
- Keep complex graphics flat while working. Multi-part designs behave better when taped down and controlled.
If the decal starts lifting with the transfer tape, stop. Press it back down, burnish again, and peel more slowly.
How to keep it looking good
After install, leave it alone for a bit so the adhesive can settle. Once it's in service, wash with some common sense. Hand washing is gentler. If you use pressure washing, don't aim hard spray directly into decal edges. Automatic wash brushes are rougher on exposed edges and thin details than most owners realize.
As decals age, expect some change. Sun, road film, and repeated cleaning wear on them over time. That doesn't mean the product failed. It means the car is a harsh environment.
If you want a straightforward route from idea to finished piece, Custom Sticker Shop offers made-to-order automotive decals and text graphics for vehicles, including pre-spaced transfer-taped options that are set up for easier application.
If you're ready to put a real design on your vehicle instead of just thinking about it, Custom Sticker Shop is a practical place to start. You can browse vehicle-specific styles, customize text-based decals, and order graphics built for glass and body-panel use without guessing your way through the process alone.