
You're probably staring at one of two things right now. A clean hull that feels a little too plain, or an older fishing rig with faded numbers, cracked graphics, and that one peeling corner you keep pretending not to notice.
That's usually when fishing boat decals stop being a fun idea and become a real project. You want the boat to look sharp, but you also don't want to buy the wrong vinyl, crowd the bow, or install a decal that starts lifting the first time you wash down the hull. The other mistake I see all the time is treating decals like pure decoration when part of the boat's visual layout is controlled by registration law, not personal taste.
A good result comes from handling both sides of the job at once. Pick graphics that fit the boat. Leave room for legal markings. Use installation methods that work on a marine surface. Then maintain them so they still look right seasons later.
Giving Your Fishing Boat a Personal Touch
A fishing boat always says something about its owner, even before the motor starts. Some owners want a clean name graphic and nothing else. Others want a marlin, bass, sailfish, hook pattern, pinstripe, or a full side graphic that turns heads at the ramp. Both approaches can work if the decal looks intentional and belongs on the hull.
A lot of boat owners start with inspiration from general boating graphics, then narrow it down to what fits a fishing setup. If you want a simple example of clean water-themed styling, a lake life pontoon decal shows the kind of uncluttered design language that often translates well to fishing boats too.
Think past the word sticker
The right fishing boat decals don't read like cheap stickers from a tackle box. They look like part of the boat. That comes from three things working together:
- Material quality: marine exposure punishes weak vinyl fast.
- Placement discipline: the best design still looks wrong if it crowds the bow or interferes with required markings.
- Installation quality: bubbles, wrinkles, and lifted edges ruin the finish before weather even gets involved.
Practical rule: If a decal looks great in your hand but forces bad placement on the boat, it's the wrong decal.
The goal is a finished boat, not just a purchased decal
Owners usually focus on design first. I'd reverse that. Start by deciding where the graphics can legally and visually live. Then choose the style and size that fit those zones.
That approach avoids the most common regrets:
- Ordering graphics that are too large for the usable hull area.
- Placing decorative art too close to registration numbers.
- Picking a busy design that makes the boat look older instead of cleaner.
- Rushing installation and blaming the vinyl when preparation was the actual problem.
A professional-looking boat isn't about using more graphics. It's about using the right amount, in the right place, with enough restraint that the hull still looks balanced.
How to Choose the Right Fishing Boat Decals
The buying decision usually comes down to three things. Material, design, and scale. Get those right and most of the other choices become easy.

Start with material, not artwork
A boat isn't a garage cabinet or a laptop lid. The hull sees sun, water, abrasion, soap, and regular wipe-downs. If the vinyl isn't built for outdoor use, the edges will tell on it early.
Custom Sticker Shop says it uses Oracal vinyl rated for up to 7 years outdoors on its decals, according to the company's publisher information. That kind of durability matters on boats because owners aren't just decorating. They're adding something that has to survive actual use.
That matters even more when you look at the boat segment itself. The U.S. has about 86,000 offshore fishing boats, defined there as 27-foot-and-larger fiberglass boats, and the average offshore fishing boat is 14 years old, according to the Watersports Foundation market snapshot. Older boats often need visual refreshes, but they also expose weak materials faster because the surfaces already have wear, oxidation, and history.
Match the design to the boat's personality
Some designs always have an audience. Fish silhouettes, hook graphics, patriotic layouts, and custom boat names are all common because they're easy to read from a distance and fit the identity of a fishing rig.
Still, not every popular design belongs on every hull.
| Boat look | Decal style that usually works | What often misses |
|---|---|---|
| Clean modern center console | Small name graphic, restrained fish outline, subtle stripe | Oversized aggressive art across every panel |
| Older bay or bass boat | Reproduction-style graphics, matching side accents, refreshed numbers | Mixing old faded OEM graphics with unrelated new art |
| Dark gelcoat hull | Metallic or high-contrast lettering | Low-contrast color that disappears in sun glare |
| Busy factory stripe package | Simple supplemental decal | Another loud graphic layered on top of existing visual clutter |
A good decal should support the hull lines, not fight them.
Size is where good ideas go bad
The most common ordering mistake isn't color. It's scale. A decal can look perfect on a product page and still be far too tall, too long, or too visually heavy for the actual side panel.
A fast way to judge size is to look at the longest uninterrupted section of usable hull and then mentally remove the areas you shouldn't use, such as high-contact zones and the bow area reserved for required markings. What remains is your real design space.
Use this shortlist before ordering:
- Measure usable width: Don't guess from memory. Measure the live panel area left to right.
- Check viewing distance: Fine detail can disappear on the water. Bold shapes usually read better.
- Respect hull breaks: Strakes, rails, cleats, and contours can chop up a design.
- Leave breathing room: A decal needs margin around it. Crowded graphics always look cheaper.
If you're torn between two sizes, the smaller one usually ages better.
Planning Placement and Navigating Registration Rules
A common pitfall in fishing boat decal projects is a divergence in priorities. Owners think in terms of symmetry and style, but law enforcement thinks in terms of visibility, spacing, and fast identification from a distance.
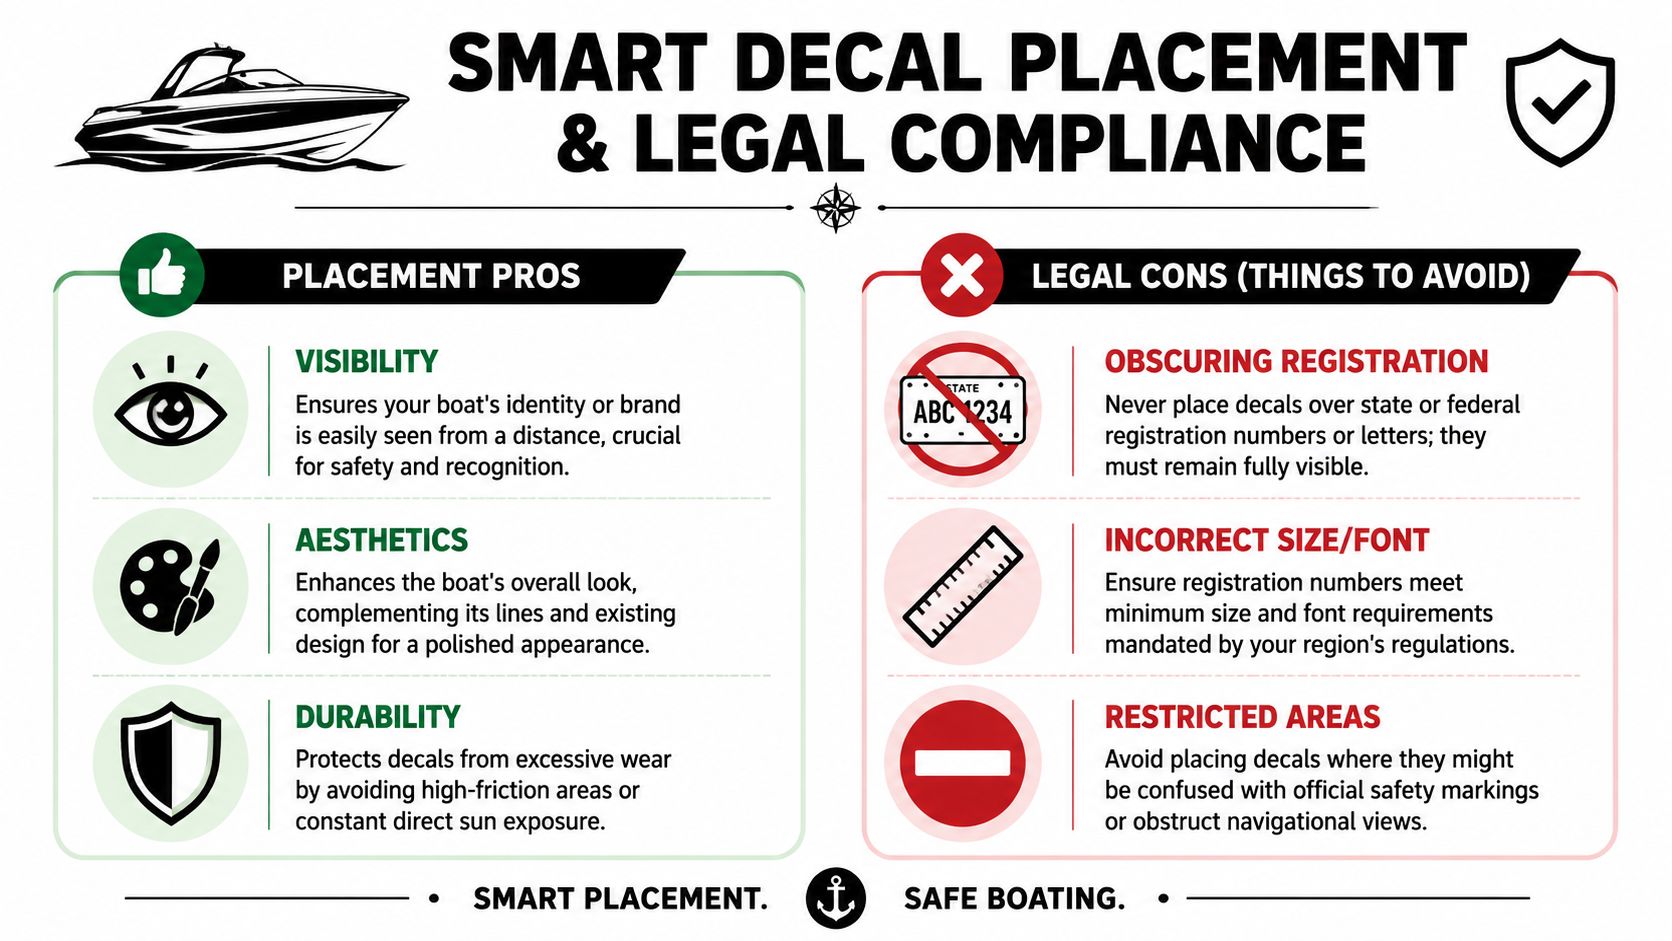
Registration controls the front half of the plan
U.S.-style guidance commonly requires registration numbers to be 3-inch block letters, in a color that contrasts with the hull, with spacing that keeps them readable by officials, as explained in this boat decal sizing and compliance guide. That requirement alone takes a meaningful chunk of the bow out of play for decorative graphics.
Ohio shows how specific the rules can get. Traditional registrations come with two identical decals placed six inches from the OH number on each side of the boat, and the registration number must be shown on both sides of the bow in block characters at least 3 inches high. Ohio also rotates decal colors every three years so expired registrations are easier to spot, according to the Ohio boat registration decal rules.
That one state example tells you something important. Fishing boat decals are often part of a compliance layout, not just a styling choice.
State sticker rules can shape the whole bow
Maine is even more explicit on annual stickers for inland waters. A new lake and river protection sticker must be purchased every year and permanently affixed to each side of the bow of all motorized watercraft, with a $59 cost for non-Maine registered watercraft and a combined $25 fee when included with Maine registration, according to the same verified data provided for this article.
If you design first and check rules later, you can easily trap yourself. The perfect fish graphic suddenly has to be moved, shrunk, or split because the legal markers own that space.
Leave the bow for numbers and state-required decals first. Treat decorative placement as secondary.
A simple pre-order placement check
Before you buy anything, stand next to the boat and mark the no-go areas with low-tack tape. That makes layout decisions much easier than guessing from photos.
Use this checklist:
- Mark required number area: Leave enough room for compliant registration characters and visibility.
- Reserve state decal spacing: If your state requires placement relative to the registration number, account for that first.
- Avoid friction zones: Don't place graphics where dock lines, bumpers, or regular foot traffic will abuse the edges.
- Step back and view both sides: A layout can seem balanced up close and still look off from the dock or trailer.
What usually works best
For most fishing boats, the cleanest setup is simple. Put legal markings where they belong on the bow. Move decorative graphics slightly aft, where the hull panel is calmer and less restricted. Keep enough separation so the eye can read the registration instantly and enjoy the art separately.
That gives you a boat that looks custom without looking careless.
Your Step-by-Step Installation Guide
Good installation is mostly patience. Bad installation is usually speed, dust, or overconfidence.
Prep the hull like the decal depends on it
It does.
Any wax, salt film, cleaner residue, or fine dust under the vinyl will show up later as edge lift, trapped bumps, or weak adhesion. Clean the area thoroughly and make sure it's fully dry before you even think about peeling backing paper.
Then dry-fit the decal with masking tape so you can confirm alignment, height, and spacing while everything is still reversible.
Use a dry application
The most reliable installation method is a dry application. After positioning the decal, press from the middle outward with a squeegee and let the graphic sit for about 30 minutes before slowly peeling the transfer tape back on itself to avoid lifting the vinyl, based on this installation guidance video.
That center-out motion matters. Light pressure first helps you set the vinyl without forcing wrinkles. Then you increase pressure to chase out air and flatten the adhesive evenly.
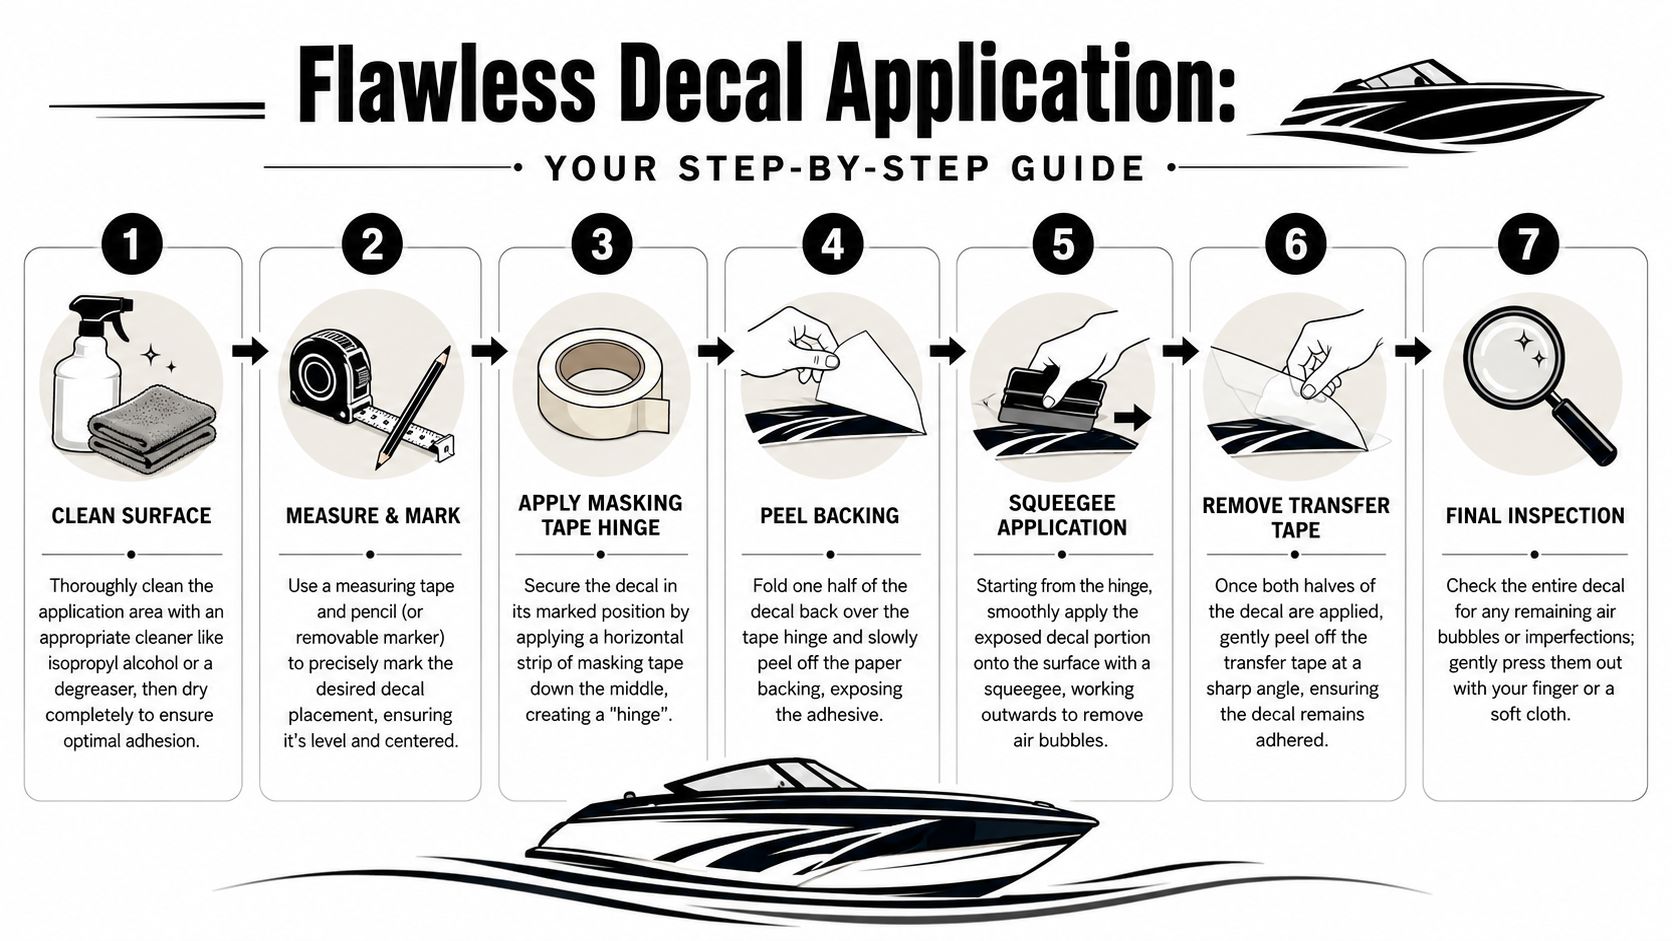
Here's a walkthrough that works well on boats:
- Clean and dry the surface completely.
- Tape the decal in place and confirm it's level.
- Create a hinge with masking tape if needed.
- Peel backing carefully without touching the adhesive more than necessary.
- Squeegee from the center outward.
- Let the decal rest before removing transfer tape.
- Peel the tape back onto itself slowly, not up and away.
A second visual can help if you want to see the sequence in action:
Mistakes that cause most failures
These are the installation problems I'd pay attention to first:
- Dust under the vinyl: Tiny debris becomes permanent texture.
- Rushed transfer tape removal: Pull too fast and you can lift the graphic.
- Pulling outward instead of back on itself: That increases the chance of distortion and edge lift.
- Trying to fix everything by hand: Use the squeegee. Fingers create uneven pressure.
Slow is smooth. Smooth is what makes the decal look factory-installed.
If a small bubble remains, don't panic. Do a final squeegee pass after the transfer tape is off. Many minor imperfections settle out once the vinyl has had time to sit and bond.
Care Removal and Replacing Old Decals
Once the decal is on, the job isn't over. Boats get washed, trailered, bumped by lines, and left in sun for long stretches. Care matters.
Keep cleaning gentle
Wash across the decal, not aggressively into the edge. A soft cloth or wash mitt is safer than anything stiff. If you use a pressure washer on the boat at all, keep it away from decal edges. High pressure can catch a corner that looked perfectly sealed the day before.
The same rule applies to scrubbing dried residue. Work patiently. Don't attack the edge of the vinyl and expect it to stay invisible.
Remove old graphics without gouging the finish
Old fishing boat decals usually come off best with gentle heat and steady peeling. Warm the vinyl enough to soften the adhesive, then lift a corner and pull slowly. If adhesive remains, use a remover that's compatible with the boat's finish and clean the panel before installing anything new.
The biggest mistake here is getting impatient and using too much force. That's how owners scratch gelcoat, leave uneven adhesive patches, or create extra cleanup that takes longer than the removal itself.
Replacing discontinued OEM decals
Older boats create a different problem. Sometimes the original logo or stripe package isn't sold anymore. In that situation, exact replacement can be harder than owners expect.
A major challenge for owners of older boats is reproducing discontinued OEM fishing boat decals. Since original artwork is often unavailable, custom reproduction based on photos and measurements is frequently the only viable path to restoring or matching faded graphics, as noted by this replacement boat logo guidance.
That's why partial replacement can look worse than doing the whole set. Fresh vinyl next to weathered original graphics often makes the old side look even older. If the boat has noticeable fading, a full refresh is usually the cleaner choice visually, even if the original plan was to replace only one missing piece.
Ordering Custom Decals and Saving Money
Wasted money on boat decals often occurs in one of two ways: buying cheap graphics twice, or ordering in pieces instead of planning the whole set at once.
If you know you need a boat name, registration numbers, and one decorative graphic, bundle the project mentally before you click buy. That helps you match colors, keep visual scale consistent, and avoid paying again later because one element doesn't fit the others. It also gives you a cleaner proofing process on custom work.
What to confirm before approving a custom order
If you're ordering custom text or a personalized name graphic, check the proof like you'd check a trailer strap before a road trip.
- Spelling and capitalization: Boat names get ruined by tiny proofing errors.
- Font fit: A font can look great on screen and feel wrong on a curved hull.
- Color contrast: Make sure the lettering will stand off the gelcoat clearly.
- Final dimensions: Confirm width and height, not just the style.
For custom lettering or a boat name, a custom text decal option is useful because it lets you control the exact wording rather than settling for a close-enough stock design.
Where savings actually come from
The best value usually isn't the lowest single decal price. It's getting the right vinyl, the right size, and the full set in one shot so you don't reorder. Publisher information for Custom Sticker Shop says the company offers free U.S. shipping on orders $25+, prices start at $7.99, and an unlimited Buy 2 Get 1 Free offer. If you already know you need multiple pieces, planning around that kind of bundle can reduce wasted spend without forcing you into lower-grade material.
Cheap decals can cost more once removal, reordering, and reinstall time enter the picture.
If you want fishing boat decals that look clean, install easily, and hold up outdoors, Custom Sticker Shop is worth a look. They make American-made vinyl decals, offer custom text options, and make it easier to order a coordinated set instead of piecing your boat graphics together one item at a time.