
You're usually searching for truck door decals near me when the need is immediate. A truck just got added to the fleet, a lease transfer happened, a rebrand rolled out, or you realized the old lettering looks tired and needs to come off. At that point, most buyers don't need abstract advice. They need the right decal, the right size, and a process that won't waste a day.
That's where a lot of people make the first mistake. They treat “near me” as a geography problem when it's really a speed, fit, and execution problem. Sometimes the closest sign shop is the right answer. Sometimes a specialized decal vendor with a tight proofing process and reliable shipping gets the job done faster and with fewer mistakes.
Truck door decals aren't a novelty product anymore. They've long been used for company identity, contact information, and operational markings, and federal guidance gives flexibility on decal placement rather than requiring a specific sticker location on the vehicle, as the FMCSA explains. That flexibility is useful, but it also means you need to order with a plan instead of guessing.
What "Near Me" Really Means for Truck Decals
A truck goes back on the road tomorrow, and the old door lettering is half-peeled, sun-faded, or wrong after a company update. In that moment, "near me" means one thing. Who can get you the right decal, in the right size, with the fewest chances for delay or rework?
Sometimes that is a local sign shop. Sometimes it is an online decal provider with a tighter proofing system and faster shipping. I have seen both outcomes. A good local shop can walk outside, check the door, spot a body crease or badge that will interfere with the layout, and adjust before anything gets cut. A good online vendor can turn around proofs quickly, cut accurately, and ship faster than a busy local shop can fit you into production.
The true comparison is service model, not zip code.
Local pickup versus shipped precision
| Option | Usually works best when | Watch out for |
|---|---|---|
| Local sign shop | You want someone to inspect the truck in person, confirm spacing around trim, or install the decals for you | Unclear vinyl specs, delayed scheduling, rushed art approval |
| Online decal specialist | You already know your measurements and want a predictable proof-to-delivery process | Weak communication, no install instructions, generic product pages that ignore door fit |
Placement flexibility helps, but it also creates room for bad decisions if the provider does not ask good questions. Door handles, lower moldings, textured paint, and curved panels all affect what size will work. A seller who only asks for your text and color is leaving out the hard part.
That is why I tell buyers to judge "near me" by four basics: material, proof accuracy, turnaround, and support after the order. If a shop cannot clearly tell you what vinyl they use, how they size the layout, when the proof arrives, and what happens if the decal shows up wrong, distance does not help much.
Practical rule: Buy from the provider who can confirm the job cleanly and quickly, not the one with the closest address.
If you run a service business, search results can also distort your options. Shops that rank well are not always the shops with the best process or the fastest production. This overview of local SEO for UK businesses explains why visibility and actual operational quality are often two different things.
There is also a difference between custom door lettering and ready-made graphics. If you want a pre-designed option with simple fitment, a product like this truck decals universal stripe kit sticker set of 2 can arrive faster and with less back-and-forth than a fully custom order.
Before you contact any provider, get clear on three points.
- Purpose. Branding, identification, and decorative graphics have different tolerance for mistakes.
- Install method. If the decal is large or the door has contours, professional installation may save time and wasted material.
- Actual deadline. Same-day local pickup sounds good, but a delayed proof or packed install calendar can make a shipped order the faster choice.
How to Find and Vet Decal Providers
A lot of buyers search one phrase, click the map pack, and stop there. That's not enough. Good truck decal providers often hide behind broader terms like vehicle graphics, commercial lettering, or fleet markings.
If you're comparing providers, look for signs that they understand work-truck use, not just custom sticker sales. One of the biggest gaps in local search results is regulatory clarity. Federal rules require commercial motor vehicles operating in interstate commerce to display the legal or trade name on both sides, plus a USDOT number when required, and that information must be plainly visible, as summarized by Truck Door Decals. Plenty of sellers market “custom truck decals” without explaining that difference.
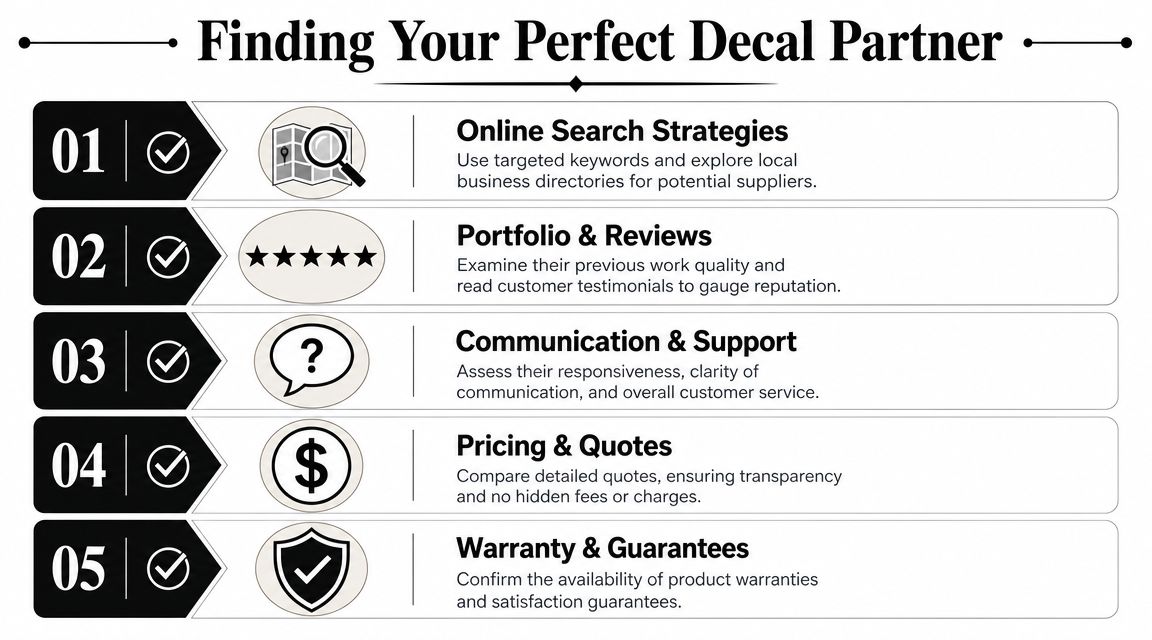
What a solid provider shows you
A decent decal seller should make the basics easy to verify.
- Clear material language. If the listing or quote mentions brand-name vinyl like 3M or Oracal, that's a stronger signal than “high-quality vinyl.”
- Real portfolio examples. You want to see truck doors, vans, work pickups, and commercial lettering. A gallery full of laptop stickers doesn't tell you much.
- Proofing process. If they can't explain how they'll show spacing, sizing, and layout before production, expect mistakes.
- Install details. Good providers know whether the job is DIY-friendly or better left to an installer.
A business website can also reveal how organized the company is. This broad Northpoint Web contractor guide isn't about decals specifically, but it's useful because it highlights what trustworthy service businesses tend to make visible online, such as clear offerings, contact paths, and proof of prior work.
Questions worth asking before you buy
Don't ask only “How much?” Ask questions that expose whether the shop is proficient in truck door work.
- Have you done door lettering for commercial trucks before?
- Do you need exact panel measurements from me, or can you size from a photo?
- Will the proof show spacing and layout as installed?
- Is this order intended for branding, USDOT-style identification, or both?
- What's included for installation?
If a seller answers everything with “It depends” and never gets specific, keep shopping.
For simple text-based jobs, something like a custom text windshield banner decal can tell you a lot about a provider's workflow. If they handle custom text cleanly, show color choices clearly, and explain application well, that's a good sign for truck door lettering too.
Red flags that cost money later
Watch for these:
- No close-up photos of installed lettering edges.
- No mention of transfer tape or pre-spaced lettering.
- No compliance conversation when you mention a commercial truck.
- Only mockups, no real installs.
- No answer on replacement or reordering if you add another truck later.
Measuring Your Doors and Specifying Your Decal
Wrong size is one of the most common ordering mistakes, and it's almost always self-inflicted. Buyers measure the full door skin instead of the usable flat space. Then the decal runs into a crease, handle, trim edge, or curved section that looks fine on paper and wrong on the truck.
Professional suppliers can produce truck decals from 6" × 6" up to 120" wide by 52" high, and some products are designed to be USDOT compliant, according to Decals.com. That range gives you options, but it also makes sloppy measuring expensive.
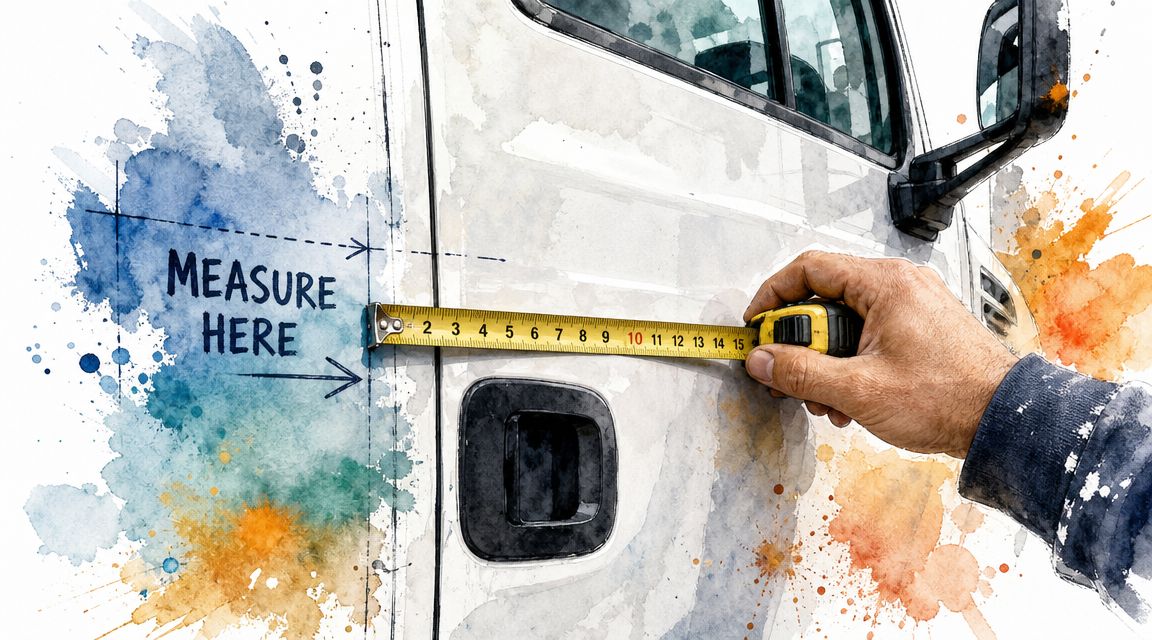
How to measure the right area
Stand square to the truck door and identify the flattest section where the decal will sit. Ignore the outer edges of the panel if they roll inward or break across a body line.
Use this sequence:
- Width first. Measure the widest flat area that doesn't run into handles, molding, or seam lines.
- Height second. Check the shortest safe height inside that same zone.
- Leave breathing room. Crowding the edges makes the install look amateur even when the decal technically fits.
- Measure both doors. Don't assume they're identical if one has added trim or equipment.
A decal that fits the panel isn't always a decal that fits the truck. Body lines decide that.
What to hand the provider
This is the worksheet I'd use before requesting a quote:
- Exact size needed. Write width by height based on usable space, not overall door size.
- Door location. Driver side, passenger side, or both.
- Artwork type. Text only, text plus logo, or stripes/graphics.
- Vinyl color and finish. Keep this simple and readable from a distance.
- Application surface. Smooth painted metal behaves differently from textured or repainted panels.
- Use case. Business branding, identification, or decorative.
For simple lettering jobs, a size-based item like this 9 inch wide custom text window decal sticker is a good reminder that dimensions drive everything. The cleaner your size notes, the cleaner your proof and quote.
Material choice matters more than color
Truck doors live outside. They get sun, wash cycles, road grime, and hand contact near the handle area. Don't buy purely on shade match. Ask for outdoor-rated vinyl and make sure the provider is treating this as a vehicle graphic, not a casual indoor sticker job.
If the design includes small text, thin strokes, or long lines of copy, readability matters just as much as adhesion. Busy artwork often looks fine on a screen and weak on a truck door.
Placing Your Order and Understanding Logistics
Ordering truck door decals should be boring. That's a compliment. A smooth order has clear specs, a proof you can approve quickly, a stated production timeline, and no mystery about whether you're getting loose characters, pre-spaced lettering, or a printed graphic.
For small businesses and fleets, speed and replacement planning matter more than most sellers admit. Providers that handle this well are transparent about turnaround, explain whether the decal is DIY-friendly or better installed professionally, and help buyers think through downtime and rework, as discussed by KY Wraps.
Local shop workflow versus online workflow
Here's the trade-off in plain terms:
| Factor | Local shop | Online specialist |
|---|---|---|
| Measurement help | Strong if they'll see the truck | Usually depends on your measurements |
| Pickup | Convenient if production is on time | Not applicable |
| Proofing | Can be excellent, can also be informal | Often more standardized |
| Install option | Often available | Usually DIY unless they partner locally |
| Scalability | May slow down on repeat orders | Often easier for reorder consistency |
The hidden cost isn't usually the decal itself. It's the truck sitting idle while you wait on revised proofs, install scheduling, or a replacement because someone sized it from the wrong photo.
What to confirm before paying
Don't send payment until these details are settled:
- Proof approval. Ask to see final layout before production.
- Packaging format. Confirm whether it ships pre-spaced and transfer-taped.
- Install responsibility. Know whether you're doing it yourself or booking help.
- Replacement path. Ask how reorders work if you add another truck or damage one side.
- Weather sensitivity. If install timing matters, ask whether conditions could delay application.
Fast shipping doesn't help if the proof is wrong. The proof is where most wasted time starts.
If you're managing more than one vehicle, think beyond this order. The provider who keeps your layout organized and can reproduce it consistently usually saves more frustration than the one with the cheapest first invoice.
DIY Installation for a Professional Finish
You can buy the right decal from the right provider and still end up with a result that looks cheap if the install goes sideways. I see that happen more with rushed DIY jobs than with bad vinyl. The fix is simple. Control the setup, control the alignment, and do not let the adhesive touch paint until you know the decal is exactly where it belongs.
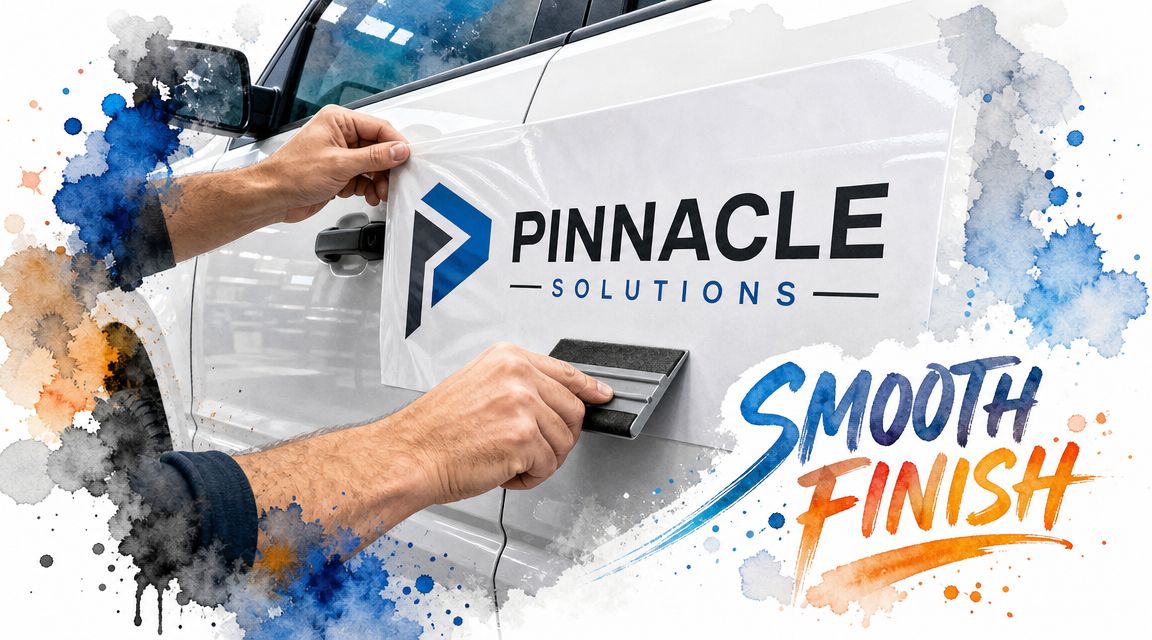
For truck doors, the hinge method gives the cleanest result for the least risk. You tape the decal in position first, build a hinge with masking tape, then apply it in a controlled pass instead of trying to freehand the whole thing. If you want to see the motion before you start, this hinge method installation tutorial shows the sequence clearly.
Gather the right tools before you start
Keep the setup simple, but complete:
- Isopropyl alcohol for the final wipe
- Masking tape for positioning and the hinge
- A squeegee with a clean edge
- Measuring tape for consistent placement
- A lint-free cloth so you do not trap fuzz under the vinyl
A clean panel matters more than extra tools. Road film, leftover wax, and silicone-based dressings are what usually cause edge failure. The decal may look fine for a day or two, then the corners start lifting.
Install in a controlled sequence
Clean the application area
Wash if needed, then wipe the exact decal area with isopropyl alcohol. Let it flash off fully. Any residue left under the adhesive reduces bite.Set the decal in place
Use small pieces of masking tape to hold the graphic on the door. Check height against the body lines and handle area. Step back several feet and look at both sides if you are lettering a pair of doors. What looks level up close can read crooked from the street.Make a hinge
Run a strip of masking tape through the middle or across the top, depending on the decal shape. The hinge keeps the layout fixed while you peel the liner. That is why it works so well for first-time installers.Apply with steady pressure
Peel back part of the liner, then squeegee from the center outward with overlapping strokes. Keep the squeegee angle consistent and work slowly enough to push air out as you go.Remove the transfer tape correctly
Peel it back low and close to the panel, on a diagonal. Pulling outward from the truck is what lifts fresh vinyl.
Shop rule: slow placement beats strong pressure every time.
Temperature matters too. Cold panels make vinyl stiffer and less willing to bond. Hot panels make the adhesive grab too fast. Mild, shaded conditions give you more control, which is one reason some online providers that ship fast can still be the better "near me" option. A well-packed decal installed on the right day will usually outperform a same-day local rush job applied in a parking lot.
This additional video can help if you want to watch a similar install flow before you touch the truck:
Where DIY installs usually fail
The last step causes a lot of damage. Installers get the vinyl down, assume the hard part is over, and rip the transfer tape away too aggressively. Fresh adhesive has not had much time to settle. If a letter or edge starts coming up with the mask, stop, lay it back down, squeegee again, and peel at a flatter angle.
Wet application has its place, but I would not make it your default on truck door lettering unless the material or supplier recommends it. It can help with larger pieces that need more slide for positioning. It also adds drying time and another chance for trapped fluid if the installer gets impatient.
Quick fixes that actually work
- Small air pocket. Push it toward the nearest edge with firm, short squeegee strokes.
- Vinyl comes up with the transfer tape. Put the tape back down, press the vinyl again, then peel lower and slower.
- Decal starts crooked early. Reset it before more adhesive contacts the panel. Trying to drag it into place after it grabs usually stretches the lettering.
- One spot will not bond. Check for contamination first. Dirt, wax, or texture is usually the cause, not lack of pressure.
A careful DIY install can look shop-done. The difference is rarely talent. It is patience, clean prep, and knowing when to stop and correct a problem before it gets locked into the panel.
Maintaining and Removing Your Decals Safely
Once the decal is on, the goal is simple. Protect the edges and don't attack the vinyl with bad cleaning habits.
Wash the truck with normal care, but keep aggressive pressure away from decal edges. The edge is always the vulnerable point. If you blast directly into it, you're testing adhesion every time you wash. Mild cleaners are the safer choice. Harsh solvents can dull the surface or weaken the adhesive over time.
Keep them looking clean
A few habits make a difference:
- Wash with intention. Clean the decal surface, but don't scrub edges with unnecessary force.
- Dry the area. Letting grime sit around the border makes old decals look rough before they fail.
- Inspect after washes. If you spot an edge starting to lift, deal with it early instead of pretending it'll settle back down.
Safe removal without making a mess
When it's time to rebrand, remove leased-vehicle markings, or replace worn lettering, use heat and patience. A hairdryer or controlled heat gun softens the adhesive so the vinyl releases more cleanly. Peel slowly rather than trying to rip it off in long, fast pulls.
If adhesive remains, clean it off with a product that's safe for automotive paint. Test first if you're unsure. Fresh paint, repainted panels, and older finishes can all behave differently.
Remove decals the same way you install them. Controlled, steady, and without forcing the material.
A clean removal sets up the next decal properly. If the old adhesive or residue stays on the panel, the new lettering won't sit right.
If you want a straightforward option for truck graphics or custom vinyl lettering, Custom Sticker Shop offers pre-spaced vinyl decals and automotive graphics that can be shipped ready for application. It's a practical fit for buyers who already know their size, want a mailed solution instead of a local appointment, and need a process that's easy to repeat on additional vehicles later.