
You're probably here because you parked your Ranger, looked up, and realized there are three more in the same lot that look almost identical. Same paint. Same stance. Same factory sheet metal. That's usually when owners start looking at stickers for Ford Ranger models, not because they want something flashy for the sake of it, but because they want their truck to feel like theirs.
A good decal does that fast. It can give an older truck a period-correct look, clean up a plain bedside, add contrast to a hood, or tie together wheels, tires, and trim without touching paint. The catch is simple. A sticker that looks right on one Ranger can look completely wrong on another. The body lines changed, the cab lengths changed, and trim-specific details matter more than most listings admit.
Giving Your Ford Ranger a Unique Identity
The Ranger has always been an easy truck to personalize because it has such a long visual history. Its first U.S. model year was 1983, following the truck's introduction in 1982, and that long run has produced more than four decades of changing shapes, trim eras, and graphic styles, as noted in this Ford Ranger generations overview. That's why old-school side stripes, work-truck lettering, off-road decals, and newer aggressive graphics all make sense on a Ranger, depending on which truck you own.
What works on a Ranger depends on what story the truck already tells. A square-body early truck usually looks best with straight, simple graphics that follow the factory lines. A later T6 truck can carry chunkier side graphics or hood treatments because the body already has more visual tension built into it. A Raptor-style build pushes that even further, especially if you're considering something like a Ranger Raptor style graphic decal.
Matching the decal to the truck's personality
I've seen owners make the same mistake over and over. They shop by decal style first and truck shape second. That's backwards.
A clean decal setup usually fits one of these lanes:
- Period-correct styling for older Rangers, where thin stripes and simple block lettering suit the flatter panels.
- Utility-focused graphics for work trucks, where door text, tailgate identifiers, and subtle side markings fit the truck's purpose.
- Off-road visual upgrades for newer trims, where hood, bedside, and fender graphics can balance larger tires and darker trim.
Practical rule: If the decal fights the body line, the truck will always look “almost right” instead of finished.
Why Ranger owners keep coming back to decals
Paint is permanent. Wraps cover a lot. Decals sit in the middle. They're easier to live with, easier to update, and easier to tailor to the exact look you want.
That matters on a truck like the Ranger because no single style owns the nameplate. An older single-cab work truck, a T6 daily driver, and a newer off-road build all wear graphics differently. The smart move is choosing a design that respects the generation first, then adds personality second.
Choosing the Right Decal Type and Material
Material is where good intentions either turn into a clean install or a peeling mess. Most buyers focus on color and style. Shops focus on vinyl type, adhesive behavior, and where the decal will live on the truck. That's the difference between a bedside graphic that stays tidy and one that starts lifting at the corners after regular use.
One useful durability baseline comes from a Ranger-specific listing that uses ORACAL 651 cut vinyl, rated for 5+ years of outdoor use in harsh weather, according to this Ford Ranger edge sticker set listing. That's a solid benchmark for exterior graphics, but the rating isn't a promise for every placement. Tailgate edges, bedside corners, and areas that catch repeated spray or abrasion usually fail earlier than flatter, quieter panels.
Cut vinyl versus printed decals
For most Ranger applications, I split decal choices into two buckets.
Cut vinyl works best when you want crisp lettering, stripes, logos, or silhouettes without a printed background. It looks cleaner on trucks, especially on windows, doors, and body-side accents.
Printed graphics make more sense when the design includes fades, textures, layered color effects, or detailed artwork. They can look great, but they also ask more from the material and the installer when the truck panel has curves or seams.
Here's the practical comparison I use at the counter.
| Vinyl Type | Outdoor Rating | Best For | Flexibility |
|---|---|---|---|
| Cut calendered vinyl | 5+ years for ORACAL 651 in one Ranger-specific listing | Door text, side stripes, simple hood or bedside graphics | Good on flat and lightly curved panels |
| Printed vinyl with laminate | Varies by product | Multicolor graphics, shaded art, textured looks | Depends on film and laminate combination |
| Cast vinyl | Not cited here with a specific rating | Deep curves, higher-end contour work, long-term wrap-style installs | Better on complex curves and recesses |
What calendered and cast really mean on a Ranger
Buyers get stuck on the terminology. The practical version is simpler.
Calendered film is usually the practical choice for standard decals on flatter Ranger panels. It handles doors, bedsides, glass, and many hood applications well if the design is sized correctly. Cast film is the better pick when the decal has to settle into more demanding contours or stay stable across trickier surfaces.
Finish matters too. Gloss tends to look sharper on glossy paint and factory-clearcoated trucks. Matte can work well on blackout themes, but it also shows dirt and edge contamination differently.
A decal can be made from decent vinyl and still fail early if it's placed in a high-wear zone or installed over residue.
Decals are not paint protection film
Some truck owners confuse graphics with protection film because both are adhesive films. They are not the same product and they don't behave the same way. If you're weighing cosmetic film against impact-focused protection, this guide that helps compare car PPF and vinyl film is worth reading before you buy.
For simple personalization, standard decal vinyl is usually the right lane. For chip-prone areas where protection is the main goal, look at film built for that job.
What I'd order for different Ranger uses
- Daily driver Ranger: Cut vinyl is usually the cleanest value. It's easy to apply, easy to replace, and doesn't overcomplicate the truck.
- Trail truck: Keep graphics off the highest-abuse edges unless you're fine with shorter service life.
- Custom text or one-off ideas: A made-to-order option like a custom car decal sticker makes sense when off-the-shelf graphics don't match your exact build theme.
The best material choice isn't the fanciest one. It's the one that matches the panel shape, the expected abuse, and how long you want the graphic to stay sharp.
Sizing and Placement for Your Ford Ranger Model
Most bad decal installs are bad decal planning. The install itself may be perfectly straight, but the size is off, the wheel arch crowds the graphic, or the cab length changes the visual balance. That happens all the time with stickers for Ford Ranger trucks because listings often sound broader than they really are.
A major market gap is fitment specificity by generation and trim. Real-world decal listings separate T6-era Rangers from 2011-2021 trucks, distinguish Next Gen models, and exclude some variants like the Raptor, as shown by Ford Ranger Stickers Australia. That tells you something important. If a product page only says “fits Ford Ranger,” you still don't know enough.
Ranger generation changes that affect decal fit
Older Rangers have flatter sheet metal and simpler breaks in the body. That gives you room for traditional side stripes, door lettering, and box-side graphics that sit straight and stay visually consistent.
Newer Rangers changed the game. Character lines are stronger. Fenders are more pronounced. Door and bedside surfaces have more shape. A stripe that looks centered on the workbench may look high or low once it's on the truck because the panel itself tapers or kicks upward.
Here's where owners usually get tripped up:
- Regular cab versus extended cab: The amount of uninterrupted door and quarter-panel space changes the look of long graphics.
- Short bed versus longer proportions: Bedside decals can run into wheel-arch spacing issues.
- Trim-specific cladding or flares: These can cut into usable panel area.
- Raptor-style variants: More aggressive body details can make a “standard Ranger” decal look undersized or awkward.
How to measure before you order
Don't measure the truck once and call it done. Measure the usable panel.
Use this sequence:
- Pick the exact panel first. Door, hood, bedside, tailgate, rear glass, or fender.
- Find the visual boundaries. Body crease, handle location, fuel door, wheel arch, flare, or panel edge.
- Measure the flat or lightly curved area only. Ignore any section where the decal would need to jump a sharp contour unless the design was made for that.
- Mock it up with masking tape. Lay out the full width and height on the truck.
- Step back and check sight lines. Look from straight on, from the front corner, and from behind.
If the tape outline already feels crowded, the actual decal will feel worse once it's installed.
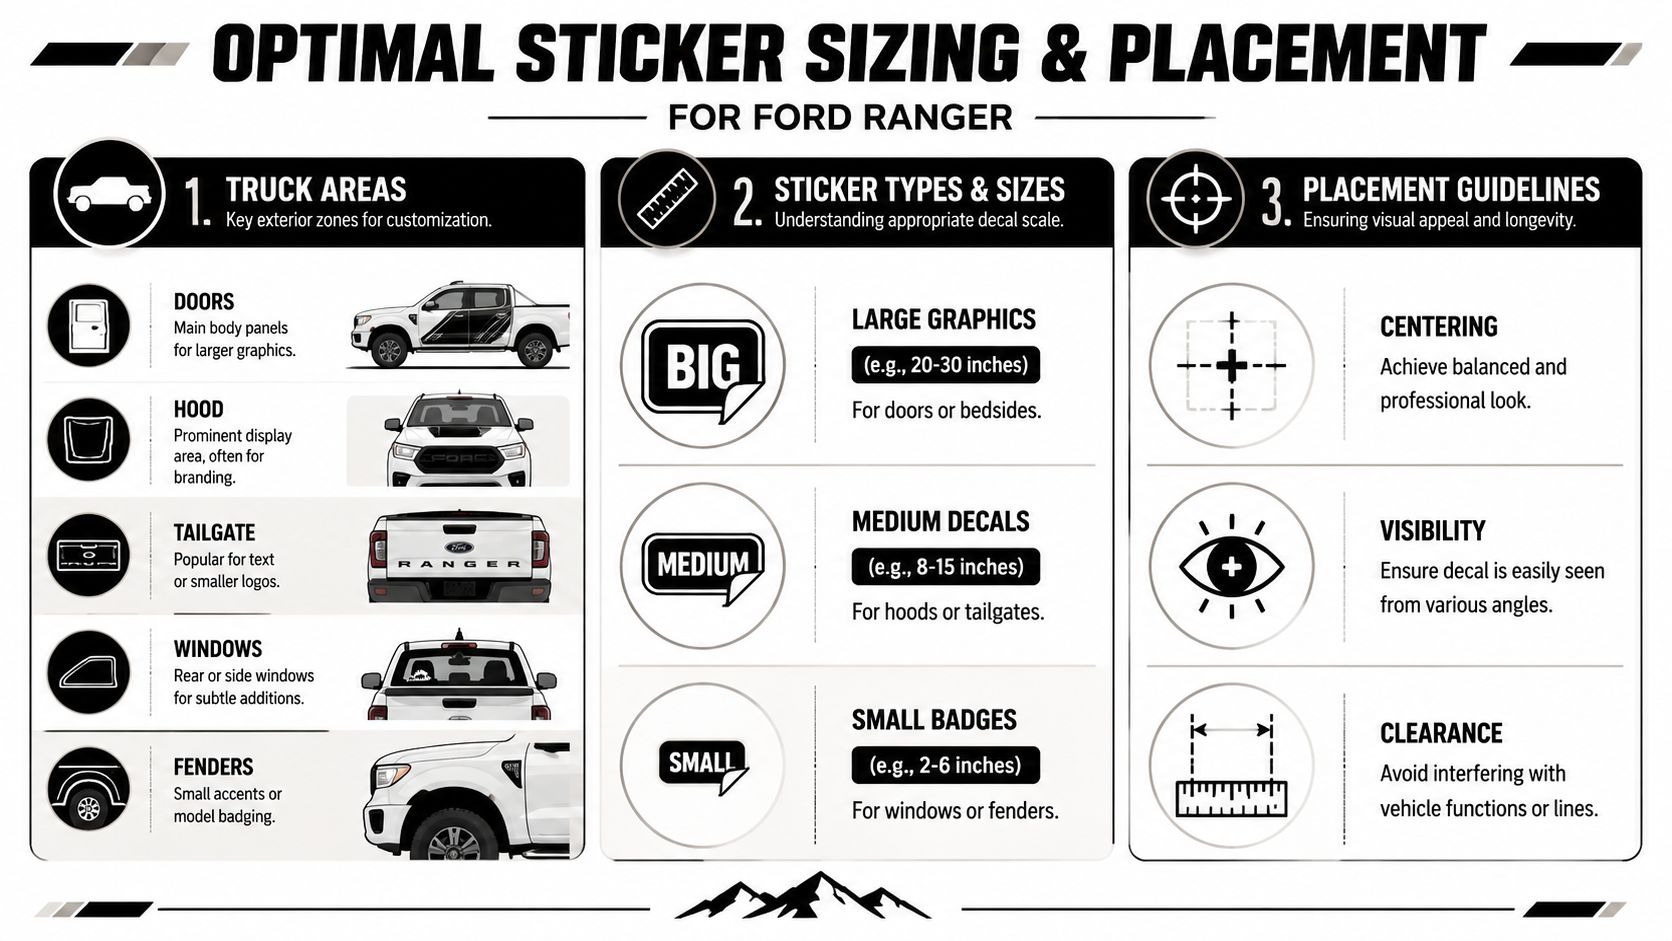
Best placement by truck area
Different areas ask for different sizes and shapes.
Doors and lower body panels
These are ideal for long graphics, side stripes, and business text. On older trucks, a straight stripe can look factory-correct. On newer trucks, it often needs to relate to the lower body contour instead of sitting at a purely level height.
Hood
The hood is high-visibility and unforgiving. If the decal isn't symmetrical, everyone sees it. Hood graphics need careful centerline work and should respect washer nozzles, vents, and raised sections.
Tailgate and rear glass
These locations are good for smaller logos, text, or a windshield-style banner concept scaled to the rear. They're easier to live with visually because they don't have to carry the whole truck design.
Fenders and small accent zones
Use these for compact badges, trim-callout style decals, or subtle off-road accents. Small graphics can look smart here, but oversized ones usually feel tacked on.
A simple fitment mindset
Don't ask whether the decal technically fits. Ask whether it fits the truck's proportions.
A decal can physically stick to the panel and still be wrong for the body style. The best-looking Rangers use graphics that match the generation, respect cab and bed proportions, and leave enough breathing room around handles, arches, seams, and trim.
The Complete Installation Process Step-by-Step
A clean install starts before the backing paper comes off. Most failures happen because someone rushed the prep, guessed at alignment, or tried to force a long decal across a seam-heavy panel in one pass. Ford's own guidance says the door-jamb label is the official source for vehicle specifications, which is why checking that information first is the right move for fitment before you order, especially on older 1983–2011 Rangers with broader variation in trim and configuration, as explained on Ford's vehicle specifications page.
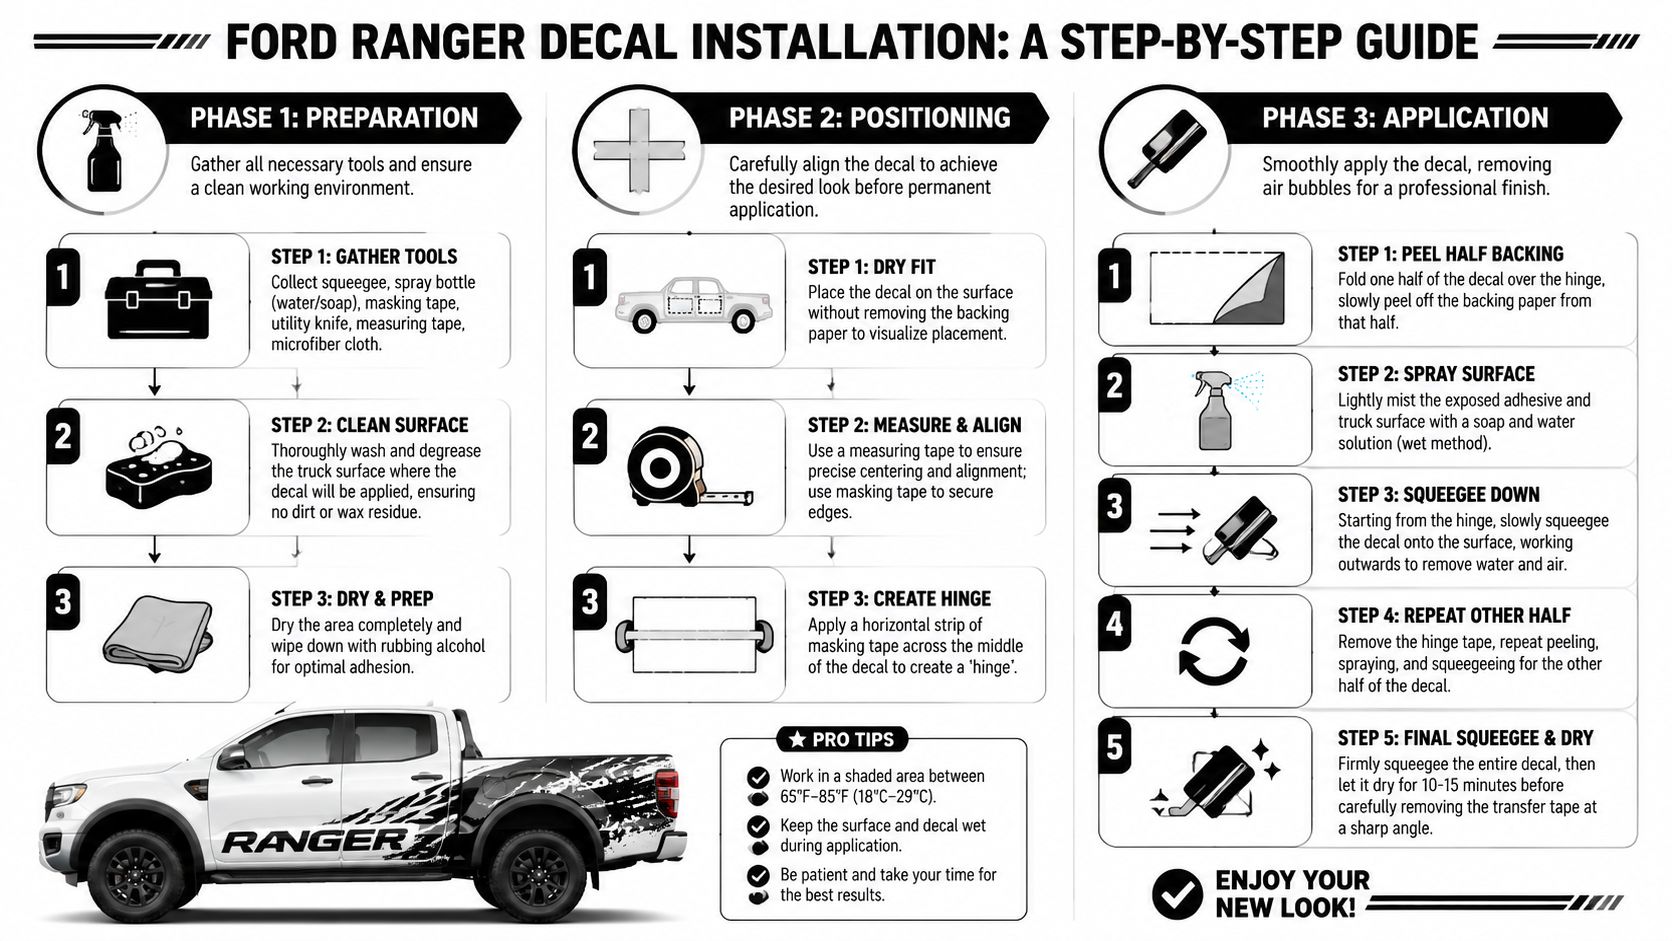
Phase one: preparation
This part decides whether the adhesive gets a fair shot.
Wash the panel with a non-wax, non-silicone detergent. Then fully degrease it. Don't stop at “looks clean.” A Ranger that gets used like a truck often carries invisible residue from road film, detail sprays, old wax, and hand oils. Any of that can weaken edge adhesion.
For tools, keep it simple:
- Microfiber towels for washing and drying
- A degreaser or alcohol wipe-down for the final prep
- Masking tape for dry fitting and hinge setup
- Measuring tape for centerlines and repeatable placement
- A felt-edge or wrapped squeegee to avoid scratching transfer tape
If the graphic crosses a seam, body crease, or curved area, dry-fit it first and mark the midpoint. On long Ranger side graphics, centerline marks save a lot of grief.
Phase two: positioning
Most DIY installs go wrong here. Owners trust their eyes too much.
Use a dry fit before peeling anything. Tape the decal in place and check it from multiple angles. Then create a hinge with masking tape across the middle or along the top edge, depending on the shape. The hinge holds your alignment while you work each side deliberately instead of chasing the decal around the panel.
For windshield or upper-glass graphics, a product like a custom text windshield banner decal sticker only works cleanly if you map the glass width and top curvature first. What looks level against the roofline can read crooked if the banner doesn't account for the glass shape.
Here's a useful installation reference before you start handling the actual film.
Shop-floor advice: Long decals should be installed in controlled sections, not in one heroic sweep.
Phase three: application
Once the hinge is set, peel back one portion of the backing and start from the center, working outward with the squeegee. Use steady, overlapping strokes. Don't mash randomly. The goal is even pressure and controlled air release.
For flatter Ranger panels, dry application is usually more direct and predictable with cut vinyl. On larger graphics or when you need a little positioning forgiveness, some installers use a light wet method. Either way, don't flood the panel, and don't apply over trapped contamination.
A few practical rules matter a lot:
- Keep tension low. Stretching the vinyl to “make it fit” invites later lift.
- Work around seams carefully. Press into transitions gradually instead of forcing the whole decal over a contour.
- Watch the edges. Firm edge pressure improves adhesive contact where lift usually starts.
After the decal is down, remove the transfer tape carefully at a sharp angle. If any section wants to lift with the tape, stop and re-squeegee before continuing.
What separates a clean install from a redo
Good installers don't rely on luck. They verify the truck, dry-fit the design, mark centerlines, and treat curved areas as their own mini-install rather than as part of one giant motion.
That's especially true on Rangers with mixed contours, trim add-ons, and generation-specific panel shapes. Precision beats speed every time.
Troubleshooting Common Installation Issues
Even when you prep well, small problems can show up. That doesn't mean the job is ruined. Most decal issues on a Ranger are fixable if you catch them early and respond with the right correction instead of making the panel worse.
Air bubbles and trapped pockets
Small bubbles usually come from uneven squeegee pressure or a tiny amount of trapped air. If the bubble is near an edge, work it outward first. If it's isolated and won't move, use a very fine pin at the edge of the bubble and press the air out gently.
Don't stab straight through the middle unless you have no better option. A tiny release at the edge leaves a cleaner result.
Wrinkles and tension marks
Wrinkles usually show up when the decal was laid down too quickly or stretched while crossing a contour. Lift that area carefully if the adhesive still allows it, then re-lay it with lower tension and firmer control from the center outward.
If the wrinkle formed over a curved section, treat the curve as a separate zone. Short strokes beat broad strokes there.
A wrinkle isn't always an alignment problem. Often it's a pressure problem.
Edges lifting after installation
Edge lift usually points to one of three causes: contamination, poor pressure at the edge, or a panel shape that asks too much of the material. Re-cleaning isn't possible once the adhesive is committed, so your best fix is usually targeted pressure and, if needed, a careful reset while the install is still fresh.
This shows up often on tailgate corners, bedside ends, and seam-adjacent graphics. Those are high-stress spots on a truck, especially one that gets washed hard or sees regular weather.
Transfer tape won't release
This is common with smaller lettering or cooler conditions. If the transfer tape keeps pulling the vinyl back up, don't yank harder. Re-squeegee the decal to the panel, wait a bit, then peel the tape back at a sharper angle and more slowly.
If you rush this step, fine details can distort. Patience fixes more transfer-tape problems than force does.
When to stop and reset
If the decal is visibly crooked, trapped in a major crease, or crossing a body line wrong, stop early. A controlled redo is better than living with a bad install every time you walk up to the truck.
The hard truth is simple. Small flaws can be corrected. Big fitment mistakes usually trace back to planning, not application.
Aftercare and Long-Term Decal Maintenance
Once the decal is on, the job shifts from installation to preservation. A truck graphic lives outdoors, sees heat cycles, catches wash chemicals, and gets hit with grime that a garage-kept car might never face. If you want stickers for Ford Ranger trucks to stay crisp, aftercare isn't optional.
There's a long history behind durable vehicle stickers. Windshield stickers were standardized in 1920 to be octagonal and five inches across, as noted in this vehicle sticker history video. That history started with functional identification, but the lesson still holds. A sticker that stays clean and intact always looks more intentional than one that's left to weather unchecked.
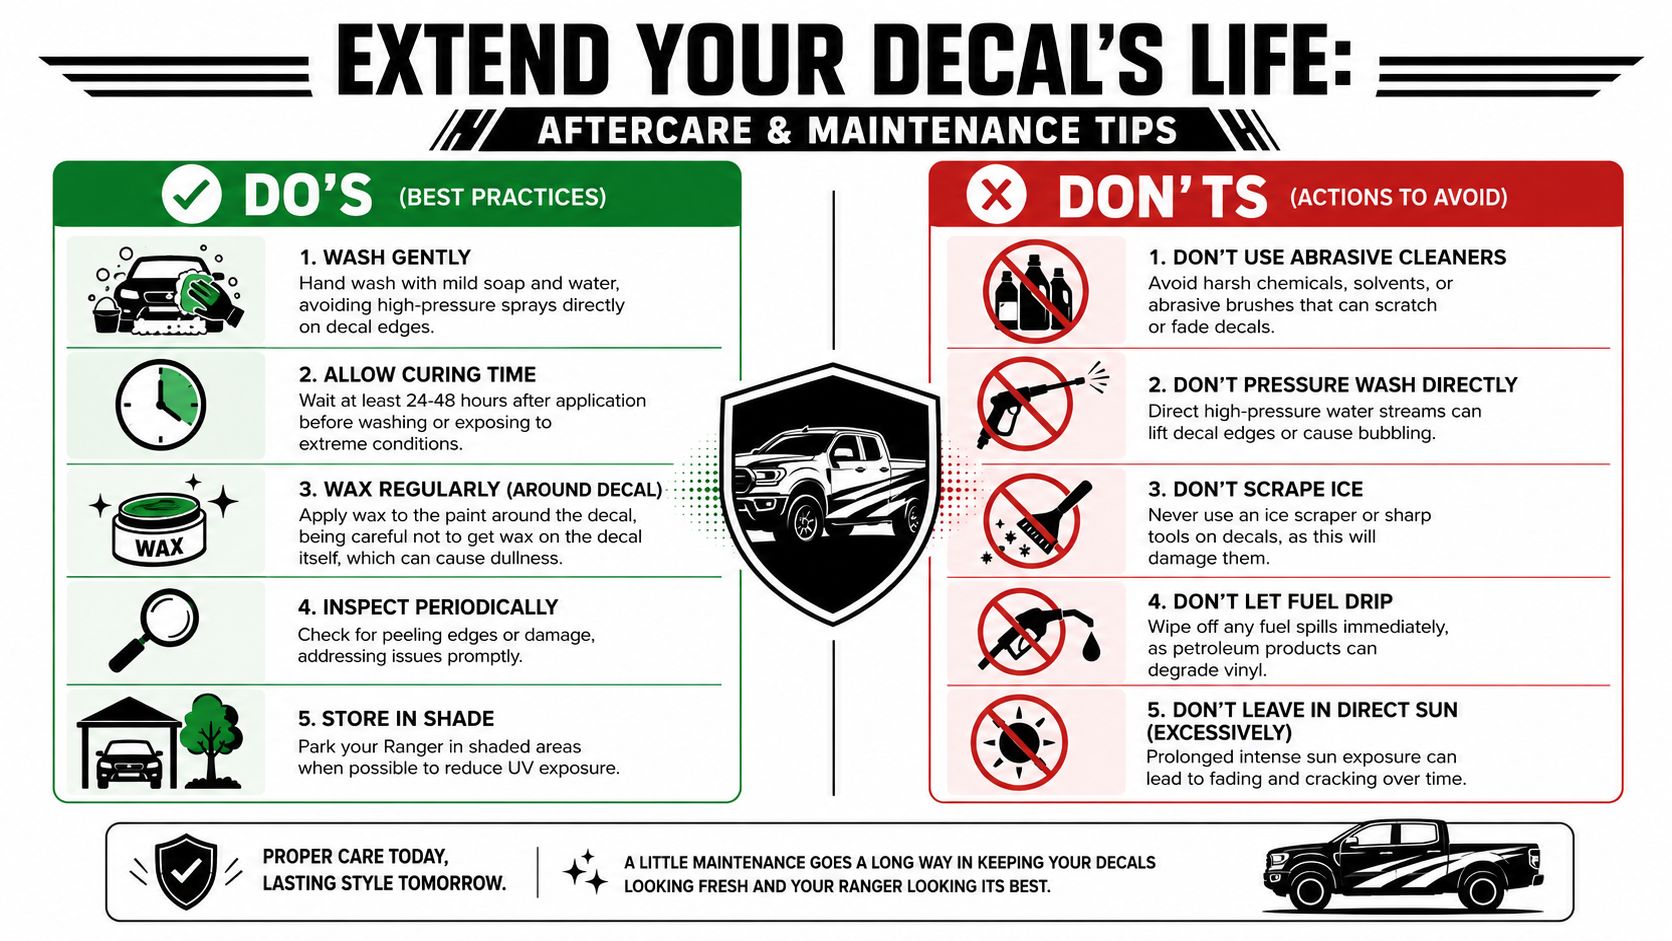
What helps decals last
Good maintenance is mostly restraint. Wash gently, inspect edges once in a while, and don't attack the decal like it's bare painted steel.
A practical routine looks like this:
- Hand wash when possible. Mild soap, soft wash media, and normal water pressure are easier on vinyl.
- Keep spray away from edges. Pressure directed into an edge is one of the fastest ways to shorten decal life.
- Clean spills quickly. Fuel, bug residue, and road grime are easier to handle when they haven't baked in.
- Park smart when you can. Shade helps any exterior graphic hold appearance longer.
If you want a general wash cadence reference for vehicles, these Northern Lights Carwash recommendations give a reasonable starting point, then you can adjust based on how your Ranger is used.
What shortens decal life fast
Truck owners usually damage decals in three ways. They use harsh chemicals, they blast edges with pressure, or they scrape directly across the vinyl.
Avoid these habits:
- Abrasive cleaners and stiff brushes
- Direct high-pressure washing at close range
- Picking at corners or scraping frost and ice off the graphic
- Letting contamination sit on horizontal surfaces for too long
Clean decals don't just look better. They give you time to catch edge issues before they become replacement jobs.
The realistic mindset
Even durable vinyl is still a service-life product. It's not paint and it's not armor. If you install it correctly and wash it like a finished surface instead of a work boot, it will hold its look much longer.
That's the difference between a decal that still sharpens the truck's appearance and one that starts making the truck look neglected.
If you're ready to narrow down the right graphic for your specific Ranger, Custom Sticker Shop is one option to explore for Ford Ranger decals, custom text, and truck graphics made from Oracal vinyl. The smart move is to start with your exact year, cab, bed, and trim, then choose a design that matches the body lines instead of forcing a generic fit.