
You’re probably in one of two spots right now. Either you’ve looked at your car, truck, or Jeep and decided it needs more attitude, or you’ve already started shopping for a joker decals car setup and realized the market is full of everything from sharp-looking pro vinyl to bargain-bin stickers that won’t last through one rough season.
That’s where a common error occurs. Many choose the artwork first and the material second. In the decal world, that order should be reversed. A killer Joker design on weak vinyl is still a weak decal.
The right Joker graphic can make a vehicle look custom without committing to a full wrap. The wrong one fades, shrinks, peels at the corners, and leaves you annoyed every time you walk up to the vehicle. Good vinyl looks intentional. Cheap vinyl looks temporary.
Unleash Your Car's Inner Rebel
A vehicle says a lot before the engine even starts. Some owners want clean and understated. Others want something that throws a little menace into the mix. Joker graphics sit in that second lane. They’re recognizable, aggressive, and loaded with personality.
That’s a big reason Joker car decals have exploded in popularity in 2025, with Walmart listing over 148 distinct sticker options and some Etsy designs reaching up to 53 inches wide for trucks and SUVs, according to this 2025 trend report on Joker car decals. That kind of retail spread tells you this isn’t some niche one-off graphic anymore. It’s mainstream custom culture.
Why the style connects
The Joker works on vehicles because the character already carries a visual language that fits automotive styling:
- Chaotic linework fits tuner builds, drift cars, and bold street setups
- Dark humor themes work well on Jeeps, trucks, and military tribute builds
- Strong contrast makes the artwork read clearly from a distance
- Flexible design elements like grins, laughter patterns, and quote decals can go small or large
A subtle smile tucked along a hood edge gives one vibe. A full side graphic with laughter text gives a completely different one. Same theme, different personality.
Practical rule: If the decal doesn’t match the personality of the vehicle, it won’t look custom. It’ll look stuck on.
More than fandom
A lot of owners start with the character, but the best results come from treating the decal like part of the vehicle’s design. Color, finish, placement, and scale matter more than people think. A matte black Joker smile on a dark hood can look sinister and clean. A loud full-color portrait on a silver door panel can work too, but only if the proportions are right.
That’s the appeal. Joker decals let you push a vehicle toward something more personal without repainting the whole thing. Done right, they feel built in. Done wrong, they feel like a marketplace impulse buy.
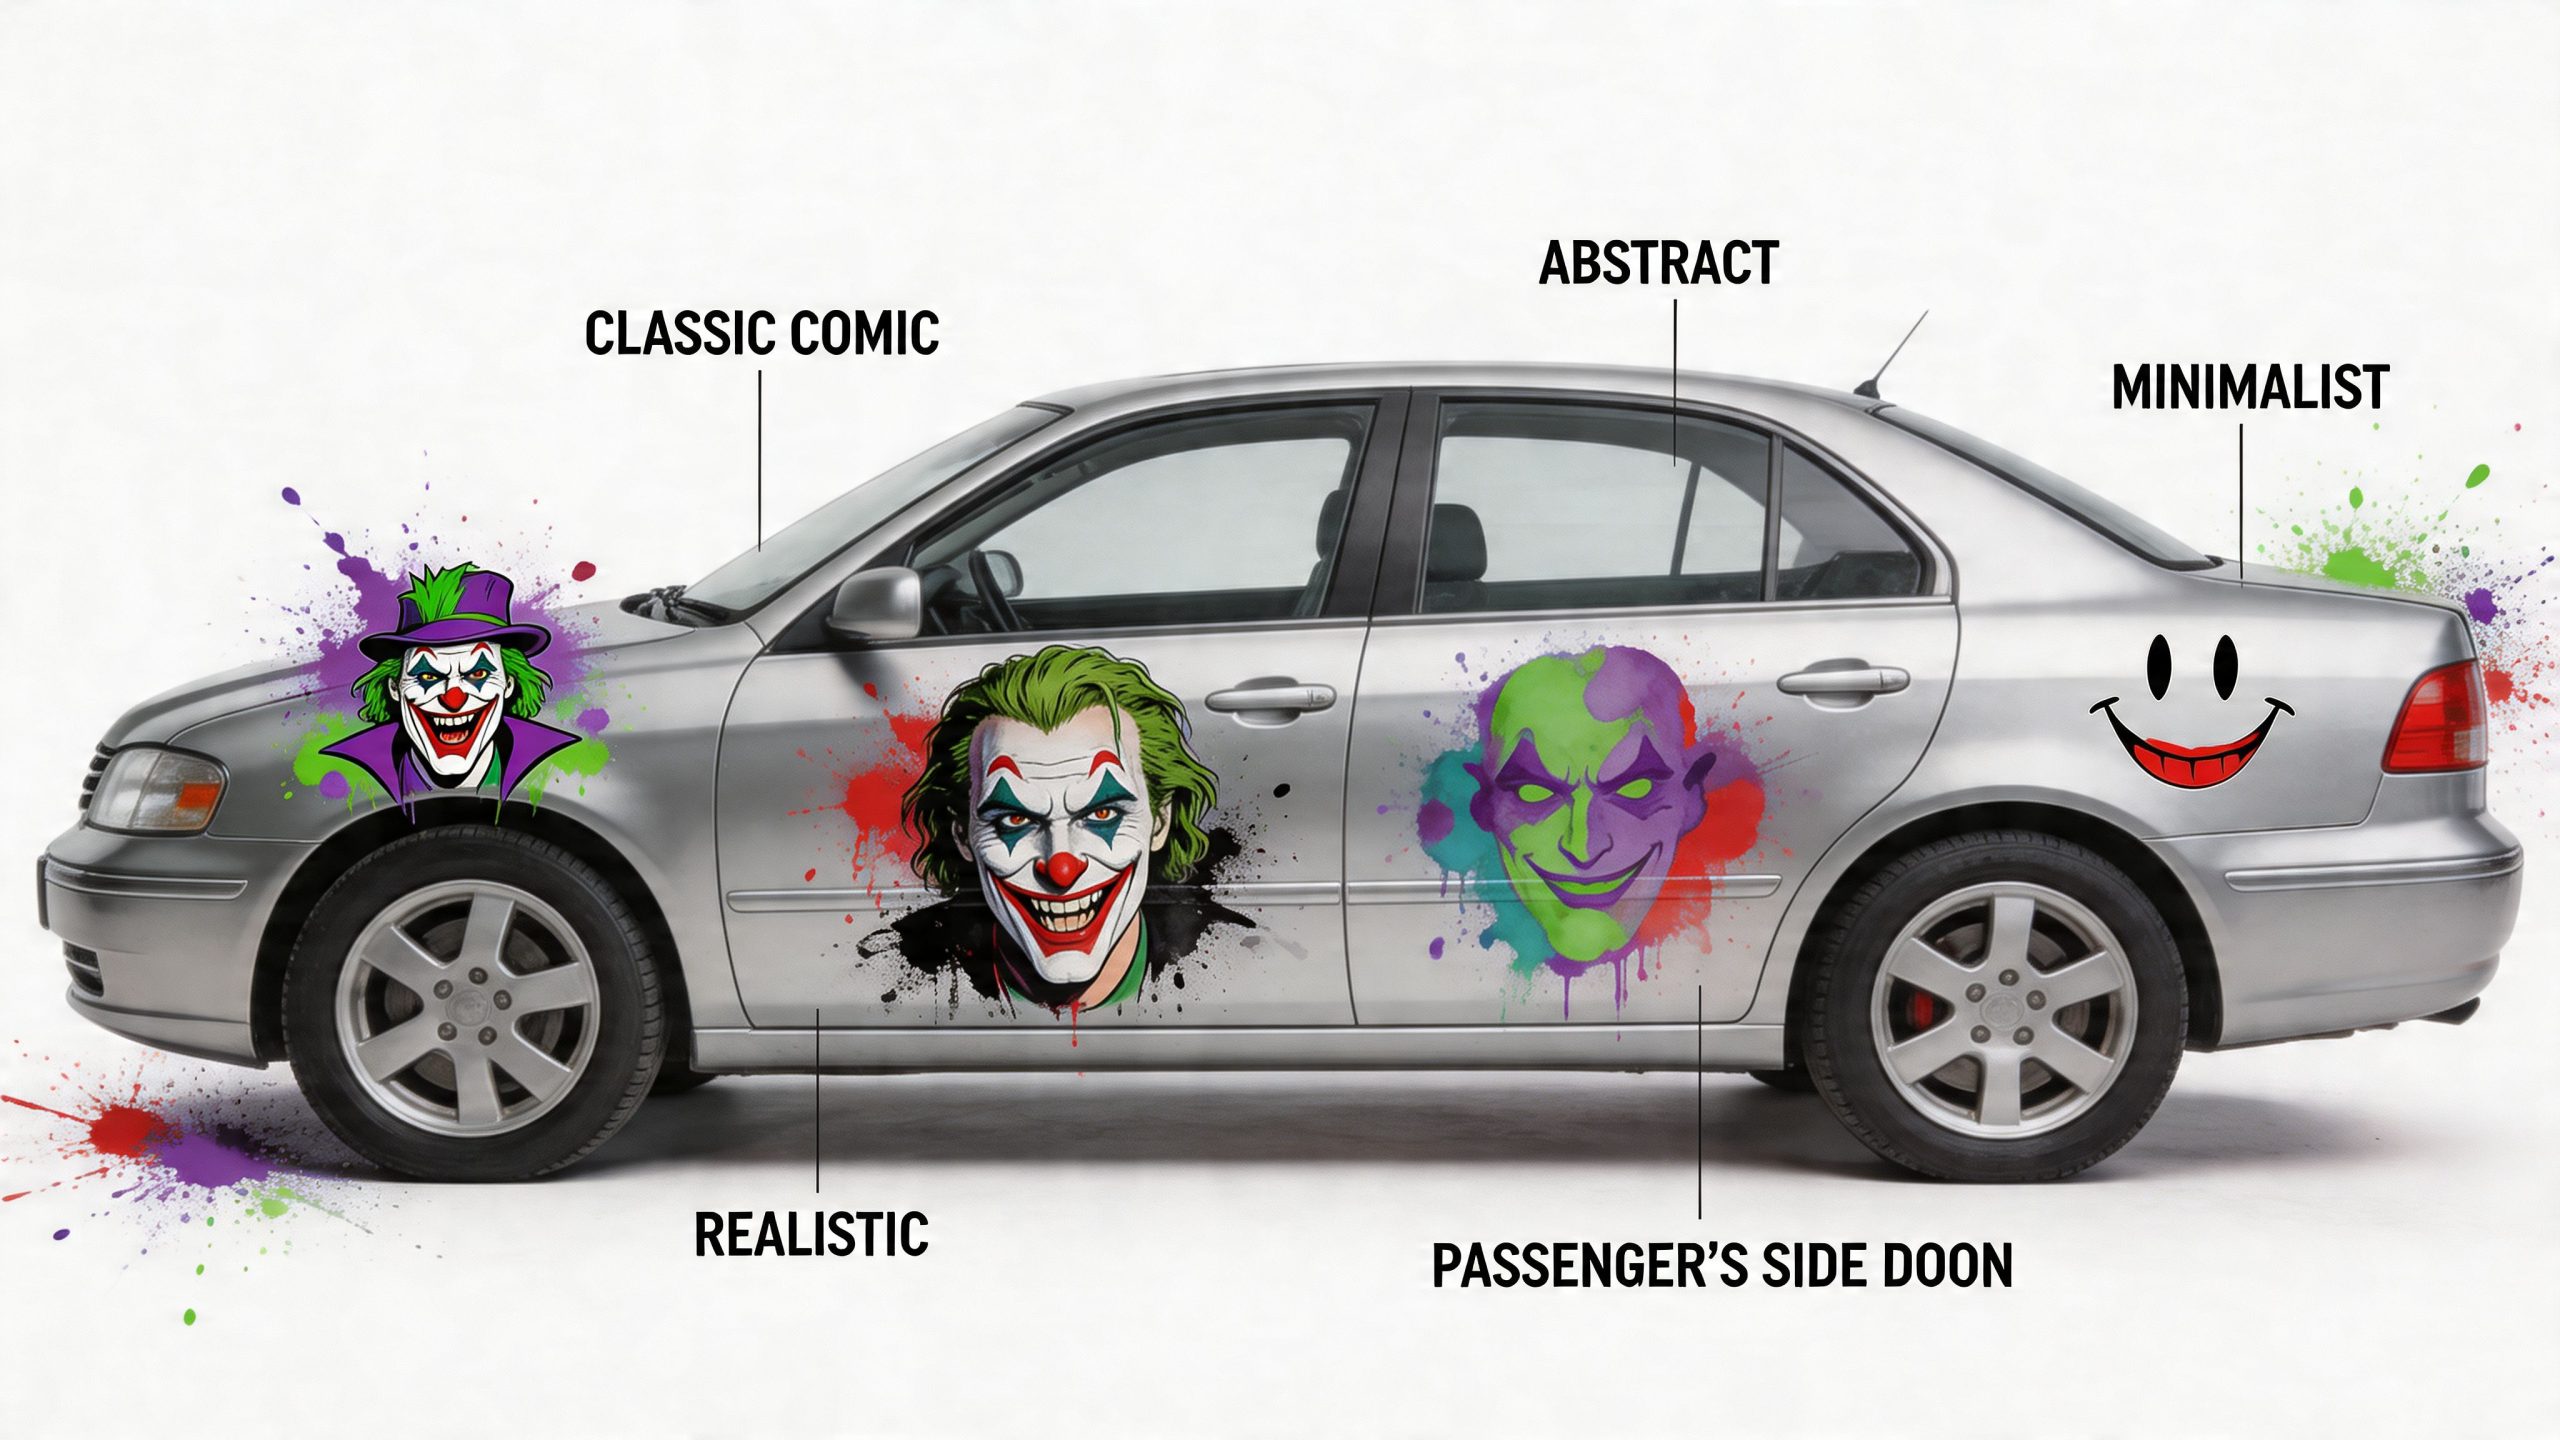
Decoding Popular Joker Decal Styles
There isn’t just one kind of Joker decal. There are several families of designs, and each one changes how the vehicle reads at a glance.
Text-driven designs
The easiest entry point is text. “Why So Serious” graphics, stylized laughter patterns, and short villain-themed phrases are popular because they fit almost anywhere. Windshield strips, rear glass, quarter panels, and rocker areas all take text well.
These work best when you want the theme without committing to a character face. They also age better visually on daily drivers because they don’t dominate the whole vehicle.
A few text formats that usually work well:
- Windshield banner style for a tuner or street build
- Repeating HA HA HA pattern down a Jeep side or truck bed
- Small quote decal on rear glass or lower panel
- Vertical text placement on a pillar or side window edge
Smile and symbol graphics
The Joker grin is one of the strongest automotive motifs because it reads instantly. It can sit along a hood line, peek from the lower corner of a rear window, or stretch across a body panel without feeling cluttered.
This category also includes cards, crowns, damaged-smile silhouettes, and hybrid villain graphics. These are smart choices when you want impact but don’t want a full portrait.
A smile decal usually looks better than a face decal on compact cars. It keeps the styling sharp and avoids crowding the sheet metal.
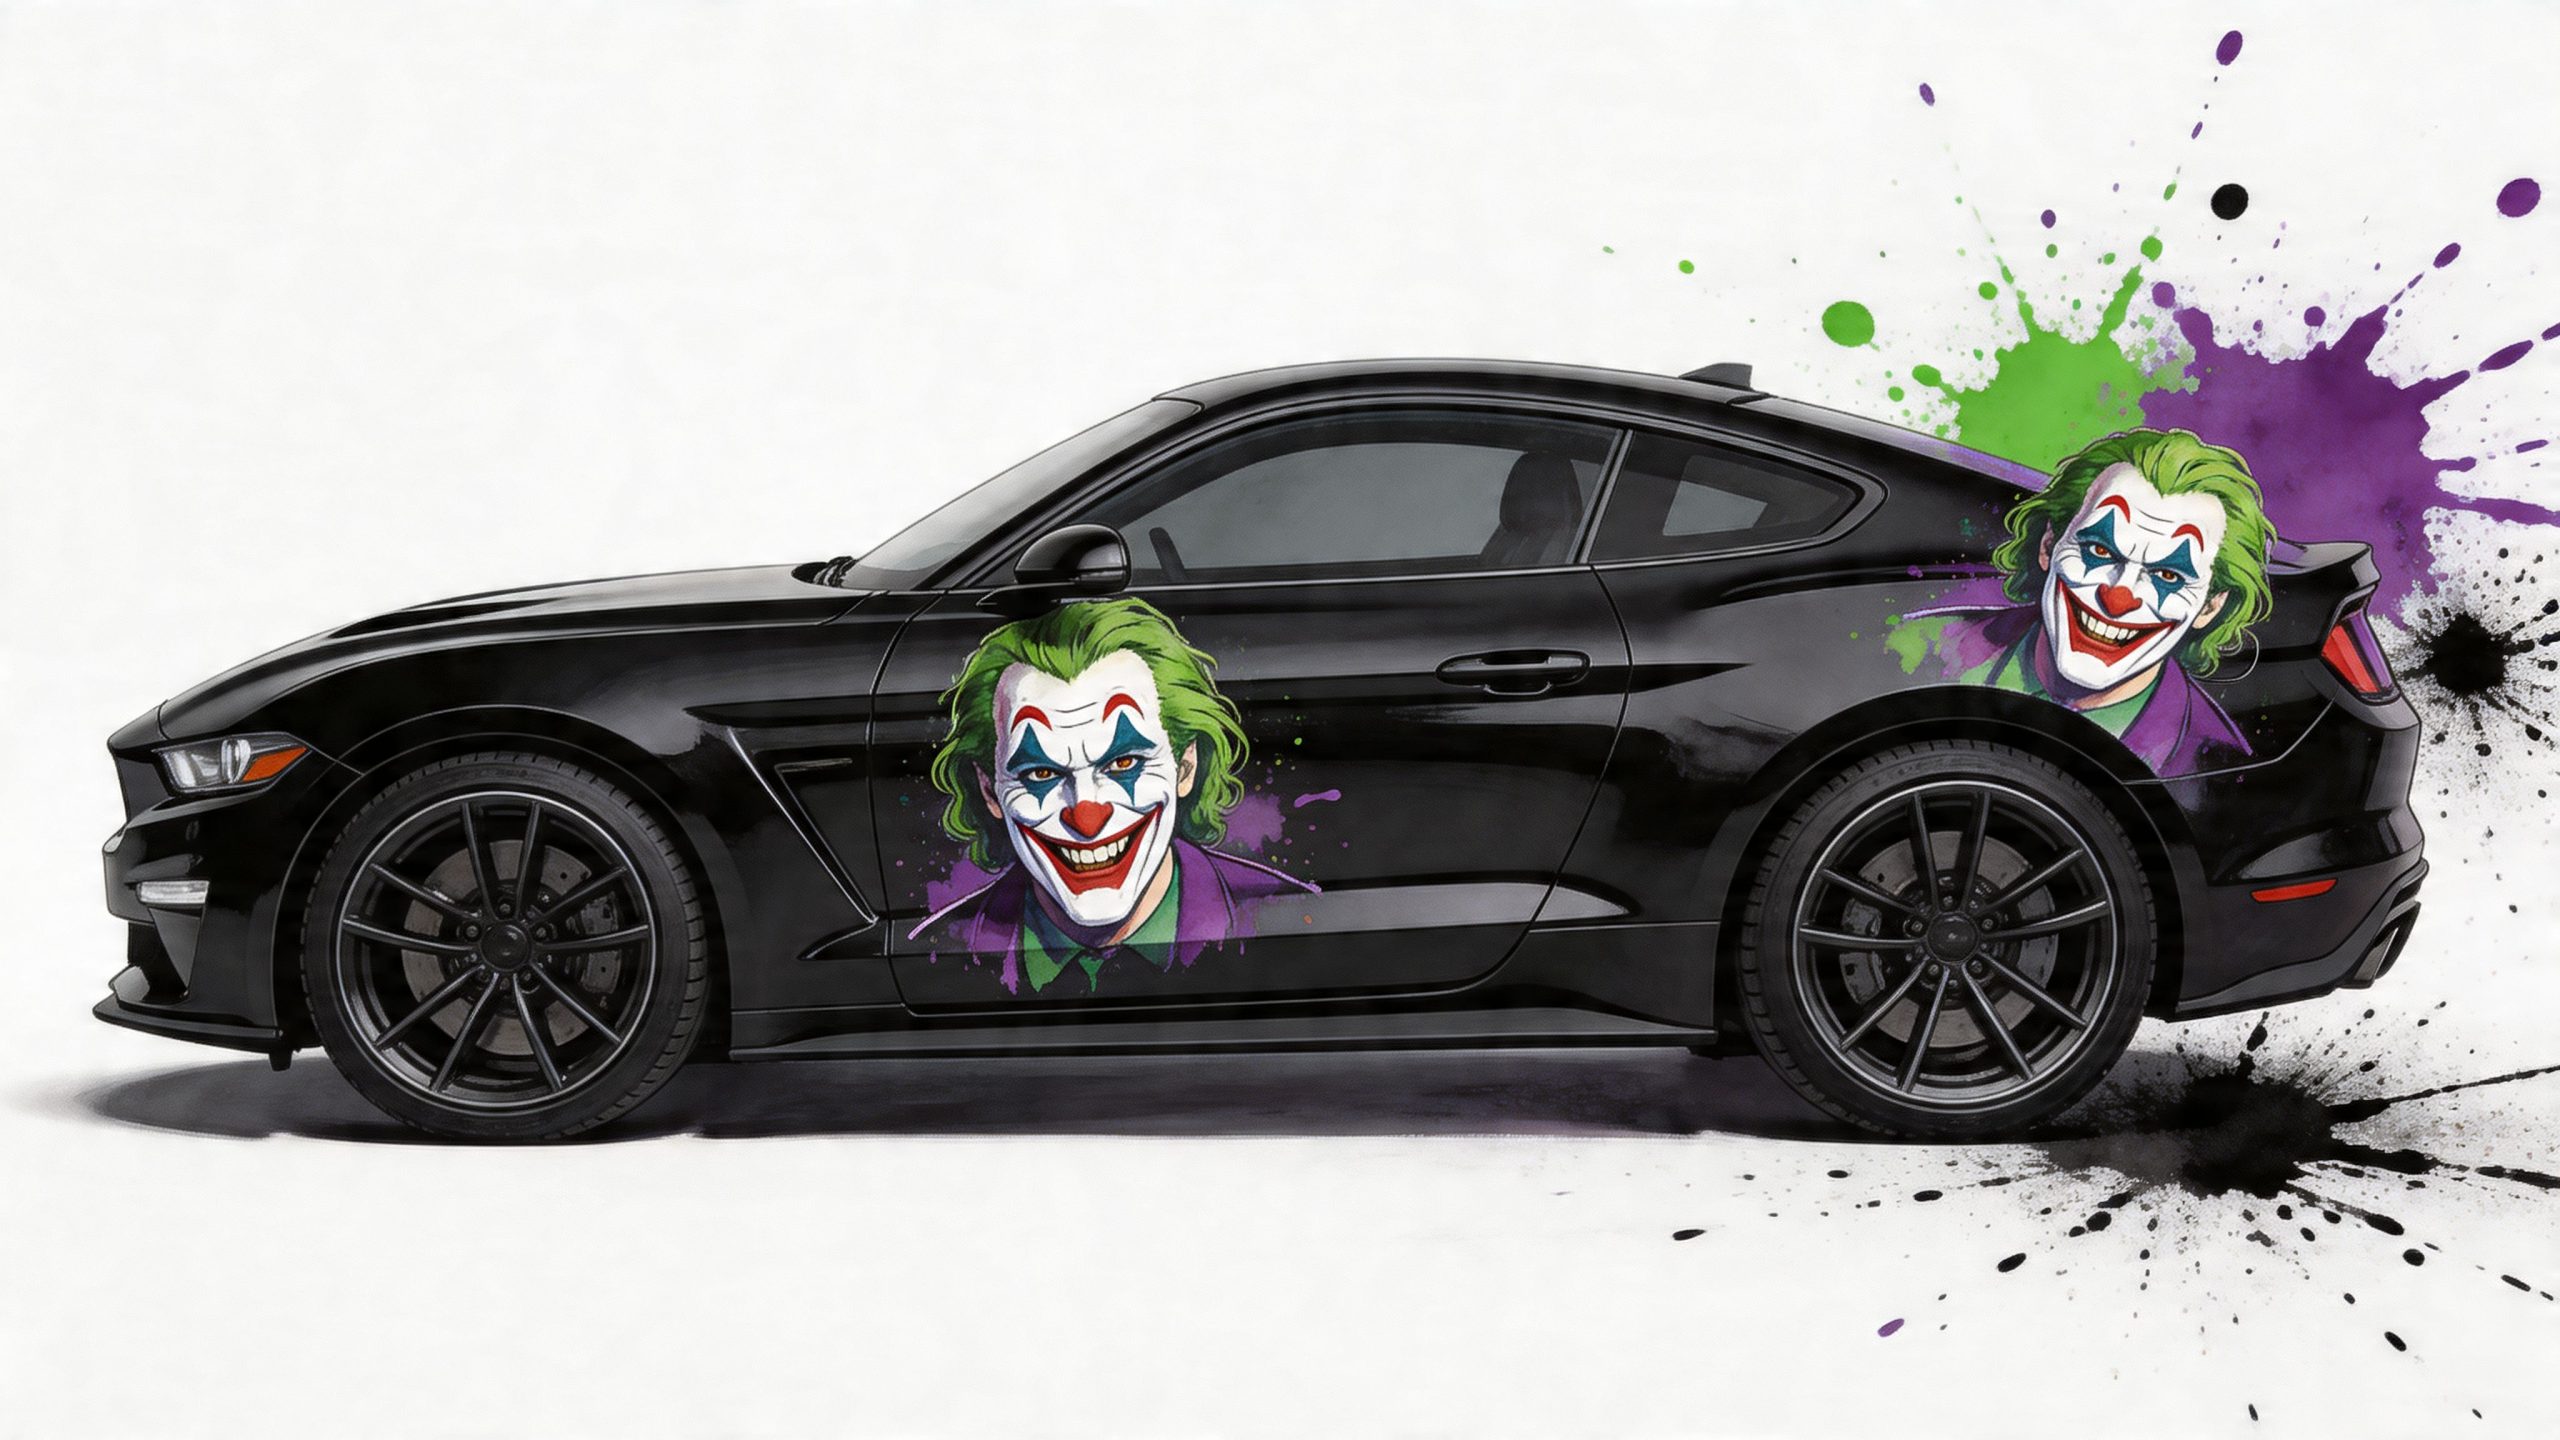
Character portraits
Portrait decals are the boldest option. They can be cinematic, comic-inspired, graffiti-styled, or heavily shadowed. These belong on larger surfaces where the art has room to breathe, such as hoods, doors, truck bedsides, and rear quarters.
The mistake people make here is sizing too small. Detailed face art shrunk into a tight space loses expression and starts looking muddy from a distance.
Finish matters as much as design
The same artwork can look completely different depending on the finish:
| Style choice | Best use | Visual effect |
|---|---|---|
| Matte black | Hoods, side panels, dark vehicles | Stealthy, aggressive, low-glare |
| Gloss black | Glass, smooth painted panels | Sharper contrast, cleaner edge definition |
| Full color | Large panels, show builds | High impact, more theatrical |
| Cut vinyl outline | Small accents, minimal builds | Cleaner, less busy |
If you want a villain-themed pairing on the same vehicle, a Harley Quinn car decal option can complement Joker artwork, but only if the two pieces share the same visual weight. Mixing a tiny accent with an oversized side graphic usually looks mismatched.
Matching style to vehicle type
Different platforms carry different decal styles better.
- Sedans and coupes usually wear windshield banners, hood smiles, and smaller side graphics best
- Jeeps can handle repeating patterns, oversized side art, and rear glass graphics
- Trucks and SUVs give enough panel space for large villain graphics without cramping the design
- Off-road builds look better with rugged, simplified artwork than delicate portrait detail
The right choice depends less on what looks cool in a listing photo and more on what fits your actual body lines.
Why Your Decal's Material Is Everything
Most decal problems aren’t design problems. They’re material problems.
A lot of shoppers see vinyl and assume vinyl is vinyl. It isn’t. Two Joker decals can look nearly identical on day one and perform completely differently once they’ve seen heat, rain, road grime, and a few wash cycles.
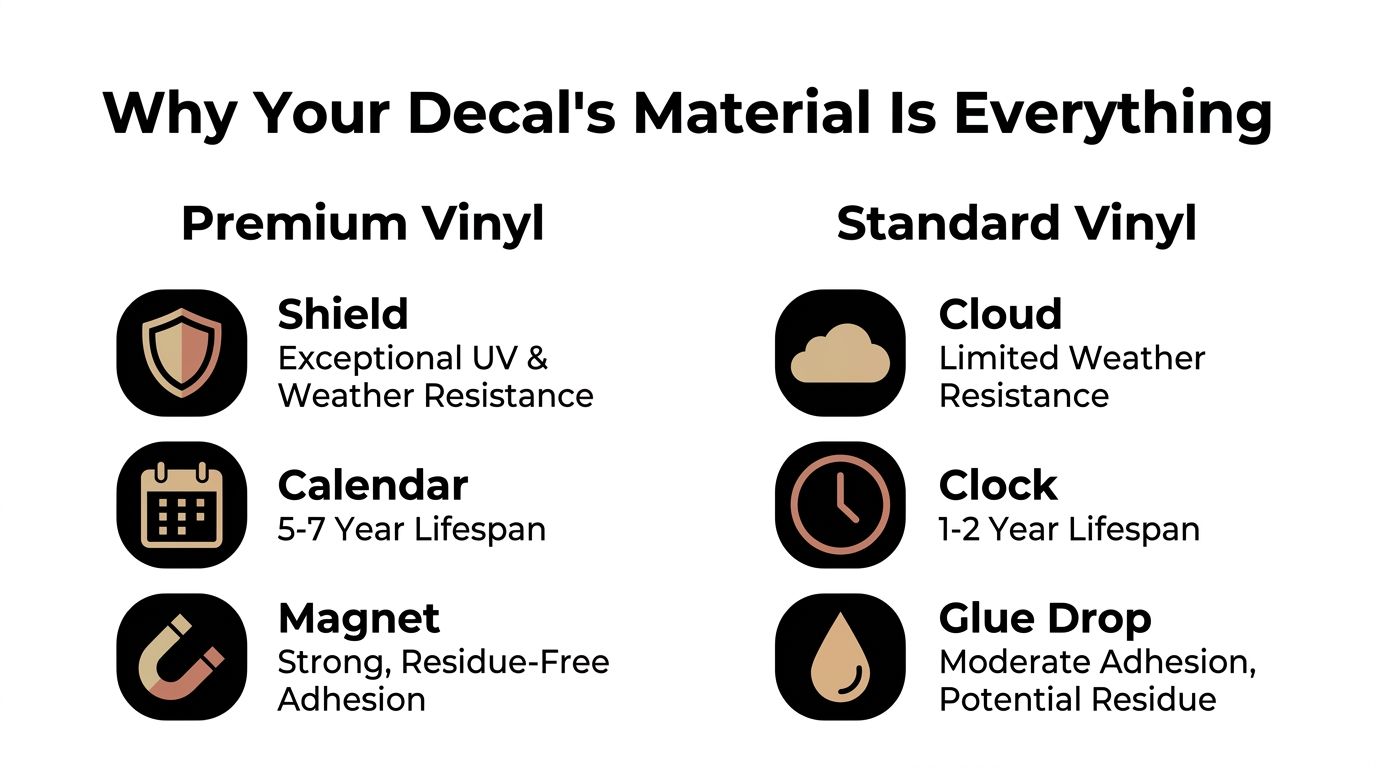
What separates pro vinyl from cheap stock
Professional-grade Oracal vinyl is rated for a 5–7 year outdoor lifespan because its embedded pigments resist UV fading, while cheap alternatives can delaminate in 1–2 years. That same material also maintains adhesion on curves and, with pre-spacing and quality transfer tape, can reduce installation errors by 70%, according to this material-focused Joker decal guide.
That one fact explains most of what owners notice in practice. Better vinyl stays flat, holds color, and survives seasons. Cheap imported film often looks decent in the package, then starts failing at the edges and surface once sun and weather get involved.
The short version of how vinyl fails
Low-grade decals usually fail in a few predictable ways:
- Surface fading because the color layer can’t handle UV exposure
- Edge curl where water and air start working under the film
- Cracking on curves because the material doesn’t want to conform
- Adhesive mess when removal leaves behind residue or brittle fragments
That’s why the material decision comes first. If the vinyl can’t handle the panel, the design never gets a fair shot.
Comparison table
| Feature | Oracal 651 (Professional Grade) | Generic Economy Vinyl (Imported) |
|---|---|---|
| Outdoor life | 5–7 years | 1–2 years typical for cheap alternatives |
| UV resistance | Embedded pigments resist fading | More prone to fading and delamination |
| Curved panel adhesion | Maintains adhesion on curved surfaces | More likely to lift or wrinkle |
| Install behavior | Works well with pre-spacing and quality transfer tape | More installer-sensitive |
| Long-term value | Fewer replacements over time | Lower upfront cost, weaker lifespan |
Why American-made material pays off
A family shop that installs and ships decals regularly sees the same pattern over and over. Owners who buy quality once are usually happier than owners who buy cheap twice. Imported bargain decals attract people on price. Premium vinyl keeps them from redoing the same job in a few months.
The sticker itself is cheap. Your time isn’t.
There’s also a practical finish difference. Good cut vinyl has cleaner edges, better consistency across the roll, and fewer surprises during weeding and transfer. That matters when you’re lining up text, placing a grin across a hood, or applying long side graphics where any distortion shows immediately.
What to ask before you buy
If a listing looks good but tells you nothing useful, stop and ask questions.
- What vinyl is it cut from
- Is it pre-spaced on transfer tape
- Is it made for outdoor automotive use
- Is the finish matte or gloss
- Will it conform cleanly to mild curves
If a seller can’t answer those basics, you’re not buying a professional automotive graphic. You’re buying a gamble.
Strategic Placement And Styling Ideas
Placement decides whether the decal looks integrated or random. A Joker graphic should work with the vehicle’s body lines, not fight them.
Large decals can also affect airflow if they’re installed poorly. According to this Etsy-based sizing and application reference, professional pre-spaced vinyl with air-release channels conforms to hood curves and helps minimize drag. The same source notes that decals on rear or side windows in the U.S. must not obstruct the driver’s view and generally should preserve over 70% light transmission.
Best locations by vehicle type
On a small car, less usually works better. On a full-size truck or Wrangler, you have room to let the graphic breathe.
Here’s how I’d break it down:
Sedans and coupes
Use hood-edge smiles, windshield banners, or lower-door accents. Tight, clean placements suit the body shape.Trucks
Bedsides, rear glass, and lower cab panels give the design enough space without swallowing the truck’s proportions.Jeeps and off-road rigs
Side laughter patterns, hood graphics, and rear quarter accents all play well with the upright body style.SUVs
Rear side glass and tailgate areas can carry larger art while keeping the profile balanced.
Placements that usually work
Hood graphics
A hood is one of the strongest places for Joker artwork because it’s visible from the front and reads as part of the vehicle’s face. Grins, eyes, laughter bands, or centered portrait work all fit here, depending on the shape of the hood.
Keep the decal away from washer nozzles, vents, and body creases that break the artwork awkwardly.
Side graphics
Sides are ideal for long “HA HA HA” runs, text bands, or large villain art on trucks and Jeeps. On a smaller coupe, a giant side portrait can overpower the body.
If the door seam cuts through a face, the design usually suffers. Text and repeating patterns tolerate seams much better.
Glass applications
Rear glass and quarter glass are popular because they’re visible and don’t interrupt paint. But regarding these areas, owners need to stay disciplined. If the decal interferes with visibility, it’s not worth it.
Keep the graphic out of the driver’s natural sightline. Style never beats safety.
A simple placement checklist
Before you apply anything, stand back and evaluate these points:
Follow the panel shape
Long decals should run with the panel, not across it awkwardly.Respect body breaks
Door gaps, trim lines, and handles can ruin a good design fast.Check visibility
Especially on rear and side glass.Scale to the vehicle
A decal that looked great in a product photo may look undersized or oversized on your exact model.Think about cleaning access
Decals jammed into trim edges and hardware traps are harder to maintain.
Styling combinations that look intentional
A few combinations consistently look strong:
| Vehicle | Good Joker decal pairing |
|---|---|
| Black coupe | Matte grin on hood plus small rear-glass text |
| Jeep Wrangler | Side laughter pattern plus hood accent |
| White truck | Black bedside graphic plus rear-window villain text |
| Gray sedan | Windshield banner plus subtle quarter-panel smile |
The key is restraint. One strong idea always beats three competing ones.
Achieving A Bubble-Free Installation
Most installation failures happen before the decal ever touches the car. Dirt, wax, bad alignment, and rushed squeegee work create the bubbles and wrinkles people blame on the vinyl.
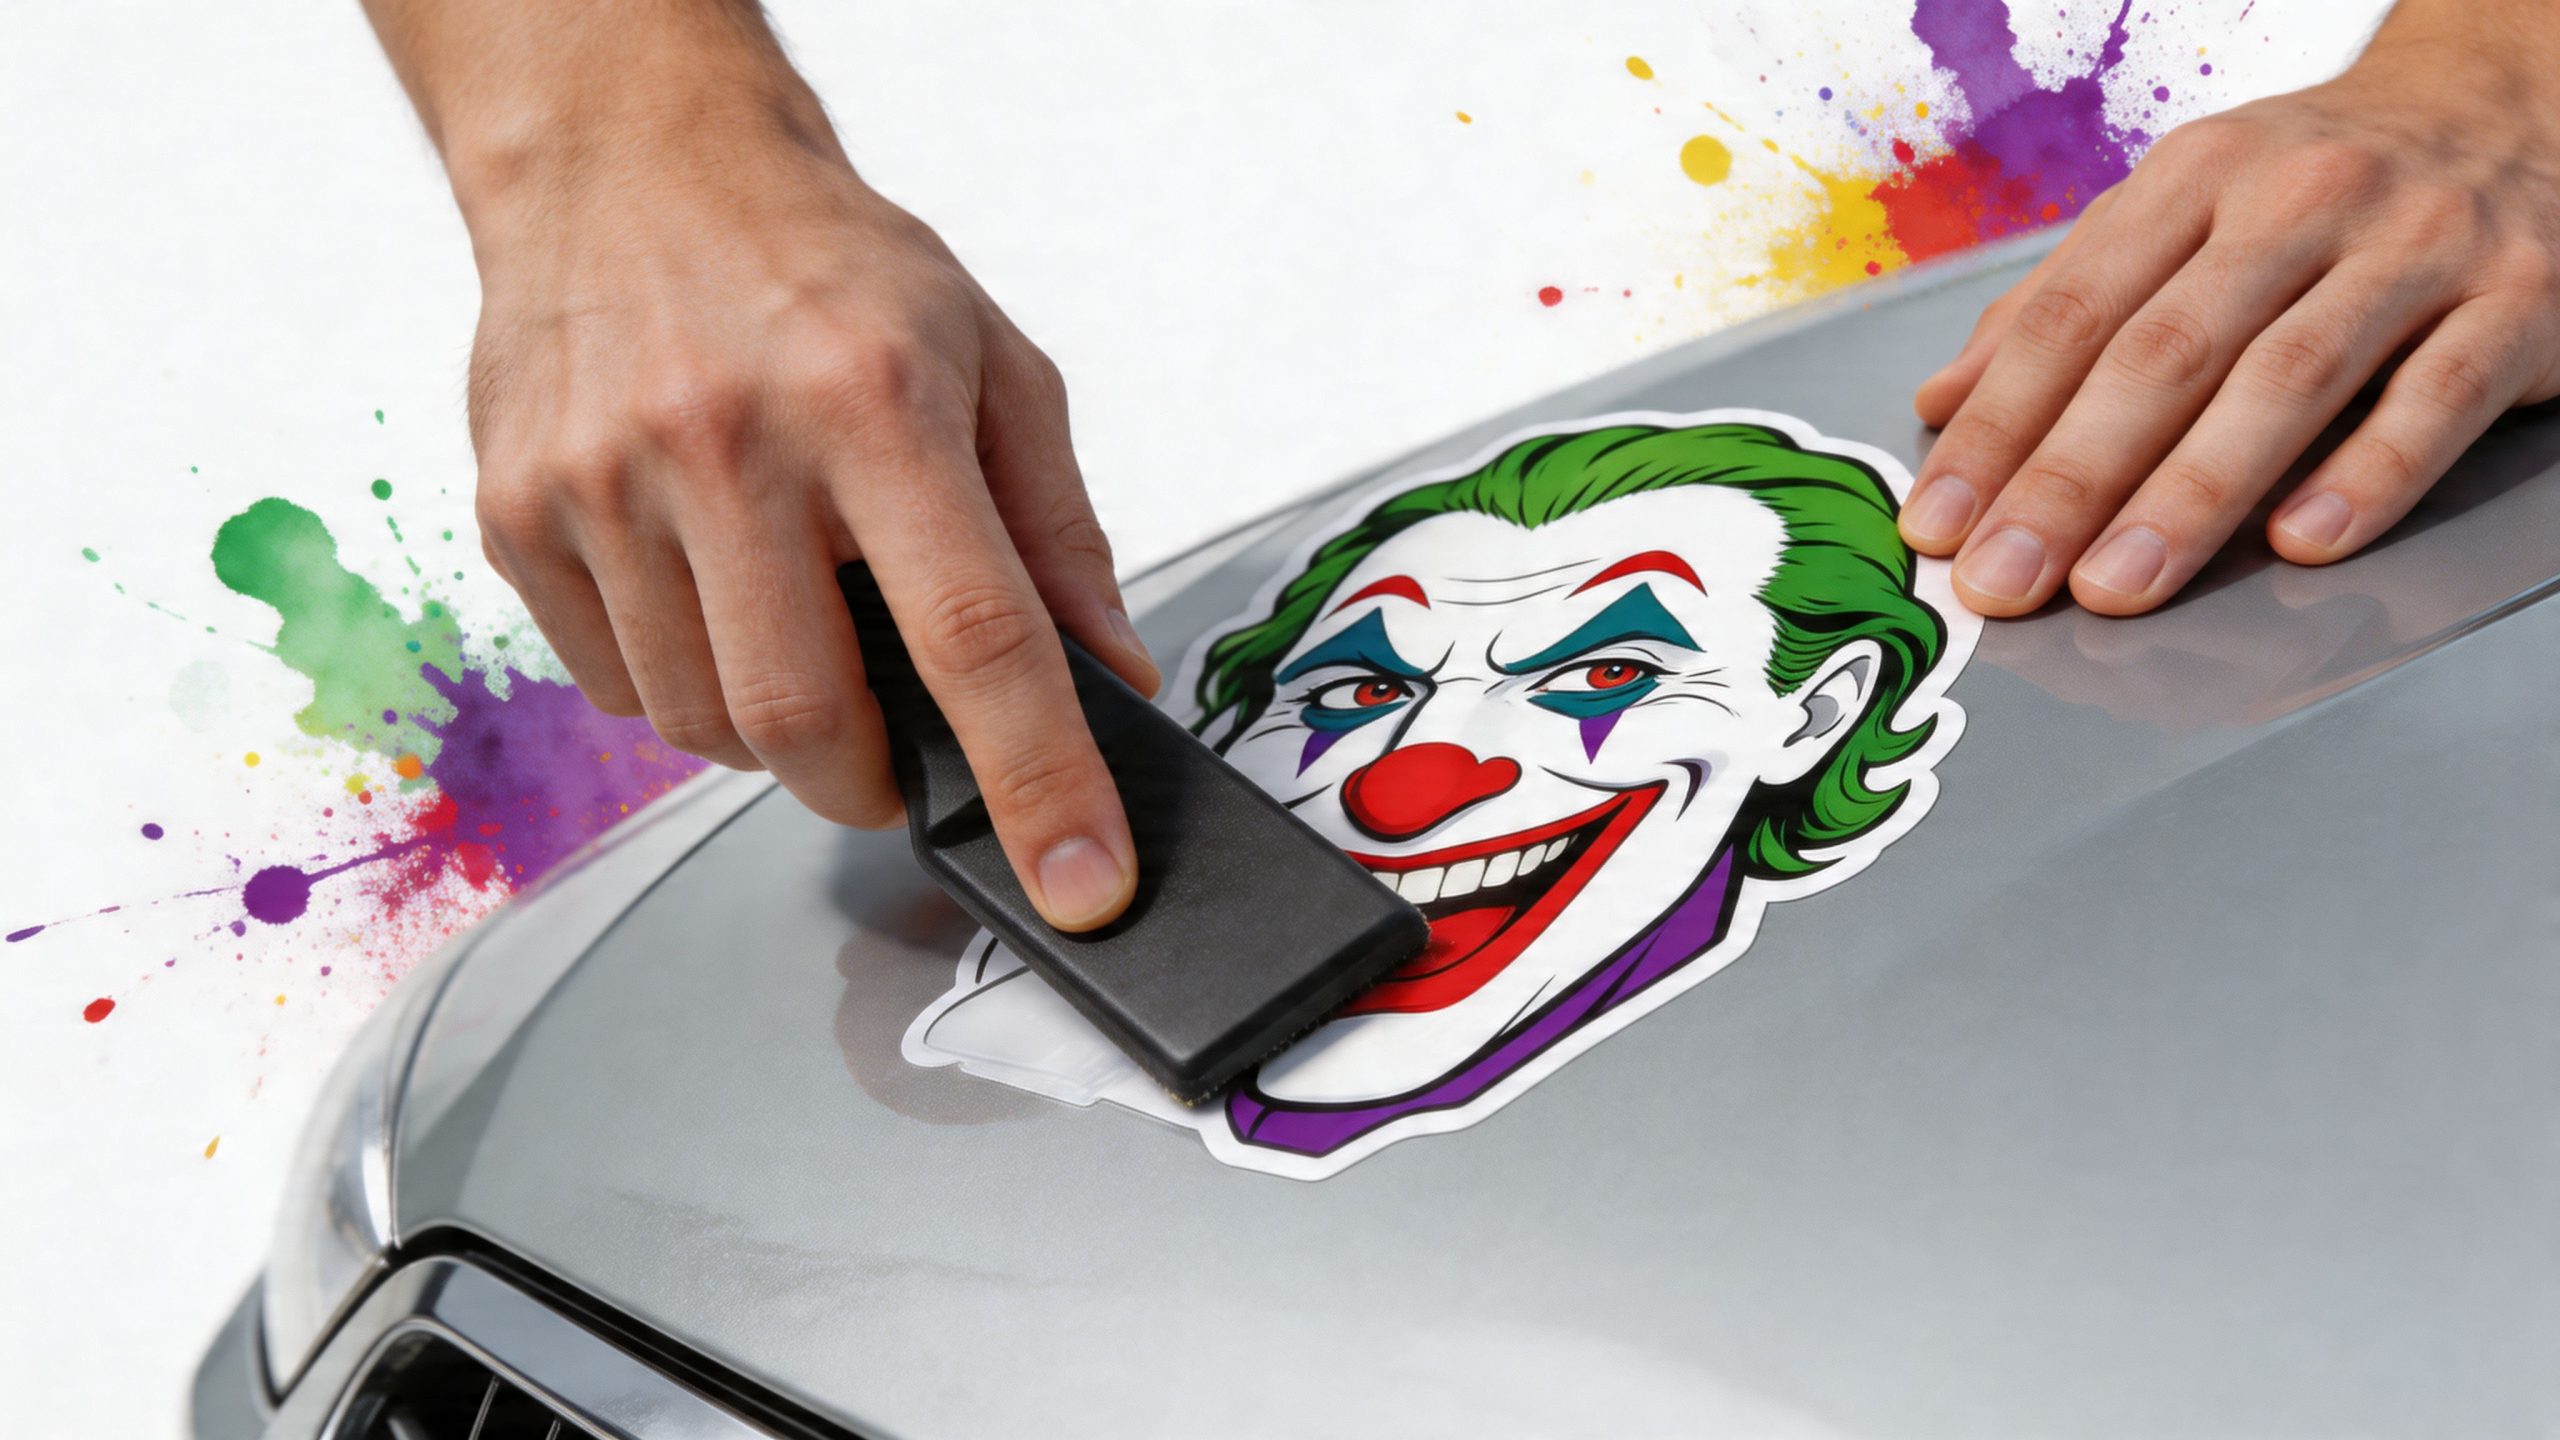
If your decal arrives pre-spaced on transfer tape, half the hard work is already done. That layout holds letters and design elements in alignment so you’re not trying to place every piece by hand.
Get the surface right first
A clean panel matters more than people think. If the paint feels slick from wax or grimy from road film, adhesion suffers.
Use this basic prep routine:
- Wash the area with standard car soap and dry it completely
- Wipe again to remove any leftover dust or residue
- Check the temperature so you’re not applying on a freezing panel or a scorching hot one
- Test the position with masking tape before peeling anything
If you’re applying a windshield banner or custom text strip, it helps to compare spacing and sightline before final placement. A custom windshield banner decal only looks professional when it sits level with the glass and trim.
The install process that works
1. Tape and align
Hold the decal in place with masking tape and step back. Check level, spacing, and relation to trim or panel edges. Don’t trust your eyes from six inches away. Walk back.
2. Peel the backing carefully
Lift one side, peel the backing paper away, and keep the decal from folding into itself. On larger graphics, go slowly and control the material with two hands if possible.
3. Squeegee from the center out
Press from the middle and work outward in overlapping passes. That pushes air away from the design instead of trapping it under the film.
Apply pressure evenly. Fast hands create bubbles. Controlled hands remove them.
4. Remove transfer tape slowly
Once the vinyl is seated, peel the transfer tape back at a low angle. If any part of the decal lifts, stop, lay the tape back down, and squeegee that area again.
A good visual demo helps if you’ve never done one of these before:
Common mistakes that ruin installs
| Mistake | What happens |
|---|---|
| Applying over wax or residue | Weak bond and early lifting |
| Rushing alignment | Crooked final placement |
| Pressing randomly | Trapped bubbles and wrinkles |
| Pulling transfer tape too fast | Parts of the design lift back up |
| Stretching the vinyl | Distortion, especially on text |
Wet method or dry method
Both can work, but the best choice depends on decal size and installer confidence. Small cut vinyl decals often go on cleanly with a dry install. Larger pieces can benefit from a controlled wet approach if the material and adhesive allow it.
What matters most is consistency. Don’t soak the panel, don’t rush the bond, and don’t start peeling transfer tape until the vinyl has laid down properly.
Protecting Your Decal For Long-Term Style
A good decal doesn’t need babying, but it does need basic respect. Owners who ruin graphics usually do it with pressure washers, harsh cleaners, or careless edge abuse.
Washing without shortening its life
Hand washing is always the safest route. Use standard car soap, a soft wash mitt, and normal rinse pressure. If you use an automatic wash, avoid anything that pounds the decal edges or drags abrasive brushes across older graphics.
Here’s the practical approach:
- Wash gently and keep the mitt clean
- Don’t blast edges with close, high-pressure water
- Skip aggressive solvents on or around the vinyl
- Dry by blotting or wiping lightly, not by scrubbing
Sun, weather, and surface protection
Outdoor-rated vinyl is built for weather, but the environment still matters. Constant sun, road salt, mud, and neglected buildup wear on any exterior finish over time. If your vehicle lives outside, simple upkeep makes a visible difference.
For owners who want another layer of protection, this guide on ceramic coating for vinyl wrap gives a useful overview of how ceramic products can help shield vinyl surfaces from contamination and make routine cleaning easier. It’s worth reading before you experiment with coatings on graphics.
If dirt sits on the decal for weeks, the vinyl pays for it. Clean graphics last better than neglected ones.
What to avoid
Some damage comes from maintenance habits, not road use.
- No razor scraping on the vinyl face
- No harsh degreasers unless the product is known to be vinyl-safe
- No direct pressure-washer hits at the edge line
- No picking at corners if an edge starts to lift
If an edge does lift, deal with it early. A small issue is manageable. A lifted corner that gets blasted with water every weekend usually becomes a replacement job.
Removing it safely later
When it’s time for a new look, removal should be slow and controlled. Use gentle heat from a hair dryer or heat gun on a careful setting, warm the vinyl, and peel it back gradually. The goal is to soften the adhesive, not cook the paint.
After removal, clean any remaining adhesive with a paint-safe product and a soft towel. Done correctly, the panel should come back clean without drama.
Get Your Custom Joker Decal At The Shop
Most buyers learn the hard way that the cheapest decal isn’t the cheapest option long term. It just has the lowest entry price. After that comes fading, peeling, frustration, and doing the job again.
Cheap imported Joker decals are easy to find, but they often come with complaints about early peeling and fading. By contrast, premium American-made Oracal vinyl reduces reapplication needs by 70% over 3 years, according to this market comparison discussing Joker decal quality and value. That’s the difference between buying a graphic and buying a problem.
What long-term value really means
A good automotive decal should do three things well:
- Look sharp when it arrives
- Install cleanly without a fight
- Keep its appearance through regular use
That’s where American-made Oracal vinyl earns its reputation. It isn’t just about lifespan on paper. It’s about edge stability, color hold, cleaner cuts, and predictable install behavior. Those are the details that separate professional graphics from throwaway imports.
When custom makes more sense than off-the-shelf
A lot of owners start by browsing pre-made designs and end up wanting changes. Maybe the grin needs to be wider. Maybe the text should fit a specific rear window. Maybe the color needs to match trim, wheels, or a full vehicle theme.
That’s when a custom order starts making more sense than trying to force a generic listing onto a specific body style. A make your own custom sticker option gives you control over the final look instead of asking you to compromise around someone else’s template.
Who benefits most from premium vinyl
Some vehicles can get away with lower-tier materials for a while. Others can’t.
- Daily drivers need decals that still look clean after weather and washing
- Jeeps and trucks need stronger durability because they see mud, grit, and rough use
- Supporter and tribute vehicles deserve material that won’t cheapen the message
- Show builds need crisp edges and consistent finish because flaws stand out fast
If the decal matters to you, the material should match that level of importance.
Good Joker graphics aren’t about buying the wildest design in the search results. They’re about pairing the right artwork with the right vinyl so the finished vehicle looks deliberate from every angle.
Frequently Asked Questions About Joker Decals
Will a Joker decal damage my paint
Not if the paint is in sound condition and the decal is made from proper automotive vinyl. Problems usually come from weak paint, bargain adhesives, or rough removal. Use heat and patience when removing, and don’t rip cold vinyl off a panel.
Are Joker decals safe for car washes
Yes, if the decal was installed well and has had time to bond. Hand washing is the safest option. Automatic washes are less risky on smaller, well-adhered graphics than on older decals with exposed edges.
What size should I choose
Match the size to the panel, not just the listing photo. A windshield corner decal can look perfect at a small scale, while a hood or truck bedside needs much more presence. Measure the actual space and account for trim, body lines, and visibility.
Do matte or gloss decals last longer
Lifespan has more to do with the vinyl quality than the sheen. Matte and gloss both work well when the material is made for outdoor vehicle use. Choose the finish based on the look you want and the panel where it’s going.
Can I install one myself
Yes, especially if it’s pre-spaced on transfer tape and you prep the surface correctly. Smaller decals are very DIY-friendly. Larger hood and side graphics take more patience, and a second set of hands helps.
What’s the best placement for a first decal
Start with a rear window corner, side glass accent, or a modest hood graphic. Those placements give you visual impact without making the vehicle feel overdone. Once you know how you like the style, you can go bigger.
How do I know if a seller is cutting corners
Watch for vague listings. If the seller doesn’t clearly state the vinyl brand, outdoor suitability, install method, or finish, that’s a warning sign. Good decal makers are usually specific because they know the material matters.
If you want a Joker decal that looks sharp, installs cleanly, and holds up the way automotive vinyl should, take a look at Custom Sticker Shop. They’re a veteran-friendly, family-run shop in Topeka, Kansas, producing American-made Oracal vinyl decals with custom options for cars, trucks, Jeeps, and windshield banners.