
You’re probably here because you’ve had the same thought a lot of us have had in the driveway or at a stoplight. Your car feels like yours, your cat definitely feels like family, and a small decal seems like the cleanest way to put both in the same frame.
Sometimes it starts with a simple silhouette on the back glass. Sometimes it’s a peeking cat on a quarter window. Sometimes it’s more personal, like a memorial decal for the cat who used to ride shotgun in spirit every time you grabbed the keys. Whatever brought you here, the right cat car decal should look sharp on day one and still look right after weather, washing, and real miles.
That’s where people often get tripped up. They pick a design they love, then end up with the wrong material, the wrong placement, or a decal that fades early because nobody informed them about heat, salt, or legal window limits. A good-looking decal isn’t hard to find. One that still looks good long term, and doesn’t create visibility trouble, takes a little more care.
Show Your Feline Pride on the Road
A lot of drivers don’t want anything loud or gimmicky. They want one detail that says something real. Cat car decals work well for that because they can be playful, clean, understated, or sentimental depending on the design and where you place it.
A black cat silhouette in the lower corner of a rear window feels very different from a wide-eyed cartoon cat on a side glass. A memorial piece with wings and a name carries a different weight entirely. The point isn’t just decoration. It’s recognition. You’re putting a little piece of your life on the vehicle you use every day.
That matters even more if your cat is part of your routine beyond the house. If you travel with pets, moving day trips or longer drives can turn your car into part of your cat’s world, not just your own. If that’s your situation, these stress-free cat travel tips are worth a read before the next long ride.
Why these decals connect with people
Some vehicle graphics are about clubs, teams, or hobbies. Cat decals are more personal than that. They usually fall into one of a few familiar situations:
- Daily drivers with personality. You want your car to feel less anonymous in a parking lot.
- Cat parents with a favorite look. Maybe your cat has a distinct profile, ears, or stare that matches a certain decal style.
- Memorial use. A small angel-cat design can be a tasteful tribute when a collar on the mirror feels too private.
- Fun builds and weekend rigs. Jeeps, hatchbacks, compact trucks, and tuners all wear a clever peeking-cat graphic well.
A good decal doesn’t fight the vehicle. It looks like it belongs there.
What separates a smart purchase from a quick impulse buy
Most buyers start with style, but long-term satisfaction usually comes down to three practical choices:
| Decision | What matters most |
|---|---|
| Material | Whether the vinyl can handle weather, washing, and curved surfaces |
| Placement | Whether the decal looks balanced and stays out of the driver’s sightlines |
| Care | Whether you’ll wash and maintain it in a way that protects the edges and color |
Get those right, and cat car decals stop feeling like novelty stickers. They become part of the vehicle’s look.
Exploring the World of Cat Decal Styles
Style is the fun part. It’s also where people either nail the look or end up with something that doesn’t match the vehicle at all. The easiest way to choose well is to think in terms of mood, not just artwork.
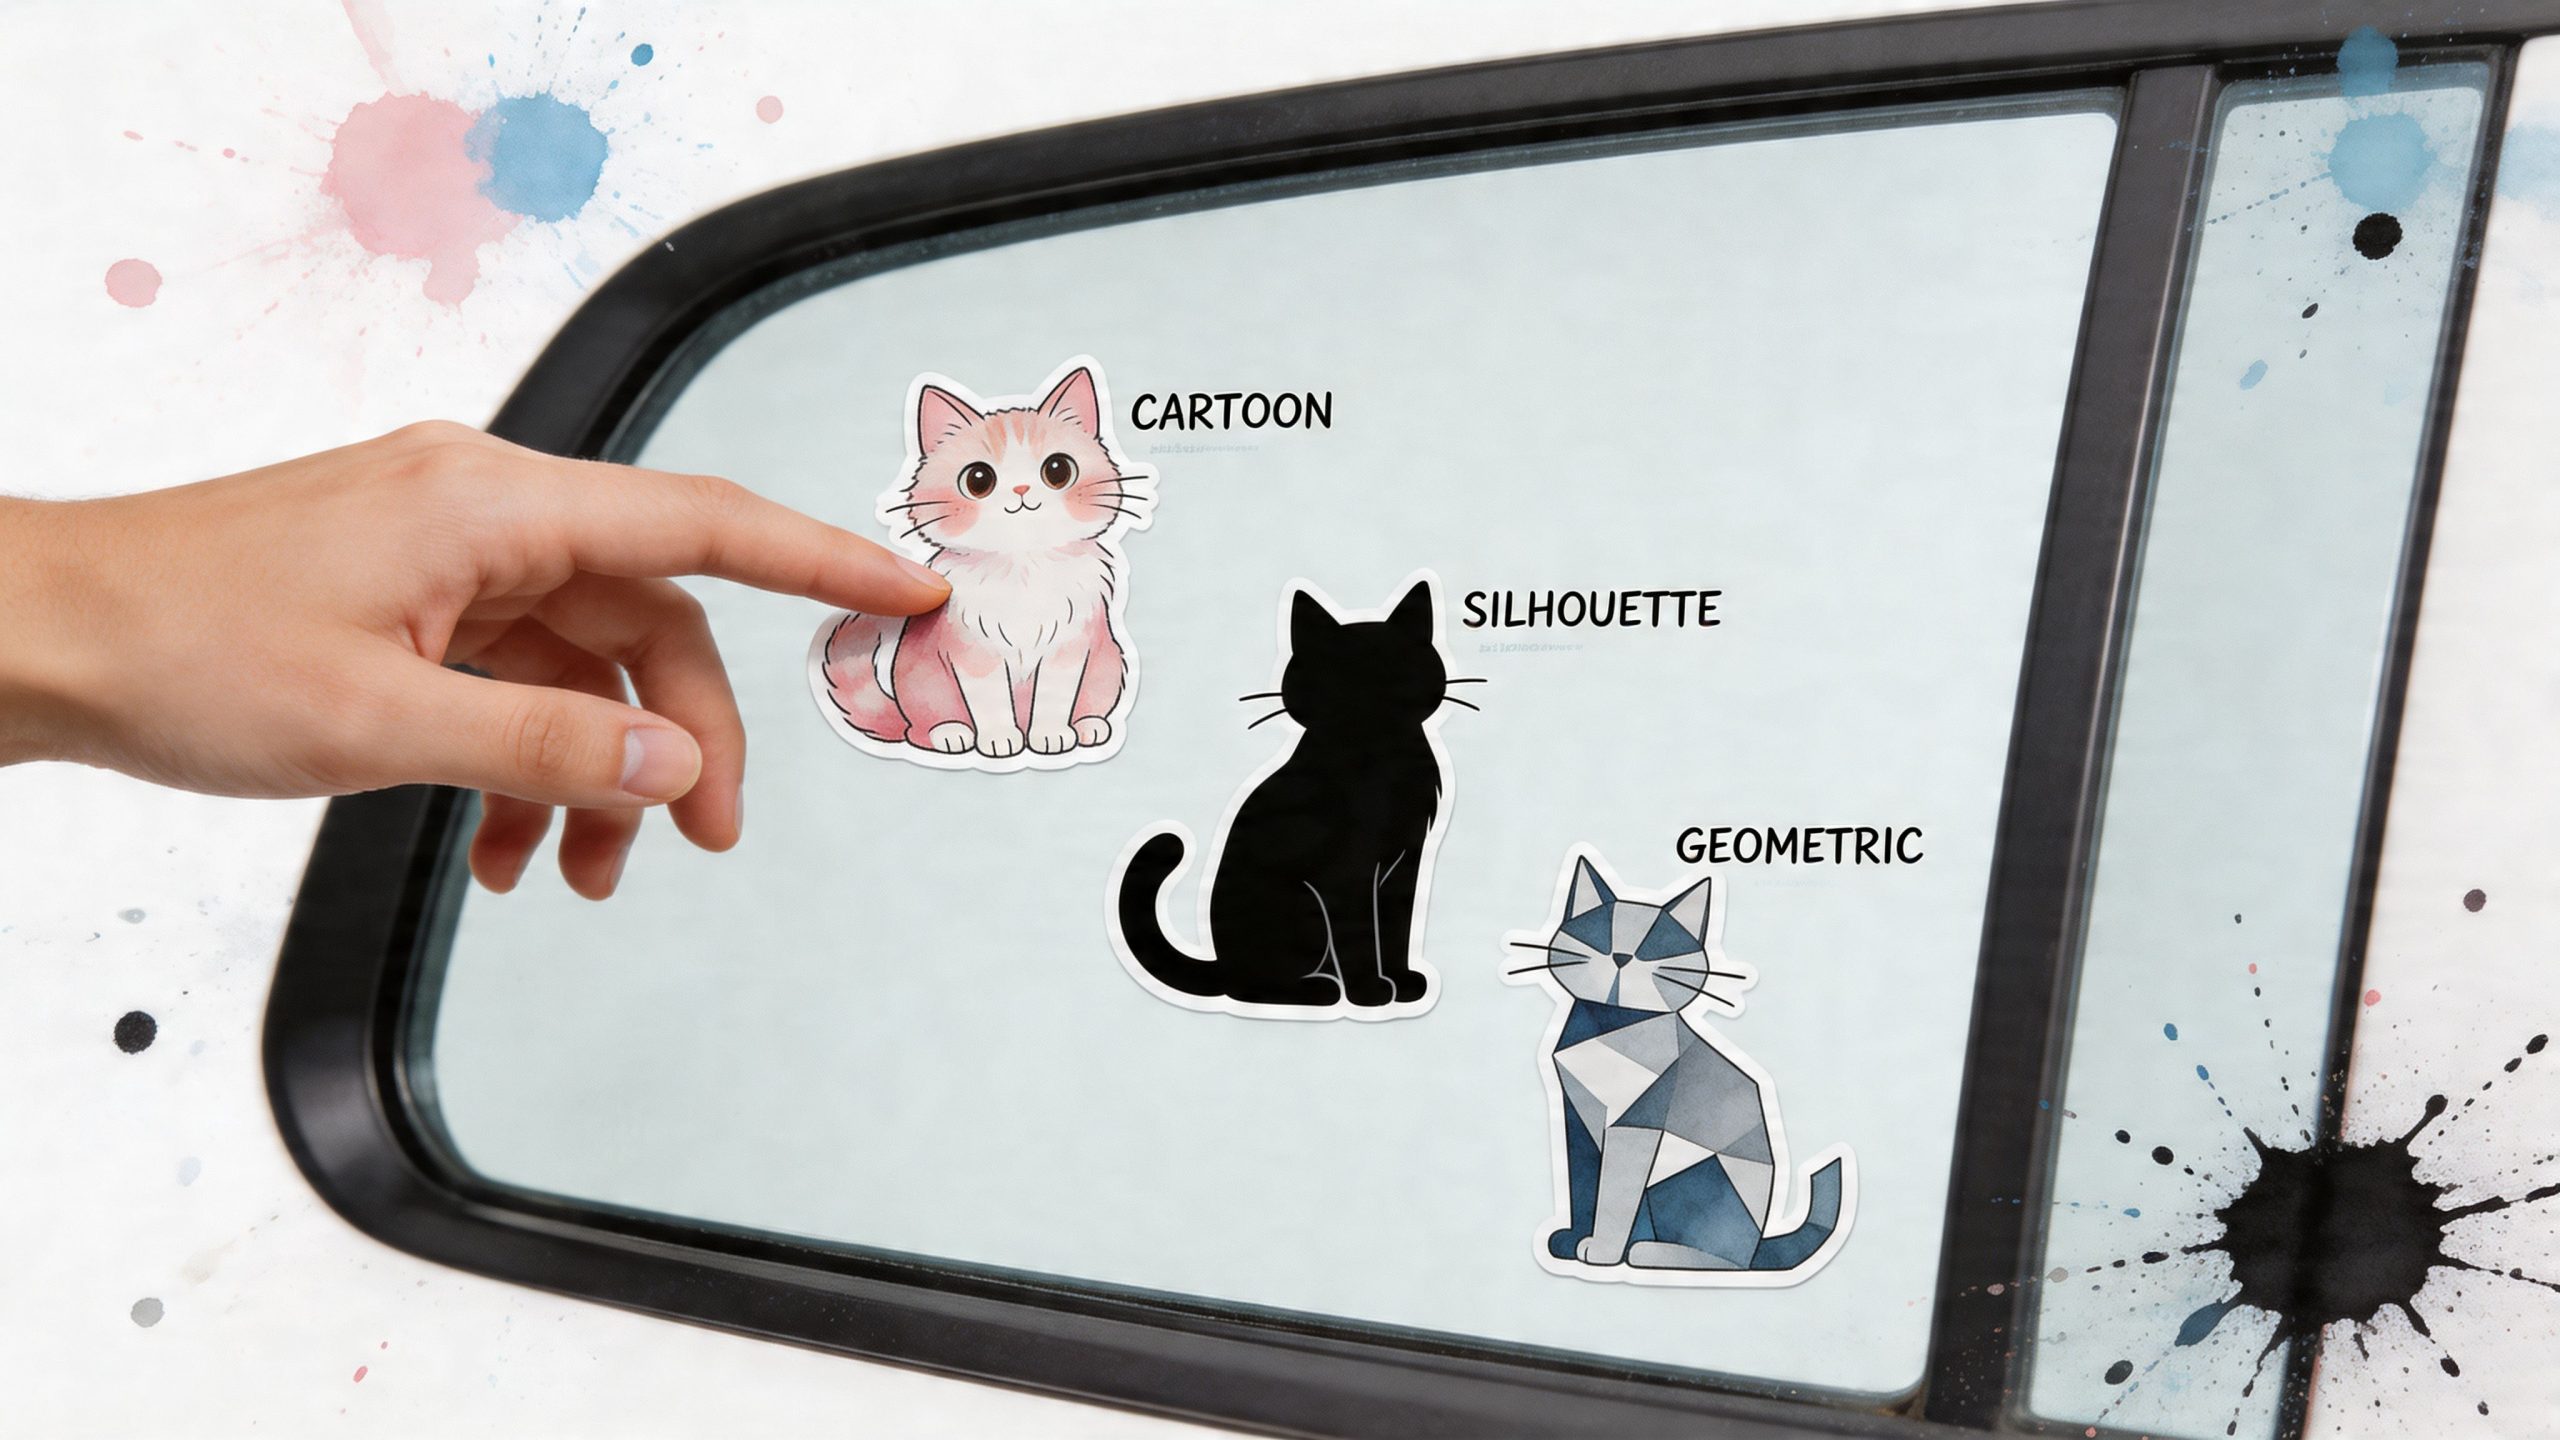
The playful styles
Peeking cats are probably the easiest win. They fit rear side windows, truck cab glass, and lower corners without taking over the whole vehicle. They’ve got humor, but they still read clean from a distance.
A design like a peeking cat decal for cars and trucks works because it uses the shape of the glass as part of the joke. The ears and paws create movement, and the decal feels integrated rather than pasted on.
Funny face decals and meme-inspired cats fit a different personality. If your vehicle already leans casual or quirky, these can work great. If your build is very clean and minimal, they can feel out of place fast.
The clean and understated looks
Silhouettes are the safe choice if you want cat car decals that age well visually. A solid black or white die-cut profile on rear glass, a hatch, or a body panel is hard to beat. It reads clearly, doesn’t clutter the vehicle, and pairs well with almost any paint color.
Geometric cats land in the middle. They’re more modern than a classic silhouette, but still cleaner than cartoon art. On newer crossovers, EVs, sedans, and monochrome truck builds, geometric designs often look sharper than playful line art.
Practical rule: If you’re not sure what style to choose, start with a silhouette. It’s the least likely design to feel dated a year from now.
Memorial and angel-cat decals
These deserve a different kind of attention. Memorial decals can be beautiful, but they’re also the category where people most often choose a design that’s too large for safe glass placement.
Angel wings, halos, paw prints, and names can all work. The best versions stay simple. Too much text, too many flourishes, or too large a layout can turn a tribute into visual clutter. This is especially true on rear windows where defroster lines and tint already add visual structure.
A better memorial decal usually has:
- A clear focal point. The cat shape or wings should lead the design.
- Limited text. A name or short date line keeps the tribute readable.
- Thoughtful scale. Smaller often feels more respectful and less busy.
Die-cut versus printed stickers
This is one of the most important style choices because it affects both appearance and wear.
Die-cut vinyl decals remove the background entirely. You only see the cat shape, outline, or lettering. That gives a cleaner, painted-on look and usually suits car windows best.
Printed stickers include a printed design on a larger material shape. They’re useful for full-color art, but they often look more like a label than a vehicle graphic. They also create more visible edges, which some drivers don’t like on glass.
If your goal is an integrated automotive look, die-cut is usually the better fit. If your goal is full-color character art, printed can make sense. It just creates a different visual effect.
Match the style to the vehicle
A quick way to narrow your options:
- Jeep or off-road build. Peeking cat, cat face, or rugged outline graphics
- Modern sedan or hatchback. Silhouette or geometric cat
- Family SUV. Friendly peeking cat or name-based window decal
- Memorial setup. Small rear-window angel design with minimal text
The right design should feel like your car and your cat at the same time.
Why Quality Vinyl Is Your Decal's Best Friend
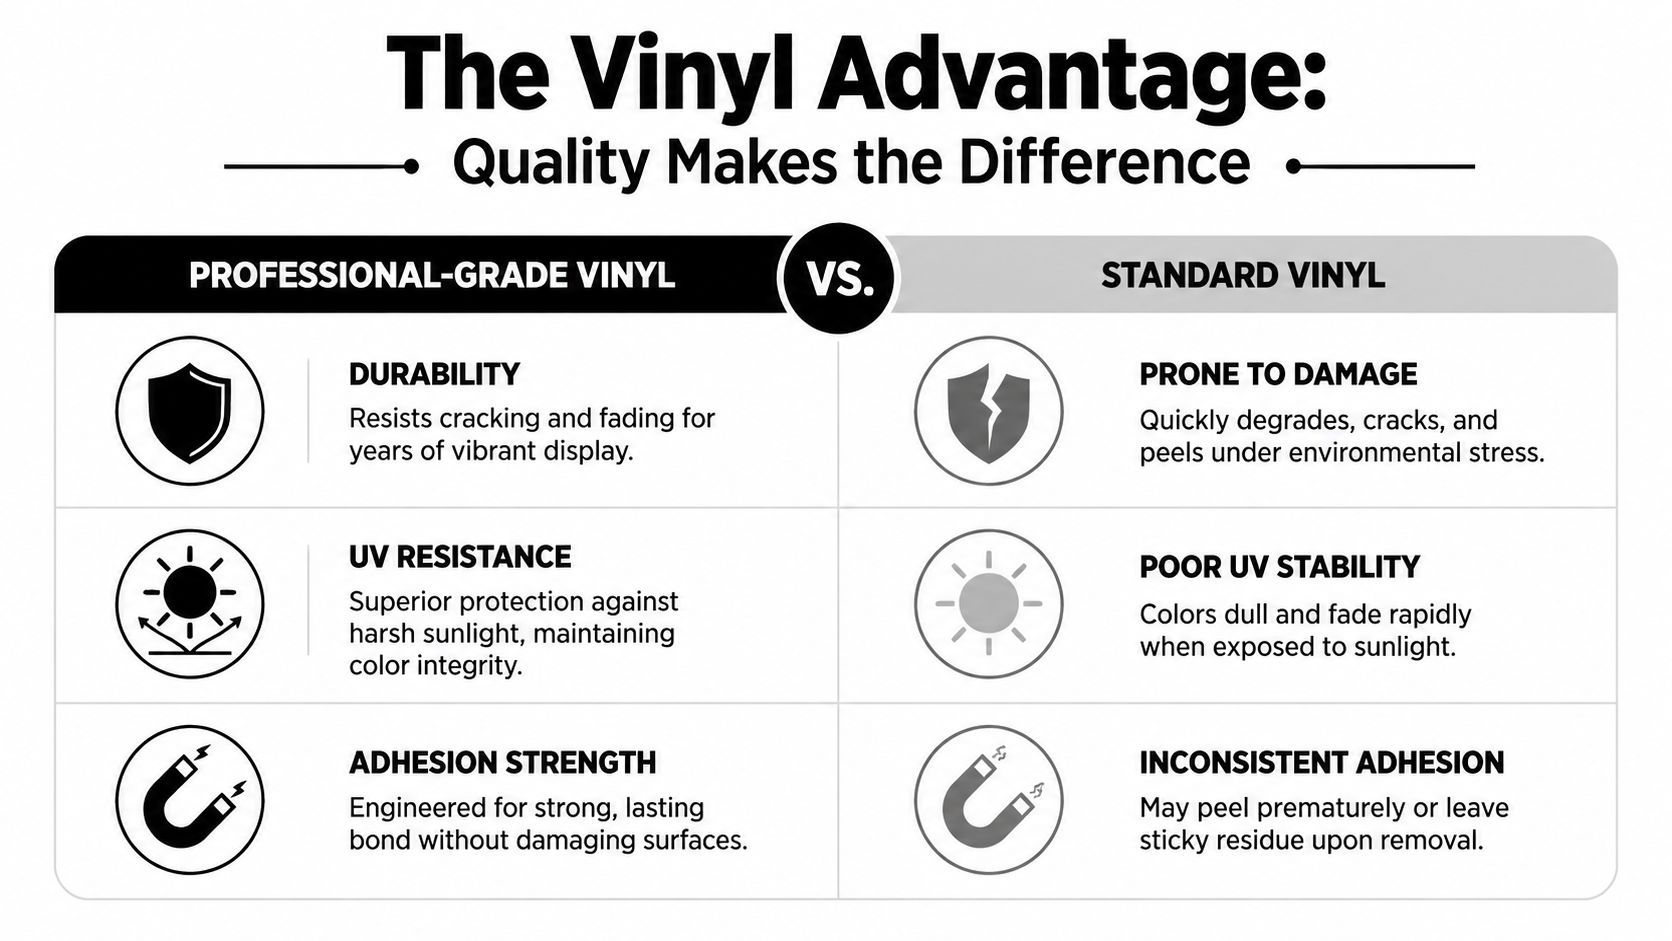
A cat decal spends its life in a rough environment. Sun bakes it, rain sits on the edges, road grit hits it at speed, and winter cold makes weak film stiff and brittle. If the vinyl is poor, even a great design starts looking cheap fast.
Professional-grade vinyl gives a decal two things that matter in real ownership. It keeps a clean shape on the vehicle, and it holds up through weather, washing, and temperature swings better than craft-grade material.
What quality vinyl changes in practice
The difference shows up on the car long before total failure. Better film settles onto glass and painted panels with less edge tension, which helps it stay flatter and look more like part of the vehicle. Cheap film often fights slight curves, shows a heavier edge, and starts collecting dirt where the corners never fully seat.
That matters even more if the decal goes on a daily driver parked outside. Heat, freezing nights, and repeated washing expose weak adhesive systems quickly.
Why thinner film often looks better
A lot of buyers assume thicker material is automatically tougher. In decal work, that is not usually how it plays out.
For rear glass, quarter windows, and lightly curved panels, a thinner cast or high-quality calendared film usually gives a cleaner result because it conforms more naturally. You get less visual bulk at the edge and fewer spots where air or tension can build up. That cleaner laydown is a big reason a simple die-cut cat graphic, such as a cat heartbeat window decal for cars and trucks, can look sharper than a more elaborate design made from lower-grade stock.
Where cheap vinyl usually goes wrong
Low-grade decals tend to fail in a familiar sequence.
The edges start catching dust. Sun exposure dulls the surface. Corners begin to lift, especially on spots that see wash brushes, rear wiper contact, or ice scraping. Once that starts, the decal rarely recovers. Dirt gets under the edge, moisture follows, and the graphic loses that painted-on look buyers want.
In very hot climates, poor film can soften and shrink enough to distort fine details. In cold climates, it can stiffen and crack sooner during removal or after repeated freeze-thaw cycles. Those are the long-term ownership problems a product photo never shows.
| Professional-grade vinyl | Generic craft-grade vinyl |
|---|---|
| Conforms better to curved glass and panels | Resists contour and shows stress at edges |
| Keeps a cleaner finish outdoors longer | Fades and dulls faster in sun |
| Handles washing and temperature swings better | Peels, shrinks, or turns brittle sooner |
| Gives a more integrated automotive look | Looks more like a temporary sticker |
Die-cut quality is visible from the curb
Material quality affects appearance right away. Cleanly cut film, stable adhesive, and proper transfer tape produce sharper lines and more consistent spacing. From ten feet away, that often matters more than having extra artwork details.
This is why I tell buyers to ask practical questions before they order:
- Is the vinyl rated for outdoor vehicle use?
- Is the design die-cut, or printed on a larger sticker shape?
- Is transfer tape included for accurate alignment?
- Is the adhesive intended for glass, paint, or both?
- Will the film hold up in the climate where the vehicle lives?
Those last two questions get overlooked all the time. A decal in Arizona, Florida, or Minnesota has a harder job than one parked in a mild garage-kept environment. Material choice should reflect that.
Custom Sticker Shop uses professional outdoor vinyl with transfer-taped application on vehicle decals. That setup gives buyers a better shot at a clean install, cleaner edges, and longer service life.
Buy the cat design because it fits your car and your personality. Judge the decal itself by the vinyl.
Sizing and Placing Your Decal Safely and Legally
You clean the glass, line up the decal, and it looks perfect from ten feet back. Then you sit in the driver’s seat and realize the cat ears land right where you check traffic or use the mirror. Good placement has to work from both angles. Outside the vehicle and behind the wheel.
Start with the vehicle, not just the decal
Size should match the panel or glass area you’re using. A small peeking cat can look sharp in a lower rear corner. A medium silhouette or line-art design usually has enough presence for a rear side window. Larger memorial graphics and text-heavy layouts need more empty space, especially on compact cars where the rear glass is already doing a lot of work.
I usually tell buyers to mock up the size with painter’s tape before ordering or installing. It takes two minutes and prevents the most common mistake, which is buying a design that looked balanced on a product photo but crowds the actual vehicle.
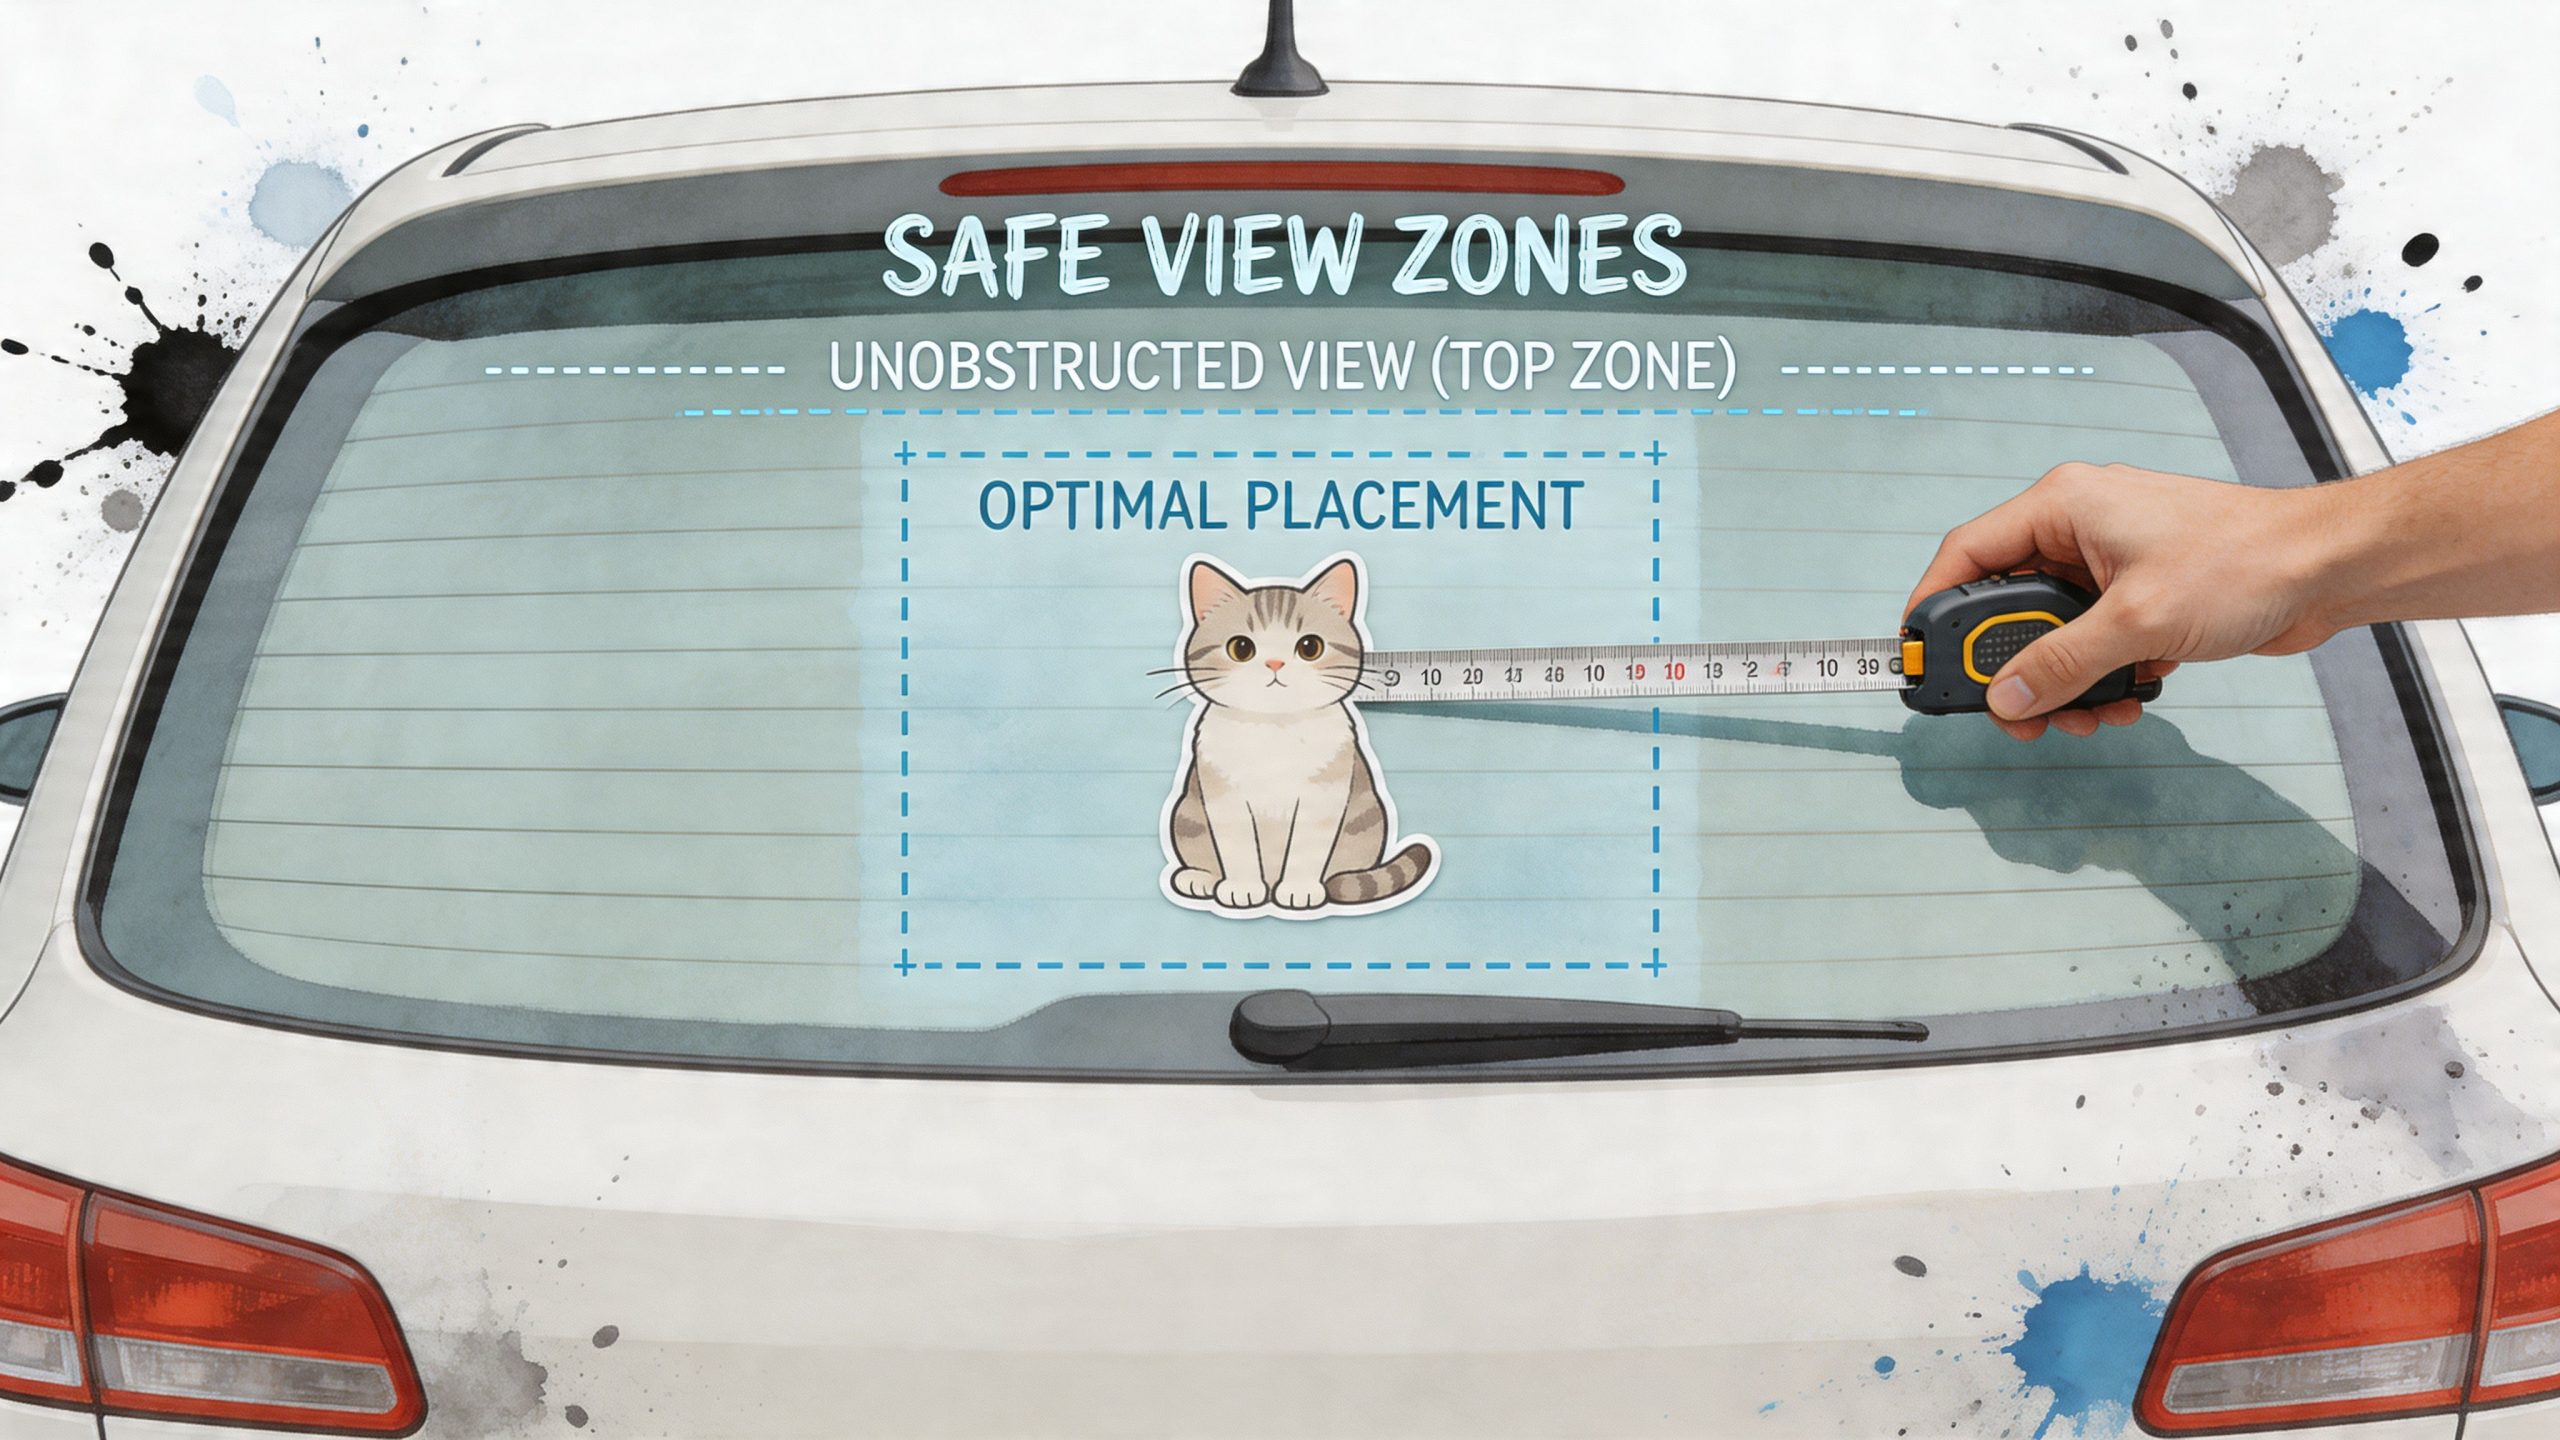
Rear glass is usually the safest choice
Rear windows, rear side windows, and quarter glass are the placements I recommend most often because they keep decorative graphics away from the driver’s primary forward view. Painted body panels can also work well if you want a cleaner, more integrated look and you have enough contrast against the paint.
A design such as a cat heartbeat window decal for cars and trucks usually reads clearly on rear glass or a rear side window, where the linework stays visible without competing with sightlines.
Front glass is where people get into trouble. What looks small from outside can still block a traffic signal, a pedestrian, or part of a mirror check once you are seated normally.
Legal placement varies by state, so check your local rule before you stick anything on front glass
There is no single national decorative-decal rule that covers every passenger vehicle in every state. Windshield and front side window restrictions are commonly handled at the state level, and tint laws often overlap with obstruction rules. The safe practical rule is simple. Keep decorative cat decals off the windshield and front side windows unless you have verified the placement is legal where the vehicle is registered and driven.
For a general federal reference point, the National Highway Traffic Safety Administration explains visibility requirements under Federal Motor Vehicle Safety Standard No. 104, which is one reason anything in the swept viewing area deserves extra caution.
Sellers often skip this part. I do not. A decal should show your cat pride, not create a ticket risk or reduce visibility in bad weather.
Check these five things before final placement
- Driver sightline. Sit in the normal driving position and confirm the decal stays out of your natural forward scan.
- Mirror use. Make sure it does not interrupt your use of the rearview mirror or side mirrors.
- Defroster lines. On rear glass, check whether fine details will break up across heavier defroster elements.
- Rear wiper sweep. If the vehicle has a rear wiper, avoid placing delicate linework where the blade passes constantly.
- Climate exposure. Vehicles parked in intense sun, deep cold, or frequent ice benefit from placements that avoid high-stress edges, tight curves, and heavy wiper contact.
That last point matters more than many buyers expect. In Arizona heat, Florida humidity, or a Midwest winter, a decal placed on a flatter, less abused section of glass usually lasts longer than one fighting wipers, frost scraping, and constant edge lift.
Memorial decals need extra restraint
Memorial and angel-cat designs carry more emotion, so buyers tend to size them up. The better approach is usually a clean rear placement with enough breathing room around the artwork. Rear hatch glass, rear side glass, and smooth painted panels all give tribute decals visibility without putting them in a legally questionable or distracting spot.
A well-placed decal feels intentional every time you walk up to the car. It also stays out of the way every time you drive it.
How to Personalize Your Purr-fect Decal
Once you’ve chosen the basic style, the small custom decisions make the decal feel like it belongs to your vehicle and your cat, not just any cat.
Personalization works best when it solves a visual problem or adds meaning. It doesn’t work when every possible option gets piled into one design. A decal is still a vehicle graphic, so restraint usually looks better than overbuilding.
Pick a color that works with the paint
The easiest mistake is choosing a vinyl color you like in isolation instead of one that reads clearly on the car.
Dark vehicles usually carry white, silver, or lighter neutral vinyl well. Light vehicles often look better with black, dark gray, or a strong contrasting color. If you have tinted rear glass, remember that the tint changes the decal’s final look. A subtle shade can disappear on dark tint even if it looked strong on the screen.
Etched-glass style vinyl is worth considering if you want a softer look. It’s quieter than a solid opaque color and can work nicely for memorial designs or understated side glass placement.
Add text only if it earns its spot
A cat’s name, nickname, or memorial date can make a basic silhouette much more personal. The key is to keep the text secondary.
Good personalization choices:
- A name under a silhouette
- A short memorial line
- A mirrored left-right pair for rear side windows
- A breed or personality cue in simple text
Less effective choices usually involve too many fonts or too much wording. If a driver behind you can’t read it cleanly, the extra text probably isn’t helping.
Think about orientation and mirror cuts
Some decals look better facing forward. Others make more sense as a pair, especially on side windows. Mirrored cuts are useful when you want symmetry on both sides of the vehicle or when a peeking cat should appear to look inward rather than away from the body line.
Interior placement is another design choice, though it changes the look a bit because the glass sits between the viewer and the vinyl. For some drivers, that’s worth it to protect the decal from weather and wipers. For others, the sharper outside-applied look is more important.
Build your own if you have a specific cat in mind
If you’ve got a distinct idea, maybe your cat’s name, a memorial phrase, or a custom arrangement of text and graphic, a make your own custom sticker setup can be the cleanest route.
The best custom work usually starts from one clear idea, not five. Pick the cat graphic first. Then choose one supporting element, such as a name or date. That’s usually enough to turn a stock design into something personal and well composed.
A Simple Guide to Flawless Installation and Removal
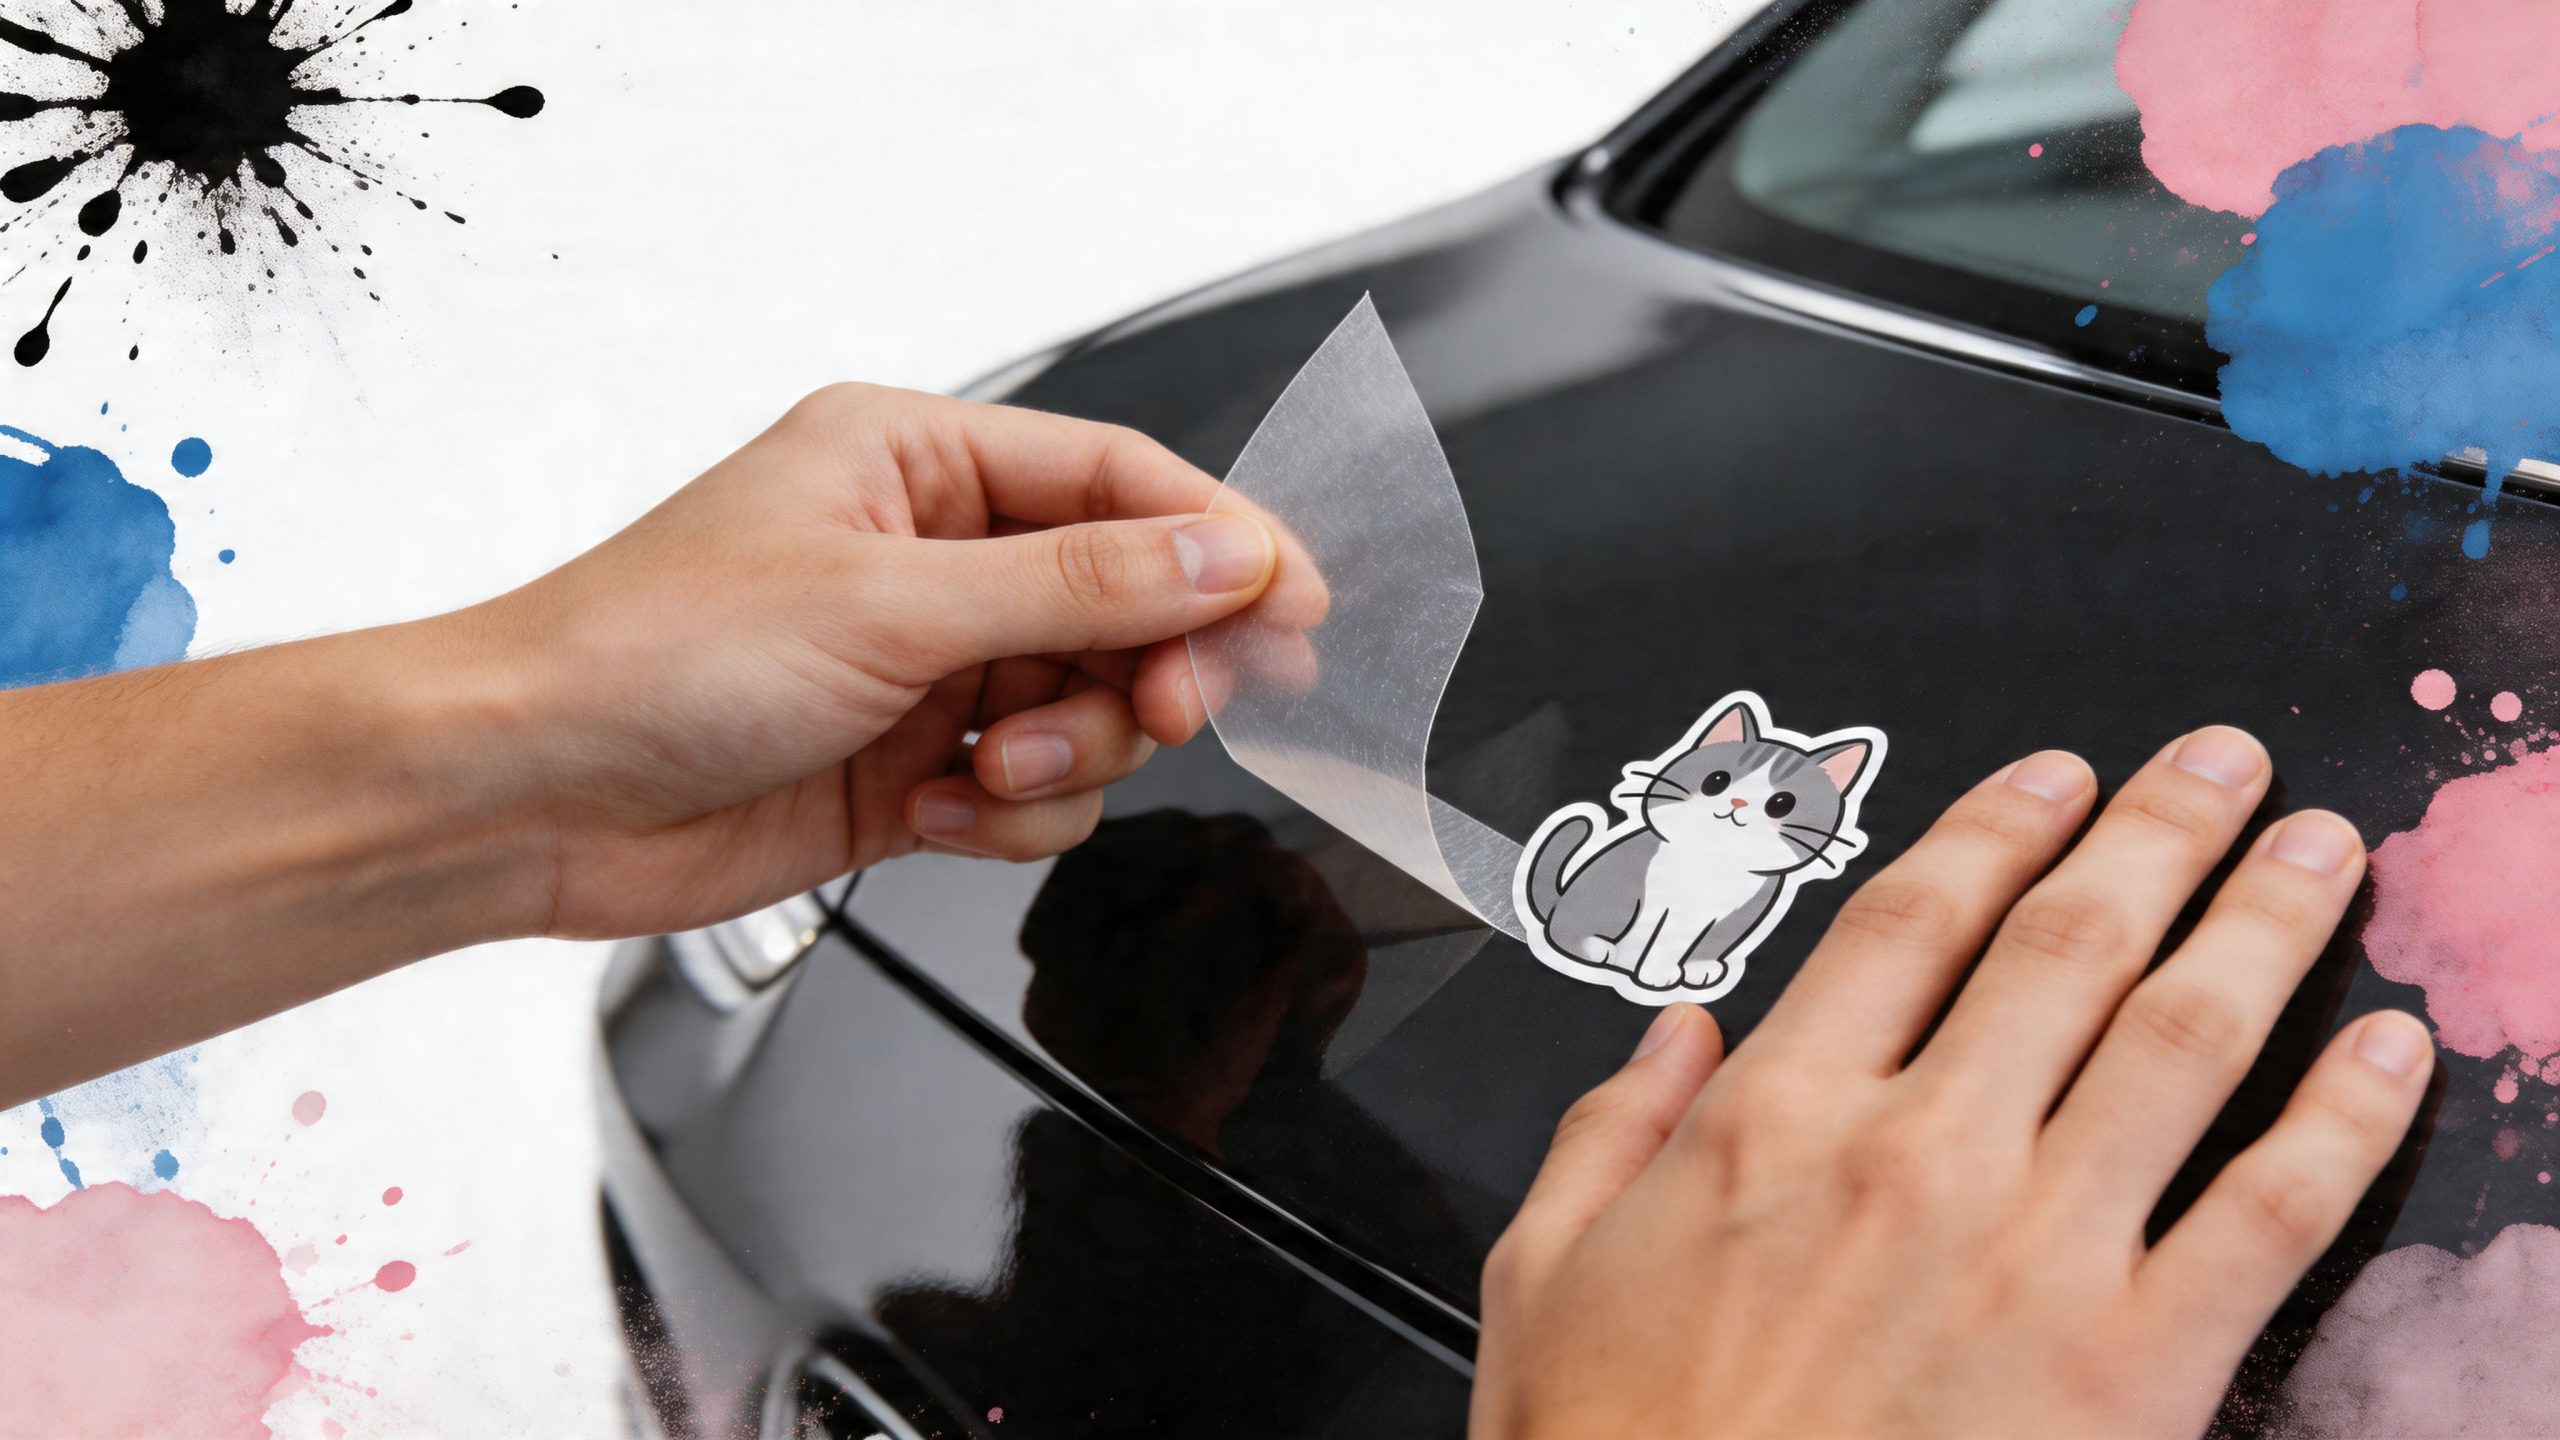
Application scares first-time buyers more than it should. A quality decal install is mostly about preparation and patience, not special talent.
Pre-masked decals make the process much easier because the transfer tape keeps all the pieces aligned while you place the graphic. That matters a lot with cat car decals that include whiskers, tails, small text, or separate shapes.
Get the surface right first
A bad install usually starts before the decal ever touches the car. Dirt, wax residue, dressing products, and moisture all fight adhesion.
Use this sequence:
- Wash the area with plain car-safe soap and water.
- Dry it completely with a lint-free towel.
- Wipe once more to remove any remaining residue.
- Check temperature. Avoid installing on very hot panels, very cold glass, or in direct harsh sun if you can.
The surface should feel clean and squeak-free, not slick.
Use the hinge method
The hinge method gives you control and reduces crooked installs. It’s simple.
- Tape the decal in position with painter’s tape while the backing is still on.
- Step back and inspect spacing, level, and how it sits with trim lines or window edges.
- Create a hinge along one side or across the top with the tape.
- Lift the decal, peel the backing away, then lower it slowly back onto the surface.
Once it touches, don’t mash everything at once. Start from the center and work outward with a squeegee or firm plastic card wrapped in a soft cloth.
Press from the middle out. That’s how you move air away from the edges instead of trapping it.
Remove the transfer tape slowly
This is the part people rush, and rushing causes lifting.
After you’ve pressed the decal down well, peel the transfer tape back slowly at a sharp angle. Don’t yank it upward. If a small part of the decal comes up with the tape, lay it back down and squeegee that section again before continuing.
For fine details like whiskers or tiny text, slower is always better.
A visual walkthrough helps if you want to see the motion and pacing before you start:
Common installation mistakes
Here are the issues that show up most often:
- Crooked placement. Fix this before peeling the backing, not after.
- Dirty glass or paint. Even a clean-looking panel can have residue that causes edge trouble.
- Installing in bad conditions. Wind, cold, or blazing hot glass makes the job harder.
- Pulling transfer tape too fast. Fine parts can lift if you hurry.
- Touching the adhesive too much. Oils from your fingers reduce tack.
Safe removal without drama
Good vinyl can come off cleanly when you remove it correctly. The trick is to soften the adhesive and avoid aggressive scraping.
Start with low, gentle heat from a hair dryer or heat gun on a cautious setting. Warm a small area, lift a corner with your fingernail or a plastic edge, and peel slowly. If adhesive remains, use an automotive-safe adhesive remover and a soft cloth.
Avoid metal scrapers. Avoid brute force. Avoid ripping at cold vinyl.
A short removal checklist
| Do this | Skip this |
|---|---|
| Warm the decal gently first | Peel cold brittle vinyl |
| Use plastic tools if needed | Use razor blades on paint or glass without reason |
| Work slowly in sections | Yank large sections fast |
| Clean leftover adhesive after removal | Leave residue to bake in the sun |
A careful install and a calm removal are what make decals feel easy to live with.
Long-Term Care for Your Decal in Any Climate
You notice long-term decal quality in month six, not day six. A cat decal can look great right after installation and still fail early if the vinyl, adhesive, or placement does not match your climate.
Heat, UV, road salt, and freeze-thaw cycles all age vinyl in different ways. Cheap film usually shows the problem first at the edges, then in the color, then in the adhesive.
Hot and sunny climates
Constant sun is hard on both pigment and adhesive. In hot regions, the biggest enemies are UV exposure, baked-on grime, and repeated heat buildup on glass or dark paint.
A few habits make a real difference:
- Rinse dust off before wiping
- Wash with a soft mitt or microfiber cloth
- Avoid aggressive scrubbing along fine points and edges
- Use shaded or covered parking when practical
Placement matters here. Upper rear glass, rooflines, and hoods take more punishment than lower body panels or rear side glass. If the goal is a decal that still looks sharp after years of summer exposure, a slightly less exposed spot usually lasts longer.
Cold, salty, and wet regions
Winter creates a different kind of stress. Salt dries at the edges, slush carries grit, and freeze-thaw cycles can work on any weak bond point.
In snowbelt, mountain, and coastal areas, routine rinsing matters more than fancy products. Salt left sitting around the edge line is what shortens the life of many decals.
Use this approach:
- Rinse off salt and road film regularly
- Keep ice scrapers off the vinyl
- Dry the area after washing when possible
- Check corners and narrow details before minor lift spreads
Most failures start at an edge or tip, not in the center.
Washing and routine care
Treat the decal like part of the vehicle finish. Wash it gently, avoid abrasive brushes, and do not blast the edges with high-pressure water from close range. That is one of the fastest ways to shorten the life of a perfectly good decal.
For long-term ownership, legal and safe placement still matters after installation. A decal that holds up for years does you no good if it sits in a spot that interferes with visibility or runs afoul of local window rules. Rear glass and rearward side glass are usually the safer choices, but state regulations vary, especially on driver sightlines and windshield coverage.
Good vinyl is low maintenance, not no maintenance. If you keep it clean, keep salt and grime from building up, and choose a climate-appropriate location from the start, your cat decal has a much better chance of aging like it belongs on the car.
Frequently Asked Questions
Will a cat car decal damage my paint?
Automotive-grade vinyl on factory paint is generally safe. Problems usually come from weak or failing clear coat, repainted panels with poor prep, bargain vinyl with aggressive adhesive, or rough removal.
In the shop, I worry more about the condition of the paint than the decal itself. If the surface is chalky, peeling, or already lifting, any adhesive product can pull at that weak spot. On sound OEM paint, a quality decal should remove cleanly with heat, patience, and the right adhesive cleaner.
Are cat car decals safe in a car wash?
Yes, once the decal has fully bonded. Hand washing is still easier on fine lines and small tips, but a properly installed decal can handle normal washing.
The primary trade-off is wear rate. Touchless washes are gentler on edges than heavy brush systems, and any wash gets riskier if the nozzle or brush keeps hitting a pointed ear, whisker detail, or narrow tail section. If your design has delicate cut lines, washing technique matters as much as vinyl quality.
Is glass or paint the better place to install one?
Both work. The better choice depends on visibility, removal plans, and local rules.
Glass is usually simpler if you may remove the decal later, and it often gives the cleanest contrast on rear windows. Paint can look more integrated, especially on tailgates, quarter panels, and hatch areas. For safety and legal compliance, decorative decals are usually a better fit on rear glass or rear side windows than on the windshield or front door glass. State rules vary, so check your local tint and obstruction laws before placing anything in a driver sightline.
What style lasts the best?
Simple die-cut shapes usually age better than intricate artwork. A clean cat silhouette, face outline, or tail design gives dirt fewer places to collect and gives the adhesive fewer tiny points that can start lifting.
That matters even more in harsh climates. In desert heat, tiny details dry out faster at the edges. In snow and coastal conditions, salt and grime build up around narrow cuts and corners first.
Can I remove it later without leaving a mess?
Usually yes. Warm the vinyl, peel slowly at a low angle, and clean any residue with an automotive-safe adhesive remover and a soft towel.
Older decals can take more time, especially after years of sun exposure. That does not always mean the vinyl was poor quality. It often means the decal did its job for a long service life and bonded tightly through years of heat, cold, and washing.
How long does shipping usually take, and are there bundle offers?
For buyers ordering from Custom Sticker Shop, orders typically arrive in 5 to 8 days from order to door, and the shop offers an unlimited Buy 2 Get 1 Free deal along with free U.S. shipping on orders over $25. Those details come from the company’s published store information, so confirm current checkout terms if timing matters.
If you’re ready to put your cat’s personality on your vehicle without guessing on material, sizing, or placement, take a look at Custom Sticker Shop. They offer American-made vinyl decals, pre-spaced transfer-taped installs, and cat-themed options that fit everything from daily drivers to trucks and Jeeps.