
You’re probably looking at your hood right now, or at least thinking about it. The truck runs fine, the Jeep looks good from ten feet away, the car still turns heads, but it doesn’t quite have that finished look. A racing stripe sticker is one of the fastest ways to change the whole personality of a vehicle, but it also has a way of exposing every shortcut in prep and installation.
That’s the part most tutorials skip. They act like every vehicle has fresh factory paint, perfectly flat panels, and a garage with ideal lighting and temperature. Real customers show up with repainted hoods, repaired fenders, light orange peel, old wax in panel seams, and trim pieces that aren’t centered. That’s normal. If you know how to work around it, you can still get a result that looks clean and lasts.
More Than a Sticker It's a Statement
A stripe changes more than color. It changes how the body lines read. A plain hood starts looking longer, a roofline feels lower, and a truck or Mustang suddenly picks up some visual tension that wasn’t there before.
That appeal isn’t new. Racing stripes started in 1951, when Briggs Cunningham ran white C-2R race cars with two blue center stripes at Le Mans to represent U.S. racing colors and help spectators identify the cars at speed, as detailed in this history of racing stripes and iconic cars. The look became part of street-car culture when the 1965 Shelby Mustang GT350 offered them from the factory.
Why the look still works
Stripes carry racing history, but they also solve a styling problem. A lot of vehicles, especially modern ones, have bulky sheet metal and interrupted body lines. A properly scaled stripe ties the hood, roof, and rear together and gives the eye one clean path to follow.
Shop truth: A stripe looks expensive when it matches the vehicle’s shape. It looks cheap when it fights the body lines.
That matters whether you’re dressing up a weekend toy or adding a stronger identity to a daily driver. If you like the broader heritage behind vehicle graphics, this guide for motorsport career professionals gives useful context on how livery and visual identity function in racing.
Small graphics count too
Not every project needs full hood-to-trunk coverage. Fender accents and hash marks can give you the same motorsport vibe with less commitment and less installation risk. A set of Mustang 3-inch fender hash decals is a good example of a smaller-format stripe treatment that still changes the attitude of the car.
A family-run decal shop sees this all the time. Customers rarely buy stripes just because they want vinyl on paint. They buy them because they want the vehicle to say something clearer than stock ever did.
How to Choose the Right Racing Stripe Sticker
Buying the wrong stripe kit causes more headaches than installing the right one. Material, width, finish, and layout all matter, and each one changes both the look and the difficulty of the job.
Start with vinyl type
For automotive stripes, cast vinyl is the material to look for. It conforms better, handles curves better, and lasts longer outdoors than bargain material made for temporary graphics. Verified trade data notes that high-performance racing stripe stickers typically use 2 to 3 mil cast vinyl and are rated for 5 to 7 years of outdoor durability under mixed UV and weather exposure in North America and Western Europe, according to this automotive stripe application guide.
Cheap material usually tells on itself fast. It resists curves, shrinks harder, and lifts sooner at edges and seams. On a flat trailer panel you can get away with more. On a hood with crown, washer nozzles, or heat, you usually can’t.
Match stripe scale to the vehicle
Good taste matters more than trend-chasing. A stripe that looks balanced on a Challenger can overwhelm a compact coupe. A thin stripe on a full-size pickup can disappear unless the color contrast is strong.
Use this as a practical sizing mindset:
| Vehicle type | What usually looks right |
|---|---|
| Compact car | Narrower layouts, cleaner gaps, less visual weight |
| Muscle car | Medium to bold center stripes with clear panel alignment |
| Truck or SUV | Wider stripes or stronger contrast so the design doesn’t get lost |
| Jeep or off-road build | Broken layouts, hood-focused graphics, or accent stripes that work with hinges and latches |
Those aren’t hard rules. They’re a reminder to judge the stripe against the whole vehicle, not the product photo.
Finish matters more than people expect
Gloss stripes on gloss paint give you an old-school factory look. Satin on gloss paint reads more modern. Matte can look sharp, but it also highlights dust, fingerprints, and poor edge work.
A few buying notes help:
- Gloss for factory style: Works well on Mustangs, Camaros, and classic-inspired builds.
- Satin for contrast: Good when you want the stripe visible without looking loud.
- Matte for custom builds: Best on vehicles that already have a more aggressive styling theme.
If you want a one-off design instead of an off-the-shelf kit, a make your own custom sticker option gives you more freedom on dimensions and layout.
One trade-off most buyers miss
Appearance can affect how the vehicle is perceived beyond the driveway. Recent surveys of automotive-insurance underwriters from 2023 to 2025 found that 15 to 25% of insurers consider aggressive visual treatments, including racing stripes, as part of risk scoring for performance-oriented vehicles, though the effect is usually modest, especially unless the vehicle is already mechanically modified, as noted in this insurance-related overview of racing stripe styling.
A stripe won’t usually create a problem by itself, but if your car already has wheels, suspension, exhaust, or power mods, the complete package is what people see.
That’s worth keeping in mind for JDM builds, lifted trucks, and Jeeps with a lot going on visually. If you want a strong look without pushing too hard, broken stripes, shorter hood treatments, or tapered graphics often feel more intentional than one uninterrupted line from nose to tail.
Essential Prep Work for a Flawless Finish
Most stripe failures don’t start during installation. They start before the backing paper comes off. Dirt, wax, polishing oils, trapped moisture, and bad measuring create the kind of mistakes that even good vinyl can’t hide.
The tools that actually matter
You don’t need a body shop. You need a clean work area and a short list of tools you’ll use:
- Microfiber towels: Use clean ones only. Fabric softener residue and old polishing dust can sabotage the surface.
- Spray bottles: One for wash solution, one for final cleaning or application fluid.
- Masking tape: For reference lines, dry test-fitting, and hinge placement.
- Tape measure: A real one, not guesswork by eyeballing trim.
- Squeegee with soft edge: Felt or a wrapped edge helps protect the transfer tape and finish.
- Sharp knife: A fresh blade gives cleaner trimming and reduces drag.
Add a heat gun later for finishing, but don’t start there. Prep is where the clean job is won.
Clean in stages, not in one pass
A quick wash isn’t enough. Road film, wax residue, and compound dust collect in panel edges and around badges. If you wipe once and call it done, the stripe will find that contamination even if you don’t see it.
A dependable prep sequence looks like this:
- Wash the vehicle normally. Remove loose dirt first.
- Dry it completely. Water hiding around trim and seams always shows up at the wrong moment.
- Clean the target panels again. Focus on hood, roof, trunk, and the inches around the stripe path.
- Check seams and edges by hand. If a panel edge still feels slick, it’s not ready.
Practical rule: If the towel glides like it’s on wax, the panel needs more cleaning.
Find the true center
One of the most common DIY mistakes is centering the stripe off a badge, grille opening, washer nozzle, or hood bulge that isn’t centered to the panel. Verified guidance from installers warns against using trim as a reference, because misalignment can show up across seams and gaps when the panel center isn’t measured correctly.
Use the panel itself. Measure width at the front, middle, and rear of the hood. Mark the midpoint each time. Then connect those points with masking tape to create your visual guide. Repeat the process on the roof and trunk instead of assuming one line will carry through by eye.
Repainted panels need extra caution
This is the part truck and Jeep owners run into all the time. The hood was resprayed after a rock-chip repair. The fender got blended. The roof has one clear coat texture and the hatch has another.
Before applying a racing stripe sticker over repaired paint, check for:
- Overspray roughness: It can weaken contact at the edges.
- Soft fresh paint: If the finish still feels tender, wait.
- Texture changes: Heavy orange peel or sanding marks reduce full contact.
- Panel seam contamination: Dust and compound often hide there.
A stripe can look excellent on repaired paint, but only if you respect what you’re applying over.
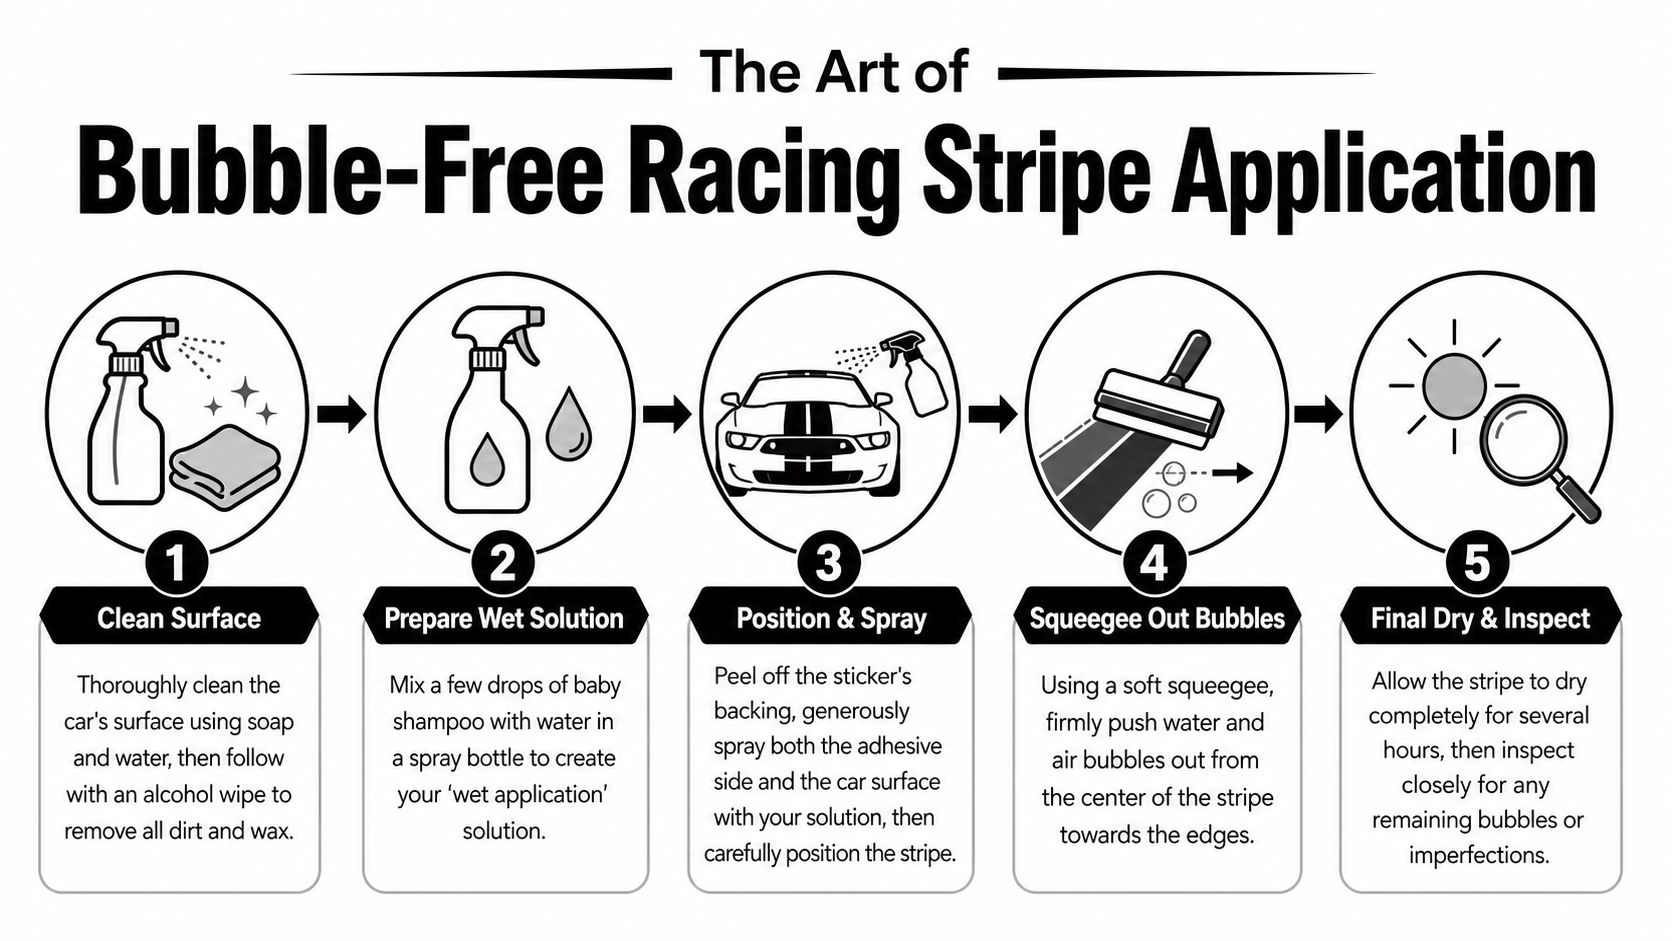
The Art of a Bubble-Free Application
The hard part usually shows up after the stripe leaves the backing paper. On a truck hood with a few stone chips, a Jeep cowl with texture, or a repainted panel that is not perfectly uniform, vinyl can grab in one spot and float in another. That is why controlled placement matters more than speed.
For a quick visual walkthrough, this infographic helps frame the flow of the job.
Why wet install works better
For many DIY installs, the wet method gives better control because the stripe does not lock down the instant it touches the panel. You get a short working window to straighten the run, check the gap, and correct a small drift before you squeegee it into place.
That extra forgiveness matters even more on imperfect surfaces. A repainted hood may have slightly different texture from front to rear. An older truck may have tiny chips or repaired spots that change how the adhesive makes contact. A wet install helps you settle the film evenly instead of fighting it dry.
If you want a ready-to-apply format, a universal truck stripe kit set of 2 keeps the stripe spacing fixed during placement, which removes one common DIY mistake.
The wet-install sequence
Use a clean spray bottle with water and a small amount of dish soap. The mix should feel slick, not sudsy. Too much soap slows bonding and makes the stripe slide longer than you want.
Work in this order:
- Dry-fit the stripe first. Tape it in place and check it from the front corner, side view, and standing height.
- Build a masking-tape hinge. A center hinge or top hinge keeps the stripe located while you peel the liner.
- Peel the backing paper slowly. Support the vinyl so it does not curl under and stick to itself.
- Mist the panel and adhesive side lightly. Cover the area evenly without flooding it.
- Lay the stripe down with light contact. Let it rest on the surface while you confirm alignment.
- Start from your reference marks. Lock the center first, then work outward in sections.
How to squeegee without trapping water
Start in the middle and push outward with overlapping passes. Use steady pressure. Too light, and you leave water behind. Too aggressive, and you can wrinkle the transfer tape or drag the stripe off line.
A simple pattern works well:
- one pass down the center
- angled strokes to the left and right
- short cleanup strokes toward the edges
Do not stop for every tiny milky spot. On cast vinyl, a few small moisture pockets often clear as the adhesive sets. The ones to fix right away are larger bubbles, fingers near curves, and any area where the edge is not sitting flat.
Here’s a useful video if you want to see hand position and movement before you try it on your own vehicle.
Handling seams and panel gaps
A stripe that crosses from hood to fascia, hood to cowl, or cab to bed should be treated panel by panel. Vehicles are not perfectly symmetrical, and older or repaired ones are even less forgiving. If you force one uninterrupted line without checking each panel, the stripe may be mathematically centered in one area and still look wrong across the vehicle.
Set the stripe so it looks straight with the panels closed. Then trim for the gap. On a truck or Jeep that sees heat, vibration, and flex, that visual check matters more than chasing a measurement that only works on paper.
If a gap is wide or uneven, do not press the vinyl deep into it and hope for the best. Bridge it cleanly, let the adhesive settle, and finish the cut once the stripe is stable.
Keep the spacing consistent
Dual stripes are judged by the center gap first. If that spacing wanders by even a little from hood to roof, people see it right away. Consistency beats chasing a specific number.
Pre-spaced kits make that easier. Hand-laid pairs can look excellent, but they demand careful measuring at every stage, especially across panel breaks and on surfaces with different paint texture.
Finishing Touches and Long-Term Care
You finish the install, back the truck into daylight, and the stripe looks dead straight. Then a week later one corner at the hood edge starts to curl. In the shop, that usually traces back to the last 10 percent of the job. Final trimming, edge pressure, and cure time decide whether the stripe stays put or starts giving you trouble.
Trim edges like a pro
Use a fresh blade and keep the cut controlled. The goal is to cut vinyl cleanly without scoring the paint underneath, especially on repainted panels where the clear may be softer than factory finish.
Leave a small margin back from exposed edges instead of trimming flush. That extra bit of vinyl support helps on hood fronts, fender tops, and roof edges that catch wind, wash spray, and heat. On older trucks and Jeeps, I am even more careful here because repaired panels and heavy orange peel tend to give edge adhesion less to hold onto.
Blade angle matters too. A shallow, deliberate cut tracks better than a steep stab at the film. If the stripe is crossing onto a panel that has been painted before, slow down and check every cut line in reflected light before you commit.
Heat-set the film before you call it done
Post-heating is what helps the vinyl relax after it has been stretched over a crown or worked around an edge. Skip it, and the film can try to pull back to its original shape over time.
Use steady, moderate heat. Then follow with firm pressure from a clean squeegee edge or your gloved thumb on the edges, ends, and any place the stripe changed direction. Those are the spots that usually fail first.
This matters even more on real-world vehicles than on clean tutorial cars. Repainted hoods, blended fenders, and lightly textured clear coat often need more patience at the finish stage because the adhesive bond is less forgiving.
Give the adhesive time to settle
The first couple of days are not the time for a wash, a road-trip pressure rinse, or picking at a tiny mark in the film. Fresh vinyl needs time to build bond, and early abuse shows up later as dirty edges, lifted corners, or water working underneath.
For that cure window:
- Do not wash the vehicle
- Do not aim high-pressure water at stripe edges
- Do not chase every faint transfer-tape mark right away
- Do not leave the vehicle where water drips onto the same spot for hours
If the vehicle has fresh paint, be even more conservative. Vinyl over paint that is still outgassing can create adhesion problems that look like installer error but start with the surface.
Long-term care
Once the stripe has cured, normal care is simple. Hand washing with a good mitt and clean microfiber towels is easier on the edges than aggressive automatic brushes. If you use a pressure washer, keep distance from the panel and spray across the surface, not straight into the edge.
Avoid heavy polishing compound on the stripe line, and be careful with wax buildup along the edge. Matte and satin films show that residue faster than gloss.
Check the ends and exposed edges every so often, especially after a hot week, a hard winter, or trail use. Catching a stressed corner early gives you a chance to warm it, press it back down, or replace a short section before dirt and moisture turn a small issue into a full redo.
Troubleshooting Common Issues and Style Tips
DIY installers usually worry about bubbles. In practice, the bigger long-term problem is often the surface under the stripe, not the stripe itself. That’s especially true on older trucks, repaired Jeeps, and modified cars with mixed paint history.
What to do when something goes wrong
A few problems are common and fixable.
- Small trapped bubble: If it’s a tiny moisture pocket, give it time before touching it. Many settle as the film cures.
- Crooked placement: If you used a wet method and caught it early, lift carefully and reset. Don’t force a bad line to stay.
- Wrinkle near a curve: Too much tension usually caused it. Lift, add slip if needed, and lay it back down with less pull.
- Edge won’t stay down: Cleanliness, paint condition, or lack of post-heat is usually the cause.
The surface matters more than people assume
Forum data shows that 40 to 50% of racing stripe complaints relate to peeling along body-panel seams or on repainted areas, not overall vinyl failure, based on this discussion of real-world stripe adhesion problems.
That lines up with what installers see in the shop. The assumption that “clean enough is good enough” causes a lot of frustration. Repainted panels can hold polishing oils, sanding residue, or subtle texture changes that reduce bond strength. Body seams collect wax and compound. A stripe laid right over that transition may look fine on day one and start talking back later.
Not all paint is equal. Factory paint, repaired paint, and wrapped surfaces each need a different level of caution.
Smart style choices for imperfect vehicles
If the vehicle isn’t showroom straight, design around that reality instead of pretending it’s perfect.
Consider these approaches:
- Break the stripe before a high-stress seam: It can look intentional and reduce lifting risk.
- Use shorter hood stripes instead of full-length runs: Less exposure, easier alignment.
- Choose stronger contrast on repaired panels: It can make slight texture differences less noticeable.
- Skip the roughest section: A clean partial stripe beats a full stripe that fails early.
Removal years later is usually straightforward with heat and patience. Warm the vinyl, peel slowly at a low angle, and clean the adhesive residue gently. The longer the stripe has lived in the sun, the more patience removal usually takes.
If you want a racing stripe sticker that’s cut for clean installation and built for real vehicle use, Custom Sticker Shop offers automotive decal options in professional-grade vinyl, including pre-spaced and transfer-taped designs that are easier to align on cars, trucks, and Jeeps.