
You pull into a track day, park next to cars with clean number panels, windshield banners, and a sharp track outline on the quarter glass, and your car suddenly looks unfinished. It may be quick. It may be sorted. But visually, it still reads like a street car.
That gap matters more than most drivers admit. Race track decals do more than dress up a build. They signal intent, help with identification, and give a car a coherent look that matches the effort underneath the hood. A good decal package makes a car look organized. A bad one looks like an impulse buy from a bargain bin.
The difference usually comes down to three things: material, layout, and installation. Get those right and the graphics look like part of the vehicle. Get them wrong and you end up with lifting corners, crooked placement, or decals that fade before the season is over.
A serious-looking car also needs the basics handled. Graphics won't hide poor stance, uneven tire wear, or a steering wheel that sits off-center. If you're dialing in the whole package, this guide to a perfect 4-wheel alignment is worth reading because a clean livery always looks better on a car that tracks straight and sits right.
From Street Car to Track Star The Power of a Perfect Decal
A race-inspired car needs visual structure. Random stickers don't create that. Purposeful decals do.
The first decision is mental. Stop thinking of decals as throwaway accessories. On a track build, they function more like trim pieces. They shape how the car reads from a distance and how the eye follows the body lines up close.
What changes the look fastest
If a car feels plain, a few decal choices make the biggest difference right away:
- Door or hood graphics: These create scale and give the car a focal point.
- Windshield banners: These lower the visual height of the glass and make the car look more competition-ready.
- Track outlines: A simple circuit silhouette says more than a pile of generic logos.
- Number placement: Even on a non-competition car, numbers create instant motorsport identity.
Most owners make one mistake early. They buy graphics one at a time with no plan. The result is clutter. The better approach is to choose one primary decal, one supporting decal, and one accent area.
Practical rule: If every panel is trying to say something, none of it stands out.
Professional-looking race track decals work because they respect the vehicle first. The decal should fit the car's shape, not fight it. A long hood wants a graphic with breathing room. A short door wants a tighter layout. A curved rear glass needs simpler lettering than a flat side window.
Presence matters at every level
This isn't just for sanctioned race cars. It matters at autocross, HPDE, drag nights, cars and coffee, off-road events, and shop builds. A clean decal package tells people you care about details. In motorsports, details usually separate the polished cars from the ones that always feel half-finished.
Understanding the Role of Race Track Decals
A decal isn't the same thing as a basic sticker. A decal is typically made for a specific surface, a longer service life, and a cleaner installed appearance. In racing, that distinction matters.

Cheap stickers are often printed fast, cut loose, and applied like labels. Race track decals are usually die-cut or transfer-taped so the graphic lands exactly where it should. That gives you cleaner spacing, sharper lines, and a finish that looks built for the car.
Identification comes first
The history of racing decals starts with numbers. The tradition of numbering race cars evolved from inconsistent hand-painted numbers into vinyl-based systems that matched stricter rules from sanctioning bodies like NASCAR and the FIA for size, font, and placement. A later NASCAR development introduced LED-integrated illuminated decals for night races in 2020, improving visibility and fan engagement, as detailed in this guide on race car number decals.
That history matters because the function hasn't changed. Officials, corner workers, timing staff, photographers, and other drivers all need to identify a car quickly. If a number or class marking is too small, too stylized, or buried in a busy design, it stops doing its job.
Three placement rules still hold up:
- Keep numbers readable at speed: Fancy fonts usually fail here.
- Use contrast: Dark on dark looks good in the garage and disappears on track.
- Respect sightlines: The best number is useless if it's hidden by mirrors, vents, or glare.
Branding is part of motorsport culture
Decals also became the visual language of sponsorship once national racing colors gave way to sponsor-driven liveries. That changed race cars from color-coded national entries into rolling brand packages.
On a grassroots build, branding doesn't have to mean corporate sponsorship. It can be your shop name, team name, social handle, local partners, or event series. The point is cohesion. A few well-placed marks beat a dozen unrelated logos every time.
The following usually works:
| Placement area | Best use | Common mistake |
|---|---|---|
| Windshield | Team name or banner text | Overly tall text that blocks vision |
| Door | Number or main identity graphic | Graphic too small for the panel |
| Rear quarter glass | Track outline or class marking | Fine detail that disappears |
| Hood | Signature graphic or tribute | Installing over heat-damaged paint |
Personal expression still matters
Some of the best race track decals aren't official at all. They're personal. Track outlines, memorial tributes, military graphics, hometown flags, and chassis nicknames all add meaning to the car.
A good decal package does two jobs at once. It makes the car easier to read and more personal to its owner.
That's why the best builds don't look generic, even when the graphics are minimal. The design says exactly what it needs to say, then gets out of the way.
Choosing Materials That Survive the Track
Material choice is where most decal problems start. If you're applying graphics to a car that sees speed, sun, heat cycles, brake dust, washing, and fuel residue, premium vinyl isn't a luxury. It's the baseline.
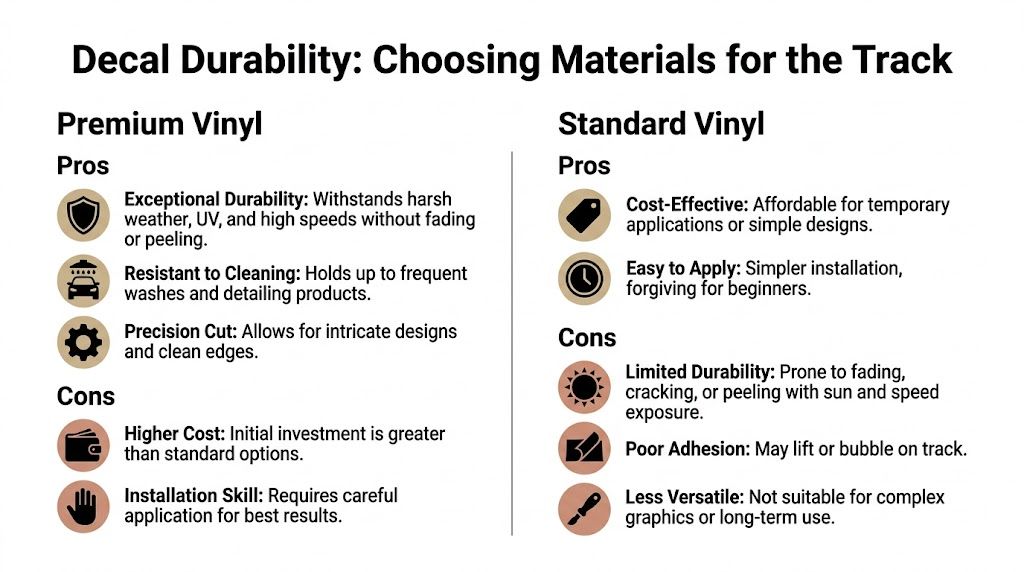
A lot of people find this out the hard way. They buy standard vinyl because it looks similar on a screen, install it on a hood or door, and then wonder why the edges start lifting after heat and wash cycles.
Why premium vinyl earns its keep
Professional-grade decals often use Oracal 651 vinyl, which is rated for 8+ years of outdoor exposure with waterproof and UV-resistant properties according to this custom race track outline vinyl decal listing. That's a meaningful benchmark because automotive use is rougher than most flat outdoor applications.
The track environment is hard on adhesives for a few reasons:
- Heat cycling: Hood surfaces, engine bay bleed-off, and sun exposure all stress the adhesive.
- UV exposure: Sun breaks down lower-grade films and fades color.
- Wind load: Air pressure works every exposed edge at speed.
- Chemical contact: Fuel splashes, quick detailers, degreasers, and tire residue all test the material.
Premium vinyl handles that abuse better because the film and adhesive are built for long-term outdoor exposure. That doesn't make it indestructible. It does mean it has a much better chance of surviving actual use instead of just looking good on install day.
Where standard vinyl fails
The biggest problem areas are predictable. Hoods, front fenders, lower doors, and rear panels behind the tire all see more punishment than flat side glass.
Many racers report standard decals peeling after just 6 months on high-heat panels like hoods, while 7-year rated Oracal vinyl is designed to resist heat, UV fading, and debris abrasion at 100+ mph, as noted by Black Flag Decals. That's the difference between a decal made for the environment and one made for occasional decoration.
If the decal is going on a hood, don't shop by color first. Shop by film quality first.
For race cars and track-prepped street cars, I recommend premium vinyl every time. That's especially true when the decal sits near brake heat, underhood heat, or the leading edge of airflow.
Matching vinyl to placement
Not every panel needs the same approach. Use the car's exposure zones to decide where to spend money.
- High-risk areas: Hood, front clip, lower rocker area, and leading edge panels need the best film.
- Moderate-risk areas: Doors and quarter panels still need quality vinyl, but they usually live an easier life than the hood.
- Safer zones: Rear side glass and inside-window applications can get away with less abuse, though quality still matters for appearance.
If you're planning a full windshield treatment, a properly cut vinyl windshield banner decal for a Chevy Corvette shows the kind of application where clean cuts and better film really matter. A banner catches sun, wiper wash, and constant eye-level scrutiny, so poor material stands out fast.
Durability is more than the vinyl name
Film grade matters, but production quality matters too. A strong material can still fail if the cutter drags the edges, the masking stretches the layout, or the installer traps contamination under the adhesive.
Look for these build details:
- Clean die-cut edges: Rough edges lift sooner.
- Uniform line widths: Important on track outlines and thin graphics.
- Proper transfer tape: The wrong tape can distort fine elements.
- Pre-spaced layouts: These install straighter and reduce handling mistakes.
Here's the trade-off in plain terms:
| Material type | Best for | Watch out for |
|---|---|---|
| Premium vinyl | Long-term exterior use, heat, speed, detailed graphics | Costs more up front |
| Standard vinyl | Temporary use, garage walls, short-term display | Lifting, fading, edge failure |
The cheap option usually becomes the expensive option once you remove it and buy the better version anyway.
Sizing and Placing Decals for Maximum Impact
Most racers don't need a huge menu of size choices. They need one size that fits the panel, reads clearly, and doesn't look awkward. For hood and door panel decals, 15 inches tall is a strong starting point.
That size works because it gives the graphic enough presence to read from a distance without swallowing the panel. On most performance cars, it feels intentional. On trucks and larger-bodied cars, you may want to scale wider overall, but 15-inch-tall graphics still provide a reliable visual anchor.
Start with panel shape, not just tape measure
A decal can be the right size on paper and still look wrong on the car. Body lines, vents, door handles, side molding, and wheel arch cuts all affect what looks balanced.
Use this placement logic before you order:
- Hoods: Center the design around the strongest flat visual area, not necessarily the exact physical center.
- Doors: Keep the graphic clear of handles, side creases, and lower scallops.
- Quarter glass: Small, sharp designs work best here, especially track outlines.
- Windshields: Leave enough drop from the roofline to keep the banner readable without crowding vision.
In racing history, clear decal placement was critical for identifying cars during major NHRA record runs, including Don Prudhomme's 247.25 mph pass, as covered in NHRA's look at decal details. That principle still applies. If the graphic can't be read quickly, placement missed the mark.
Common placements that usually work
A simple layout often looks best:
| Location | What works well | What to avoid |
|---|---|---|
| Hood | Main graphic, tribute, large logo | Placing over sharp vents or broken clear coat |
| Door | Number, class, primary side graphic | Too low, where road grime hides it |
| Windshield | Banner text | Excessive height |
| Rear window | Custom text or club name | Dense text blocks |
| Quarter glass | Track outline, flag, small icon | Ultra-thin detail |
For owners who want a clean text treatment on glass, a 22-inch-wide custom text window decal sticker is the sort of size that often fits rear glass or side windows without overloading the car.
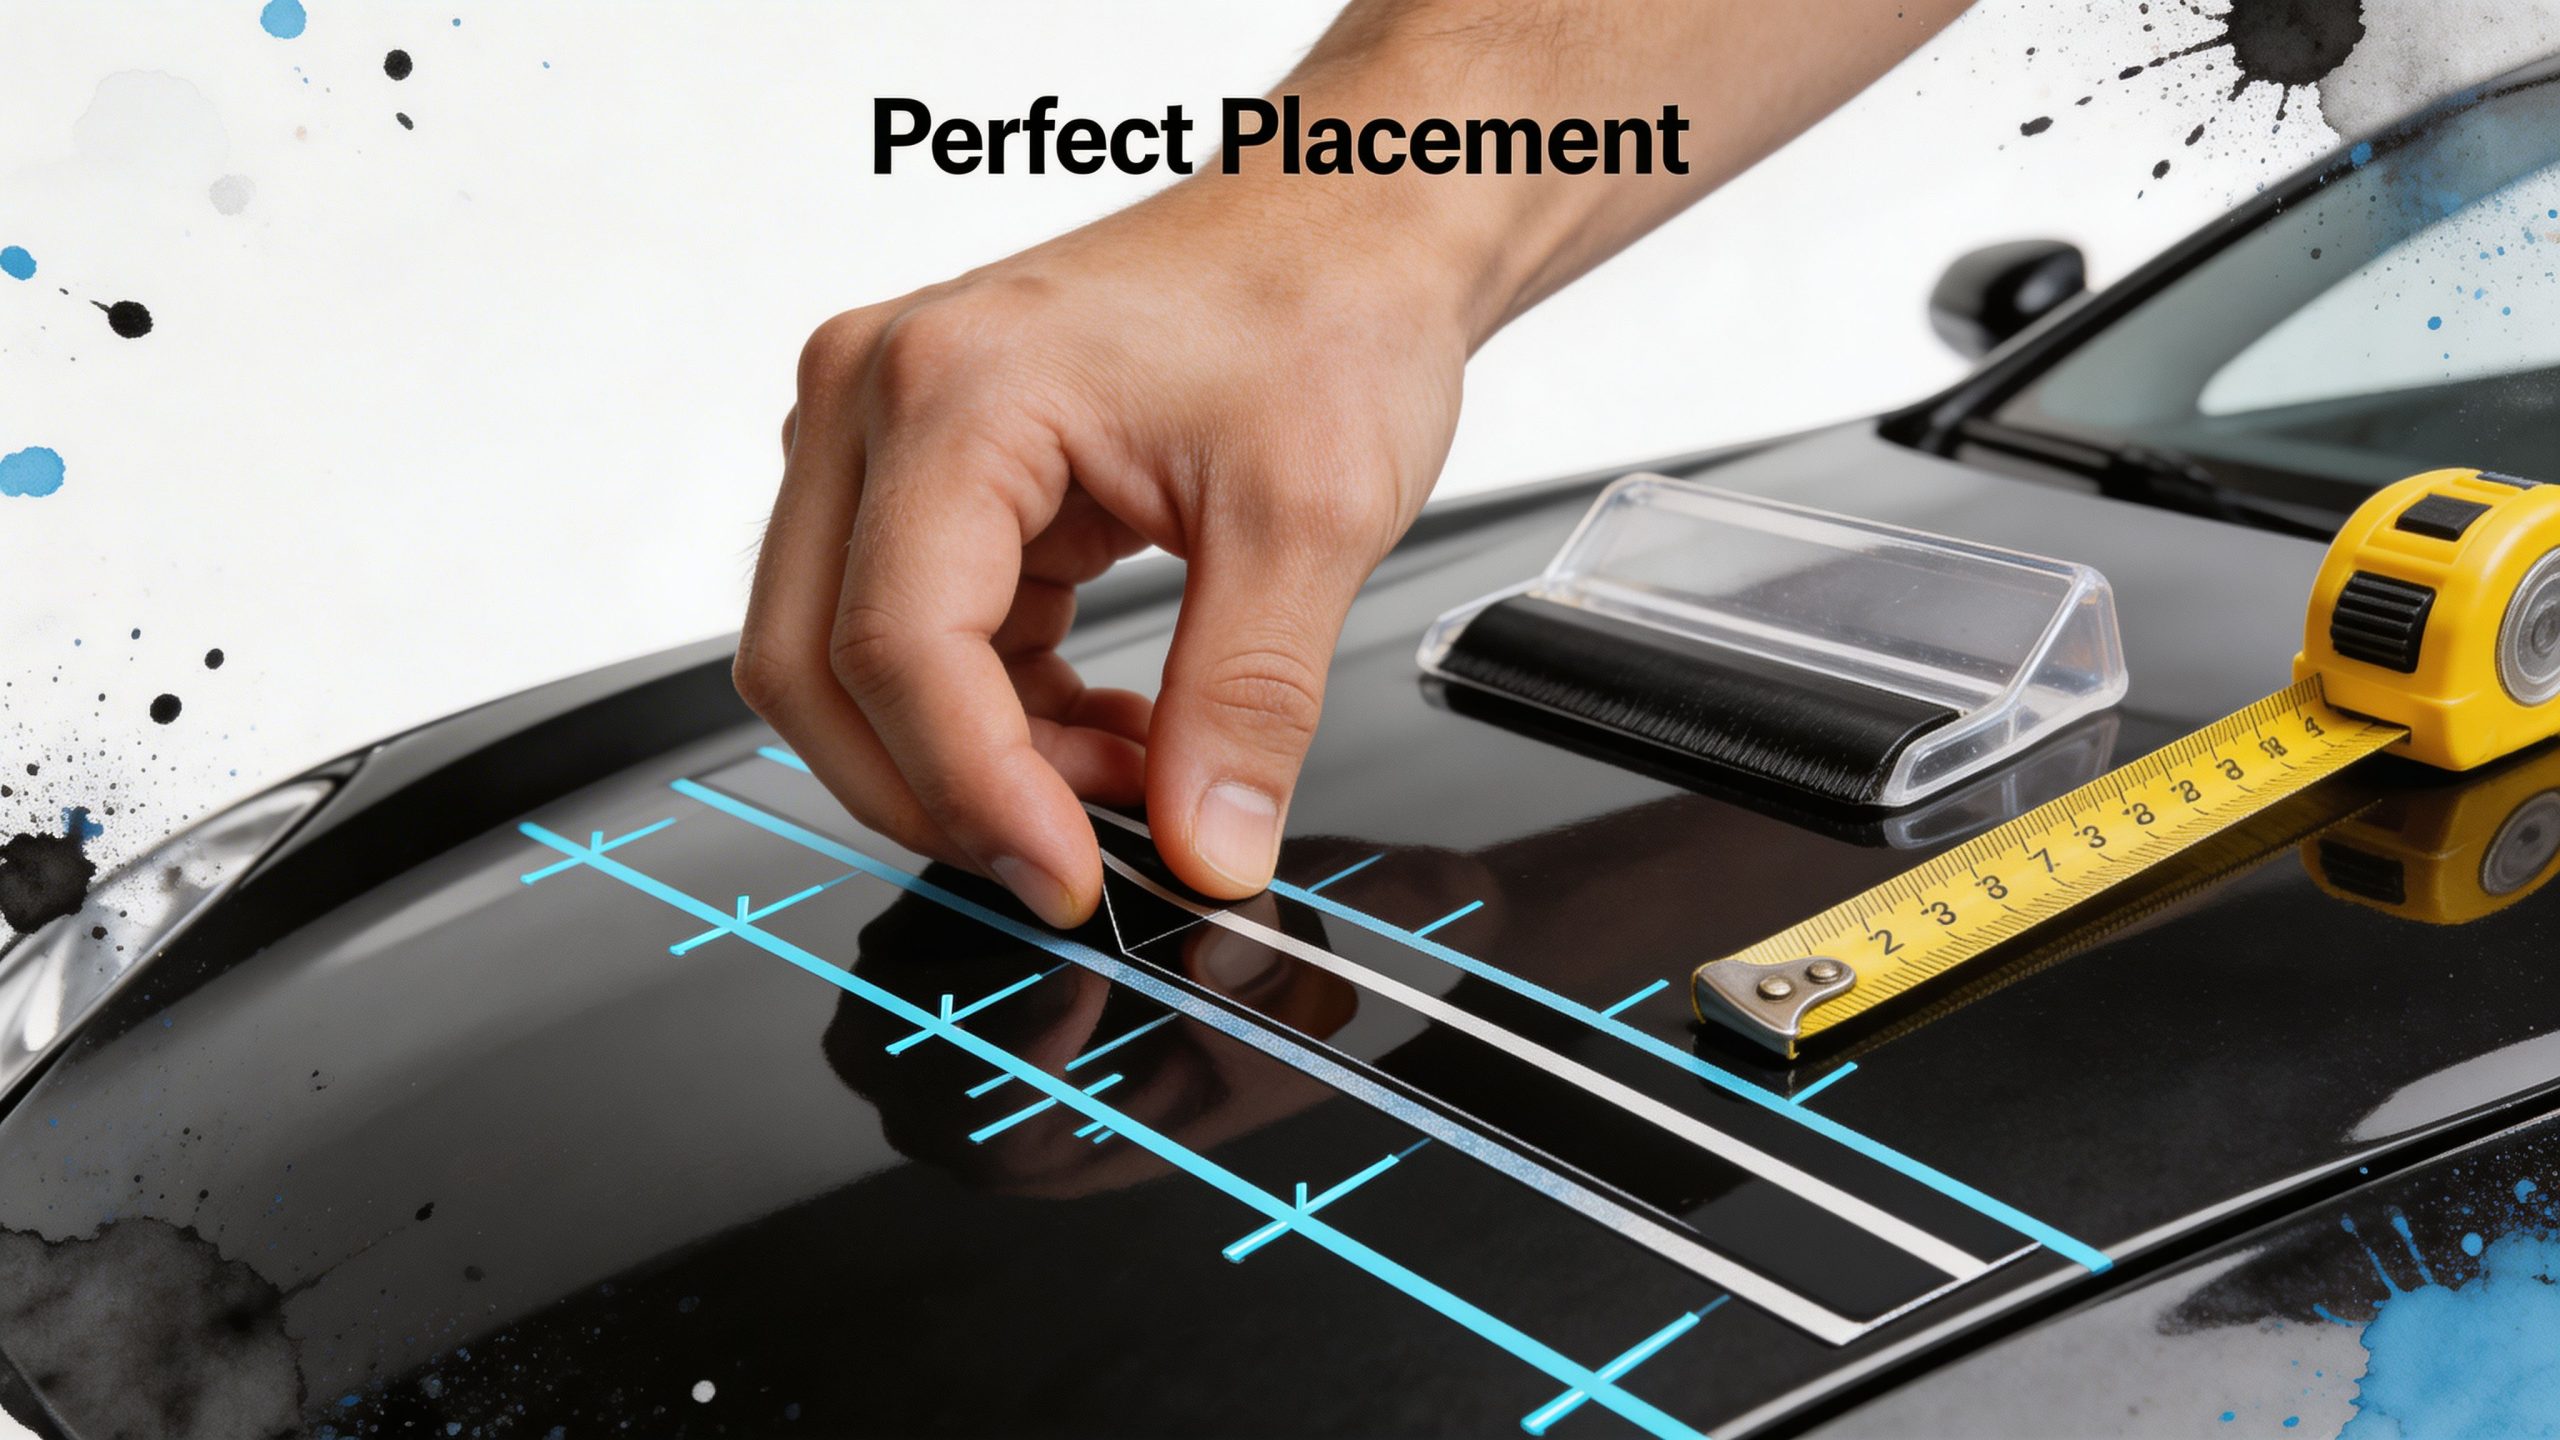
Use spacing to make the decal look expensive
The eye notices margins before it notices artwork. A decal shoved too close to an edge looks cheap, even when the cut is perfect.
Good placement usually means:
- Leaving visible paint around the decal.
- Following the car's major body line with the bottom or top edge of the design.
- Matching left and right side positions with actual measurements, not eyeballing.
This install walkthrough is useful if you want to see how careful measuring and alignment change the result:
Measure from fixed points. Door edges, hood edges, and trim lines don't move. Your eyes do.
The best-looking race track decals aren't always the largest. They're the ones that fit the car like they were meant to be there.
Custom Decals From Track Outlines to Personal Tributes
A car pulls into the paddock with heat in the brakes, rubber on the quarters, and a track outline on the glass. If that outline is cut clean and the design makes sense, people notice. If the line weight is uneven or the tribute graphic looks crowded, they notice that too.
That is why custom work deserves more thought than picking a shape and a color. A race track decal has to read fast, survive weather, wash cycles, and heat, and still feel personal. The best pieces do all three.
A track outline decal remains one of the sharpest options because it carries meaning without taking over the car. Drivers use them to mark home tracks, bucket-list circuits, drag strips, dirt ovals, and road courses that meant something. The hard part is execution. Thin outlines show every mistake in the file, every bad weed, and every bit of stretch during transfer.
Why precision matters on track outlines
Track maps look simple on a screen. They are less forgiving in vinyl.
Corners, chicanes, hairpins, and narrow connectors need clean vector work before the cutter ever starts. Then the vinyl has to hold those details without tearing, shrinking back, or lifting at the ends. On small glass decals, a line that is too thin can disappear from ten feet away. On larger body-panel graphics, a line that is too thick can make the course look wrong to anyone who has driven it.
Good track outlines usually share three traits:
- Even line weight: The whole course reads as one intentional shape.
- Clean corner definition: Tight turns stay crisp instead of rounding off.
- Stable transfer handling: The decal releases and lays down without twisting the layout.
That level of control matters even more once buyers move beyond the usual circuits.
Custom work gets better when the catalog goes deeper
A lot of shops can produce mainstream track outlines. Fewer can handle niche requests without compromising the design. That is where custom work gets interesting.
Some drivers want a local short track that never makes national lists. Others want a Japan-inspired build with circuit graphics that fit the era of the car, or a memorial layout that combines flags, names, and dates without looking cluttered. We also see military tribute builds, off-road hybrids, and club cars that need graphics tied to a region, unit, or family history. Those jobs separate template sellers from shops that understand design restraint.
One outside reference that shows how broad buyer demand can get is this track outline collection reference. The lesson is not the catalog size. It is that customers want more than a generic track map. They want something tied to their own motorsport story.
The personal side of race track decals
Personal tributes work best when the message is clear in one glance.
I usually recommend choosing one lead idea and building around it. If the car honors a specific driver, veteran, family member, or track memory, let that theme carry the design. Supporting details should reinforce it, not compete with it.
A few combinations tend to work well:
- JDM-inspired builds: Track outline, simple Japanese text, and period-correct numbering
- Military tributes: Unit insignia, restrained flag treatment, memorial names, and branch references
- Off-road and trail builds: Regional maps, trail names, family identifiers, and recovery motifs
- Memorial graphics: Names, dates, race flags, silhouettes, and one meaningful location marker
If the goal is remembrance without turning the car into a collage, a racing flags memorial decal for in-memory builds shows the kind of layout that can stay respectful and still look right on a performance car.
What custom packages usually get wrong
Too many ideas in one decal package is the usual failure point. The car ends up saying five things at once.
A drift-style windshield banner, a military crest, a cartoon quarter-window graphic, and a road-course outline may all be good pieces on their own. Together, they often fight for attention and cheapen the result. Strong custom work has hierarchy. One main theme, one supporting theme, and enough open space for the eye to rest.
Surface condition matters here too. Tribute decals and fine-line outlines both look worse on neglected paint or oxidized glass, so some owners benefit from professional exterior detailing services before finalizing a custom install.
The best custom decal does two jobs at once. It survives real track use, and it still means something every time you walk back to the car.
Your Step by Step Guide to Flawless Installation and Removal
Good vinyl can still look bad if the install is rushed. Most decal failures blamed on material are really prep failures, alignment mistakes, or poor post-install care.
Prep the surface correctly
Start with a cool, clean panel. Not warm. Not dusty. Not fresh from a drive.
Wash the area first, then remove any leftover wax, detail spray residue, bug remover, or polish film. If the paint feels slick from a protectant, the adhesive may not bond the way it should.
A few prep checks matter:
- Inspect the paint: If clear coat is failing, a decal won't hide it and removal may expose more damage.
- Check for chips and raised edges: These create air pockets.
- Avoid contaminated surfaces: Silicone-heavy dressings and cheap spray waxes are common problems.
If the vehicle needs a proper reset before install, getting the panel corrected through professional exterior detailing services can be worthwhile. Clean paint gives the adhesive a fair shot.
Apply with control, not speed
Pre-spaced and transfer-taped decals are easier to align because the layout is held in place before it touches the car. Tape the decal in position first and step back to confirm it looks level against body lines, not just the floor.
A clean install usually follows this order:
- Test fit the decal. Use masking tape as hinges and confirm spacing from panel edges.
- Peel the backing carefully. Make sure every part of the vinyl lifts with the transfer tape.
- Lay it down gradually. Start from one side or the center hinge and work outward.
- Use a squeegee with steady pressure. Push air toward the edges.
- Remove transfer tape slowly. Pull it back at a low angle, not straight up.
Dry method versus wet method
Both can work, but they suit different jobs.
- Dry method: Better for many die-cut vinyl decals, especially smaller graphics and experienced installers.
- Wet method: Can help with larger pieces when slight repositioning is needed, though not every adhesive system benefits from it.
If you're unsure, follow the decal maker's recommendation for that specific film and cut style. Thin track outlines and fine text often demand more patience than a broad banner.
Slow hands beat fast hands. The decal only has to go down once.
Post-install care
Once the decal is down, let the adhesive settle. Don't wash it immediately. Don't pick at small edges. Don't test it with your fingernail.
Early care should be simple:
- Leave it alone for a bit: Give the adhesive time to bond.
- Avoid harsh washing right away: Especially pressure aimed at the edges.
- Watch corners and fine points: Those show mistakes first.
Safe removal without paint damage
Removal is straightforward if the paint is healthy. The goal is to soften the adhesive, not cook it.
Use gentle heat from a heat gun on a low setting or a hair dryer. Warm a small area, lift a corner, and peel slowly back over itself. If adhesive remains, use an automotive-safe remover and a soft towel.
Don't:
- Rip cold vinyl off a panel.
- Use metal blades on painted surfaces.
- Overheat the panel.
If a decal has been baked on for years, patience matters more than force. Clean removal protects the finish and makes the next set of race track decals easier to install.
How to Buy Race Track Decals Smart
You find the right track outline, the color matches the car, and the photos look clean. Then the decal shows up with rough cuts, uneven spacing, and film that feels thin before it ever touches the panel. That is how buyers waste money.
Buy quality based on how the decal is built, not how flashy the mockup looks. A proper race track decal should have consistent line width, clean die-cut edges, and layout spacing that keeps the design straight during install. Sellers offering a wide catalog of track shapes and custom themes should also show that they work from organized vector files, not stretched screenshots or loose artwork. That matters a lot with thin outlines, corner-heavy track maps, and tribute pieces where small errors stand out fast.
A short buying checklist
Before ordering, check for these details:
- Cast or other high-grade automotive vinyl: Better suited for heat, sun, and curved panels than bargain craft film.
- Pre-spaced or transfer-taped layouts: Especially helpful for track outlines, lettering, and multi-piece designs.
- Clean sample photos: Look closely at corners, line consistency, and weeding quality.
- Clear material and use-case guidance: A good seller should tell you what belongs on paint, glass, helmets, toolboxes, or enclosed trailer panels.
- Made in the USA production: Usually a better sign for material consistency, turnaround, and support if you need a re-cut.
- Custom capability beyond generic shapes: Niche tracks, memorial designs, class numbers, corner names, and themed layouts require real file prep, not clip-art assembly.
Price still matters, but track-use decals live or die on durability. Heat cycles, wash chemicals, wind load, brake dust, and repeated sun exposure expose weak film and bad adhesive quickly. A cheap decal that shrinks, curls, or fades after a few weekends costs more than a properly made one that stays put through a season.
I also look at how the seller talks about the product. Shops with real motorsports experience usually mention panel shape, surface type, and expected abuse. They know the difference between a decal for a garage fridge and one meant for a hood, windshield, or trailer that sees highway miles and paddock grime.
Good value is simple. The decal arrives cut right, installs without a fight, holds up under real track conditions, and comes off cleanly when it is time to update the car. Veteran-run and family-run shops often do that better because they build for repeat customers who use their equipment.
Frequently Asked Questions About Race Track Decals
Are race track decals legal on a street car
Usually, yes, but legality depends on placement and visibility. Don't block required glass areas, lights, mirrors, or plates. Windshield banners need common sense. If the banner drops too low, it can create a visibility problem even if you like the look.
Will decals stick to ceramic-coated paint
They can, but coating chemistry can reduce adhesion depending on the surface and how recently it was treated. If the panel has a slick coating, test first or use a surface prep method recommended for automotive vinyl. A clean, bare bonding surface is always safer than guessing.
What's the best place for a first decal if I've never installed one
Start with side glass or a simple flat panel. Avoid the hood if you're learning. Heat, contour, and visual prominence make hood installs less forgiving.
How should I wash a car with decals
Hand washing is safest. Use normal automotive soap and a soft mitt. Rinse grit off first so you don't drag debris across the vinyl edges.
A few habits help a lot:
- Spray with the panel, not into the edge: Direct high-pressure spray can lift corners.
- Use clean towels: Dirty microfiber scratches both paint and film.
- Skip aggressive solvents: Strong chemicals can dull the finish or weaken adhesive.
Can I put race track decals on matte paint or wraps
Yes, but caution matters. Matte surfaces show application mistakes more easily, and removal can be trickier. If the car is wrapped, make sure the wrap is fully cured and in good shape before adding another layer on top.
How long do race track decals usually last
That depends on material, placement, weather, washing habits, and how often the car sees track use. Better vinyl lasts longer, especially on glass and flatter side panels. Hoods and forward-facing areas usually live the hardest life.
What ruins decals fastest
Poor prep is the big one. After that, it's usually heat, sun, careless washing, and low-grade film. Installing over wax, old polish residue, or damaged paint almost always leads to disappointment.
Can I remove a decal and reuse it
Usually not. Most automotive vinyl decals are designed for one clean application. Once removed, the adhesive and shape usually won't support a second proper install.
If you want race track decals that are built for real automotive use, Custom Sticker Shop is worth a look. They're a veteran-friendly, family-run shop in Topeka, Kansas, producing American-made decals with professional-grade Oracal vinyl rated for up to 7 years outdoors. Their catalog includes more than 1,200 designs, from military tributes and Jeep graphics to custom text and automotive themes, and orders arrive pre-spaced and transfer-taped for easier installation. With prices starting at $7.99, free US shipping on orders $25+, and an unlimited Buy 2 Get 1 Free offer, it's a practical place to outfit a street car, track toy, truck, or tribute build with graphics that look right and last.