
Your car’s rear window is more than just a piece of glass. Think of it as a blank canvas, a perfect spot to tell the world a little bit about who you are. With custom window stickers for cars, you can transform that empty space into a personal statement, sharing your passions, humor, or identity with everyone on the road.
It's hands-down one of the easiest and most affordable ways to personalize your ride.
More Than Decor: How Stickers Tell Your Story
Pay attention to the stickers you see on your daily commute. Every single one offers a small glimpse into the driver's life, turning an otherwise anonymous vehicle into something distinctly personal.
A well-chosen decal does more than just decorate—it communicates who you are without you ever having to say a word. It's a powerful, silent form of self-expression that connects you with like-minded people on the road.
For many folks, these graphics are badges of honor or symbols of community. They represent deeply held values and affiliations that shape our lives.
Showcasing Your Identity
The right sticker can instantly signal your connection to a group or a passion. It’s a way to find your tribe, even when you’re just driving to the grocery store.
- Military and Veteran Pride: An emblem for a branch of the armed forces is a proud declaration of service and patriotism. It’s an immediate nod of respect between those who have served.
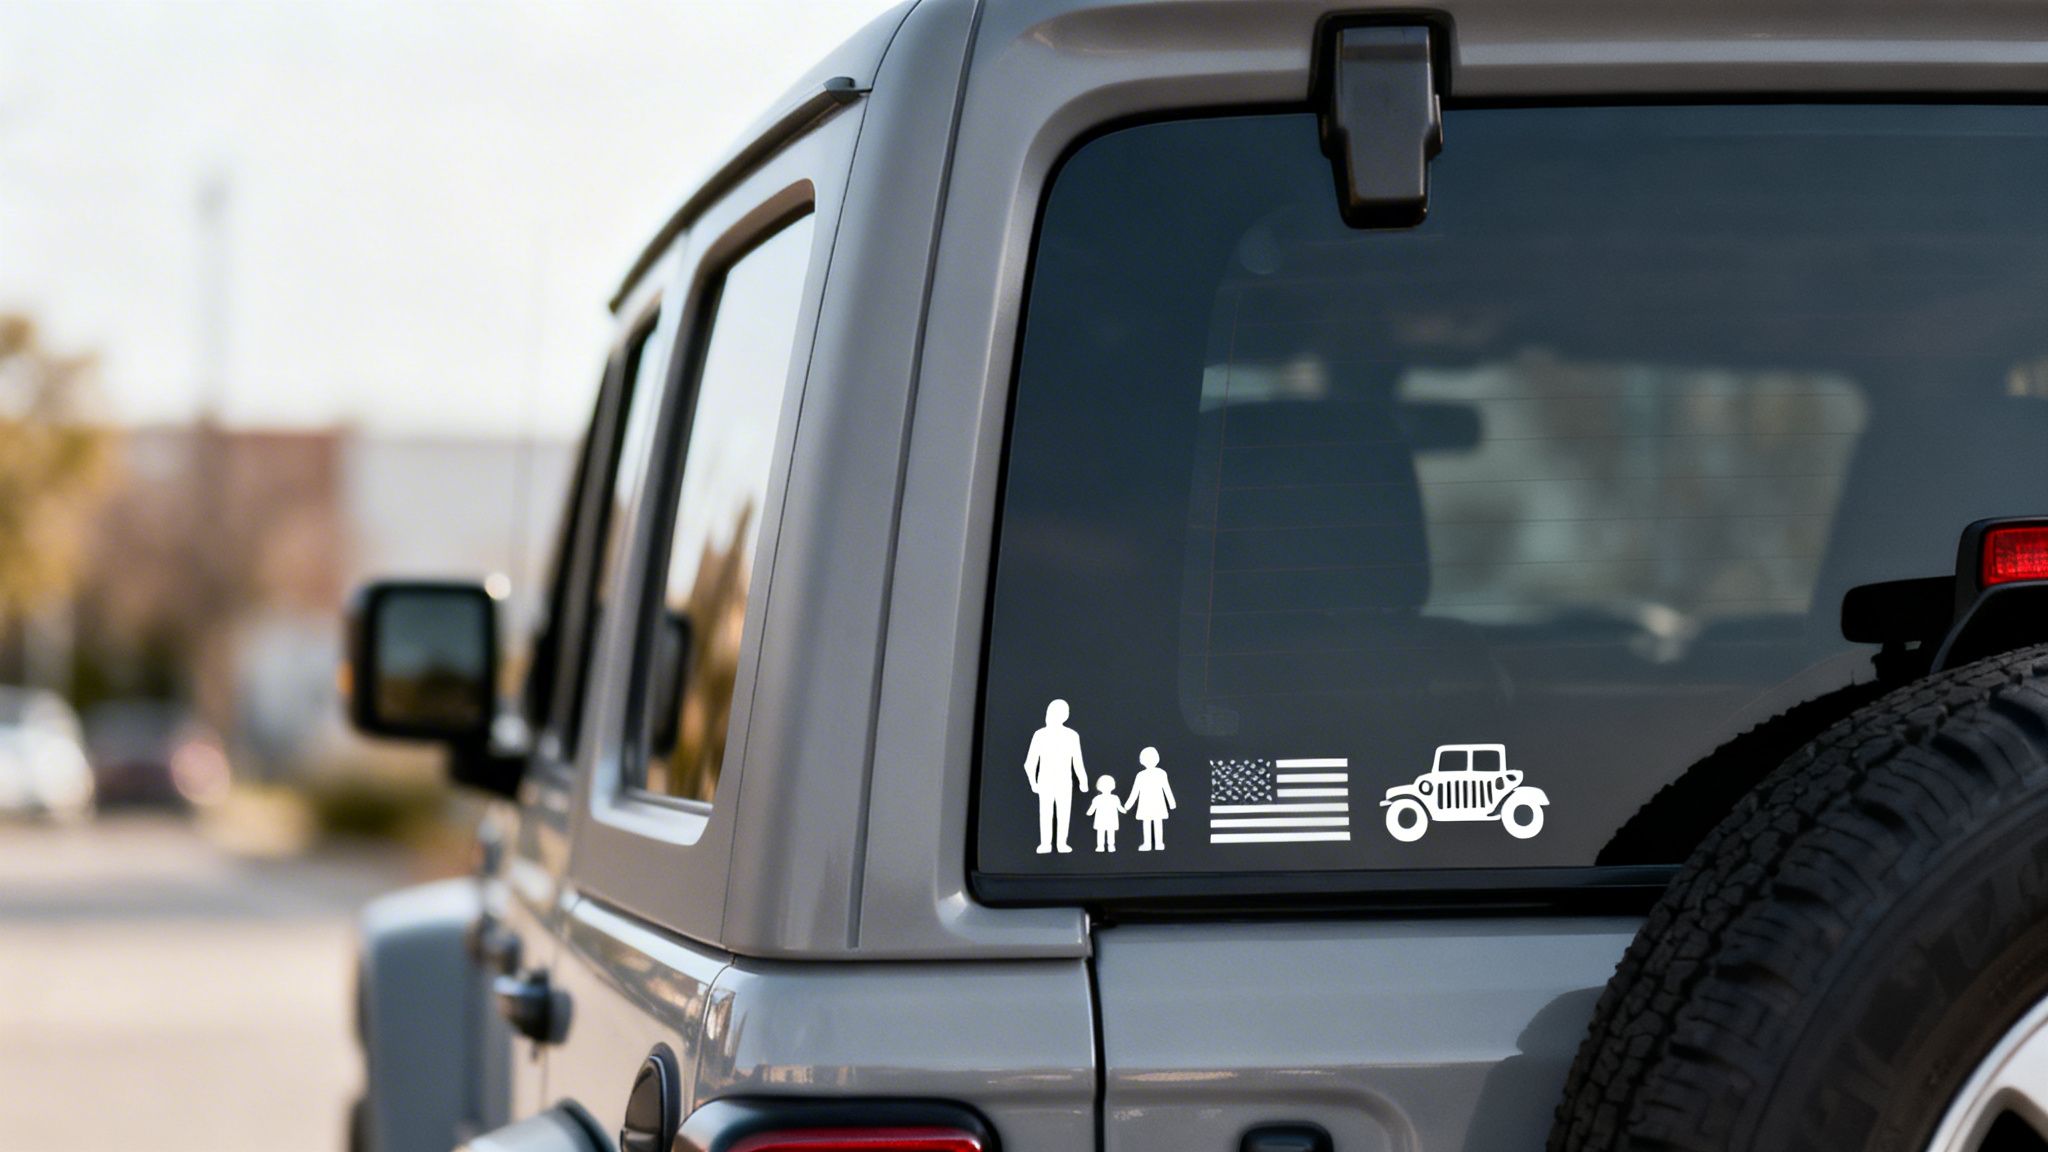
- Jeep and Off-Road Culture: The iconic Jeep wave is just the beginning. Custom decals show you're part of a community built on adventure, freedom, and a love for the road less traveled.
- Family and Humor: From stick-figure families showing off the kids and pets to a witty phrase that makes people chuckle, these decals add a touch of warmth and personality. They tell the world what matters most to you in a lighthearted way.
A car window sticker is a modern-day bumper sticker, but with more style and substance. It’s a curated piece of your personality, chosen to reflect what you love, what you believe in, or what makes you laugh.
A Mark of Quality and Passion
Beyond the message itself, the quality of the sticker says something. A crisp, professionally made vinyl decal shows you care about the details. It reflects a desire for a clean, polished look that actually enhances your vehicle’s appearance.
Whether it's a sleek logo for a small business or a tribute to a beloved profession, a high-quality sticker demonstrates pride. For a great example of a professional decal, check out this nurses-do-it-better window decal.
This guide will walk you through choosing and applying a sticker that not only looks fantastic but truly represents a piece of your story.
Choosing a Design and Material That Lasts
Picking the right design for your vehicle is the best part of the process. You get to decide how you want to represent yourself on the road. Are you honoring your military service with a bold emblem, showing off your family with a custom stick figure lineup, or joining the Jeep wave community? The right design should feel like a natural extension of who you are.
Think about how a sticker will look on your specific car. A sleek, minimalist design might feel right at home on a modern sports car, while a rugged, detailed graphic could look perfect on a lifted truck. Don't forget to consider your car's color and window tint. A bright white or silver decal creates a sharp, eye-catching contrast on dark tinted glass, making sure it gets noticed.
But here's the honest truth: the most brilliant design in the world is useless if it's printed on cheap material. This is where so many people go wrong. They grab a low-cost sticker online, and within a few months of sun and rain, it's a cracked, peeling, faded mess.
Why the Vinyl Matters More Than the Design
The difference between a sticker that lasts for years and one that fails in a single season comes down to one thing: the vinyl. And not all vinyl is created equal. The flimsy stuff you find in big-box craft stores is meant for indoor scrapbooking projects, not for surviving a brutal summer or a freezing winter on the back of your car. It will degrade quickly under the sun's harsh UV rays and fluctuating weather.
For custom window stickers that are meant for cars, you absolutely need a professional-grade outdoor vinyl. This stuff is specifically engineered to handle everything the road throws at it.
The single biggest factor in your sticker's longevity is the quality of the vinyl. Investing in a premium material means you're buying a decal that will stay vibrant and intact for years, not just weeks.
The demand for durable, personalized gear is exploding. Customization is a huge driver in the global stickers market, which hit USD 4.61 billion and is projected to climb to USD 7.67 billion by 2033. This growth is all about people wanting products that reflect their identity—a trend you can see in recent market data insights.
Professional Grade vs. Craft Vinyl
Understanding what you're buying helps you make a smart investment. When you're looking at different options, pay close attention to the type of vinyl being used. It's a technical detail, but it's the one that makes all the difference in how your sticker looks and performs. This is why we make it easy to make your own custom car decal using only the right materials from the start.
Here’s a quick breakdown of what sets professional vinyl apart from the cheap stuff:
- Durability: Professional materials like Oracal vinyl come with an outdoor rating of 7+ years. That’s not just a guess—it means they're proven to resist fading, shrinking, and cracking from constant sun and rain exposure.
- Adhesive: Outdoor vinyl uses a much stronger, permanent adhesive. It’s designed to bond securely to glass but can still be removed without damaging the surface. The weak adhesive on craft vinyl often fails in extreme heat or cold.
- Thickness: This might seem backward, but professional decal vinyl is often thinner. This is a good thing! It allows the decal to conform better to the slight curves of a window and gives it a clean, "painted-on" look.
I've been in this business for over two decades, and I can tell you that the material choice is non-negotiable. Using a high-quality, weather-resistant vinyl like Oracal is the only way to ensure your design stays crisp and clear for the long haul. It protects your investment and keeps your vehicle looking exactly how you want it to.
Vinyl Material Comparison for Car Stickers
Choosing the right vinyl can feel technical, but it’s the most important decision you'll make for the life of your sticker. A high-quality material ensures your decal won't just look good on day one, but will continue to look great for years. The table below breaks down the real-world differences between a professional-grade vinyl and the generic craft vinyl you'll find elsewhere.
| Feature | Oracal Vinyl (Professional Grade) | Generic Craft Vinyl |
|---|---|---|
| Outdoor Lifespan | Rated for 7+ years of outdoor durability against sun, rain, and snow. | Typically lasts less than 1 year before fading or peeling. |
| UV Resistance | Contains UV inhibitors to prevent fading and keep colors vibrant. | Fades quickly in direct sunlight, often within a few months. |
| Adhesive Type | Strong, permanent adhesive that bonds securely but is removable. | Weaker, often water-based adhesive that fails in weather. |
| Weatherproof | Engineered to withstand extreme heat, cold, and moisture. | Can crack in the cold, bubble in the heat, and peel when wet. |
| Appearance | Thinner material conforms to surfaces for a clean, "painted-on" look. | Thicker and less flexible, often looking cheap and bulky. |
| Best For | Car windows, bumpers, boats, outdoor signs, and any long-term use. | Indoor crafts, temporary labels, and short-term projects. |
Ultimately, the choice is clear. For a car decal that represents something important to you, investing in a professional-grade material isn't just a good idea—it's essential for getting a product you'll be happy with for years to come.
Getting the Sizing and Placement Just Right
You’ve found a killer design and picked the perfect vinyl, but even the best sticker can look awful with bad sizing or placement. Honestly, getting these two things right is just as important as the design itself.
A decal that’s too big will look obnoxious and can even obstruct your view. But one that’s too small? It’ll just get lost and won't make the impact you're hoping for.
The goal is to hit that sweet spot where your new graphic complements your vehicle's lines and looks like it actually belongs there. This isn’t about guesswork; a few simple steps will give you a flawless, professional-looking result. Start by grabbing a tape measure and getting a real sense of the space you have to work with.
Measure Twice, Apply Once
Before you even think about clicking "add to cart," head out to your car with a tape measure. Figure out the general area you want to place the decal—maybe the corner of the rear window, centered under the third brake light, or as a banner across the top.
Measure the maximum height and width of that specific spot.
Jot these numbers down. This gives you a hard boundary to work within. Now, when you're browsing for custom window stickers for cars, you can immediately rule out sizes that won’t fit. It saves you the headache of ordering a decal that’s way too big for your intended spot.
The Paper Mockup Trick
This is a pro tip I've been sharing for years, and it's the single best way to avoid placement regret. Once you have a sticker in mind, cut out a piece of paper to its exact dimensions. Then, use a little painter's tape to stick this paper template onto your car window.
Now for the important part: take a few steps back. Look at it from different angles. Is it level? Does it feel centered? How does it look from 20 feet away? This simple trick lets you see exactly how the sticker will fill the space before you ever peel off a backing.
This hands-on approach is your best defense against the most common mistakes. You can physically see if the decal feels balanced or if it competes with other things on your vehicle, ensuring the final placement looks clean and intentional.
This is especially critical for larger graphics. For example, a custom windshield banner has to follow the curve of the glass perfectly. A paper template lets you map out that curve and confirm the sizing is spot-on before you commit. You can see what I mean by exploring options for a custom text windshield banner.
Placement Tips for Different Vehicles
Where you put your sticker can also depend on what you drive. What works on a big truck might look out of place on a small sports car.
- Trucks and SUVs: With those large, flat rear windows, you have a ton of real estate. Lower corners are a classic spot, and so is centering a decal just below the rear wiper.
- Sports Cars and Sedans: These vehicles often have more sloped and curved rear windows. Placing a decal in the upper or lower corners can really accentuate the car's sleek lines.
- Jeeps: The rear window or the side rear windows are popular spots. A lot of Jeep owners also use smaller decals to create a collection of "badges" showing off trails they've conquered.
At the end of the day, the best placement is one that enhances your vehicle’s look without compromising your visibility or safety. Take your time with these steps, and you’ll end up with a result you'll be proud of for years.
A Step-By-Step Guide to Flawless Application
Getting a professional, bubble-free finish on your vehicle is way easier than you might think. The secret isn't some complicated technique—it's just patience and good prep. A few extra minutes at the start will make your new sticker look like it was installed by a pro and ensure it lasts for years.
The biggest mistake I see people make is rushing the job. They get excited about the new graphic and skip the most critical step of all: cleaning the glass properly. You absolutely have to start with a surface that's completely free of dust, oils, and any lingering residues like wax or rain-repellent coatings.
Prepare the Surface for a Perfect Bond
Before you even think about peeling off the sticker’s backing, grab a microfiber cloth and some isopropyl (rubbing) alcohol. Give the spot where you're putting the decal a thorough wipe-down. This simple step gets rid of all the invisible gunk that can stop the adhesive from getting a solid, permanent grip on the glass.
Whatever you do, don't use a standard glass cleaner for this. Many of them contain ammonia or other chemicals that leave behind a film, which is exactly what you're trying to get rid of. Rubbing alcohol is perfect because it evaporates completely, leaving you with a perfectly prepped surface.
Taking the time to personalize your vehicle like this is a huge trend. The global car decal market was valued at USD 850.75 million and is expected to hit USD 1,350.50 million by 2032. It's clear that the passion for making a vehicle your own is only growing. You can discover more insights about the rising demand for car decals and see just how popular this has become.
The Hinge Method: Your Secret Weapon for Perfect Placement
For larger or more intricate custom window stickers for cars, the "hinge method" is your best friend. It takes all the stress out of trying to line up the whole decal at once and helps you avoid a crooked, sloppy-looking result.
Here’s how it works:
- Position the Decal: With the backing still on, place your sticker on the window. Use a tape measure to get it perfectly level and centered.
- Create the Hinge: Once you’re happy with the spot, run a strip of painter's tape across the middle of the decal, sticking it firmly to the glass. This tape now acts as a hinge.
- Apply One Side: Lift one half of the decal and carefully peel the backing paper away from the vinyl, stopping at your tape hinge. Use scissors to snip off the exposed backing paper.
- Squeegee It Down: Holding the sticker taut and away from the glass, use a squeegee or a credit card to slowly press the vinyl onto the window. Work from the center hinge outwards to push out any air.
- Repeat for the Other Side: Now, remove the painter's tape. Lift the other side of the decal, remove the rest of the backing paper, and squeegee it down just like the first side, working from the center out.
This simple three-step visual shows the core idea: measure, visualize, then place. Getting that foundation right is everything.
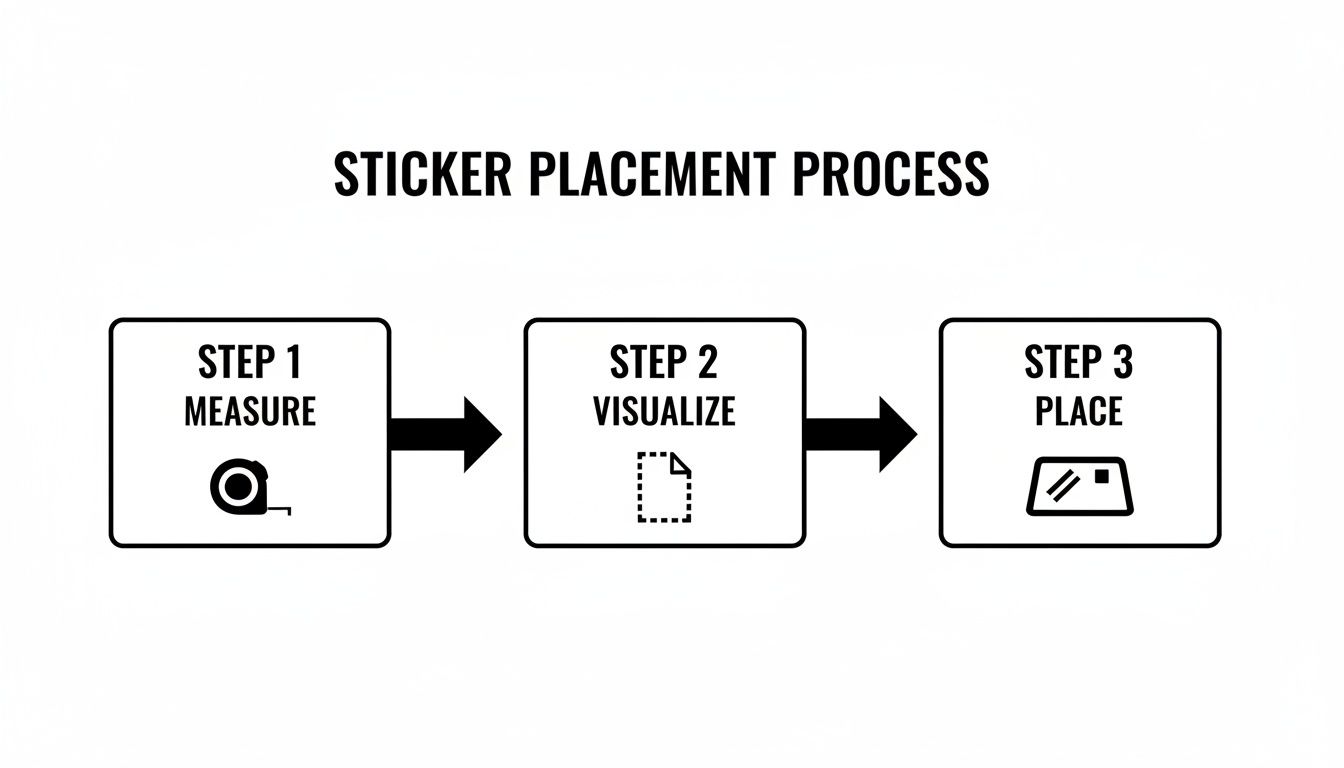
This process highlights how a systematic approach—from measurement to mockup to final placement—is the key to a successful application every time.
Pro Tip: When you're using the squeegee, always apply firm, overlapping strokes. This makes sure every bit of the vinyl makes solid contact with the glass and pushes out any trapped air bubbles from the very start.
Peeling the Transfer Tape and Fixing Bubbles
After you've squeegeed the entire decal, it's time to remove that top layer of transfer tape. Don't just rip it off like a band-aid. Instead, pull it back on itself at a sharp, 180-degree angle, keeping it as flat against the glass as possible. This technique ensures the vinyl sticker stays exactly where you put it.
If you see a few tiny air bubbles, don't panic. Most small ones will actually disappear on their own after a few hot days as the sun bakes the vinyl and lets the air escape. For any stubborn bubbles that stick around, just take a pin, poke a tiny hole right in the center, and gently press the air out with your finger. Good as new.
Caring For and Safely Removing Your Decal
Now that your custom sticker is perfectly placed, you'll want to keep it looking sharp for years to come. The good news is that high-quality vinyl is incredibly tough. It's built for the outdoors, so it doesn't need much coddling, but a few simple habits will make all the difference.
When washing your car, just be a little mindful of the decal's edges. Your best bet is to hand wash the area around the sticker with a soft sponge or microfiber cloth. This gentle approach stops you from accidentally catching a corner and lifting it up.
Protecting Your Sticker at the Car Wash
So, what about automated car washes? For the most part, they’re perfectly safe. There’s just one thing to watch out for: high-pressure sprayers. The intense jets used in some touchless car washes are powerful enough to start peeling up the edges of any vinyl graphic if you're not careful.
If you’re using one of those self-serve wash bays, just avoid blasting the wand directly at the sticker's edge for an extended time. A good rule of thumb is to treat your decal like you would your car’s paint. A little caution goes a long way.
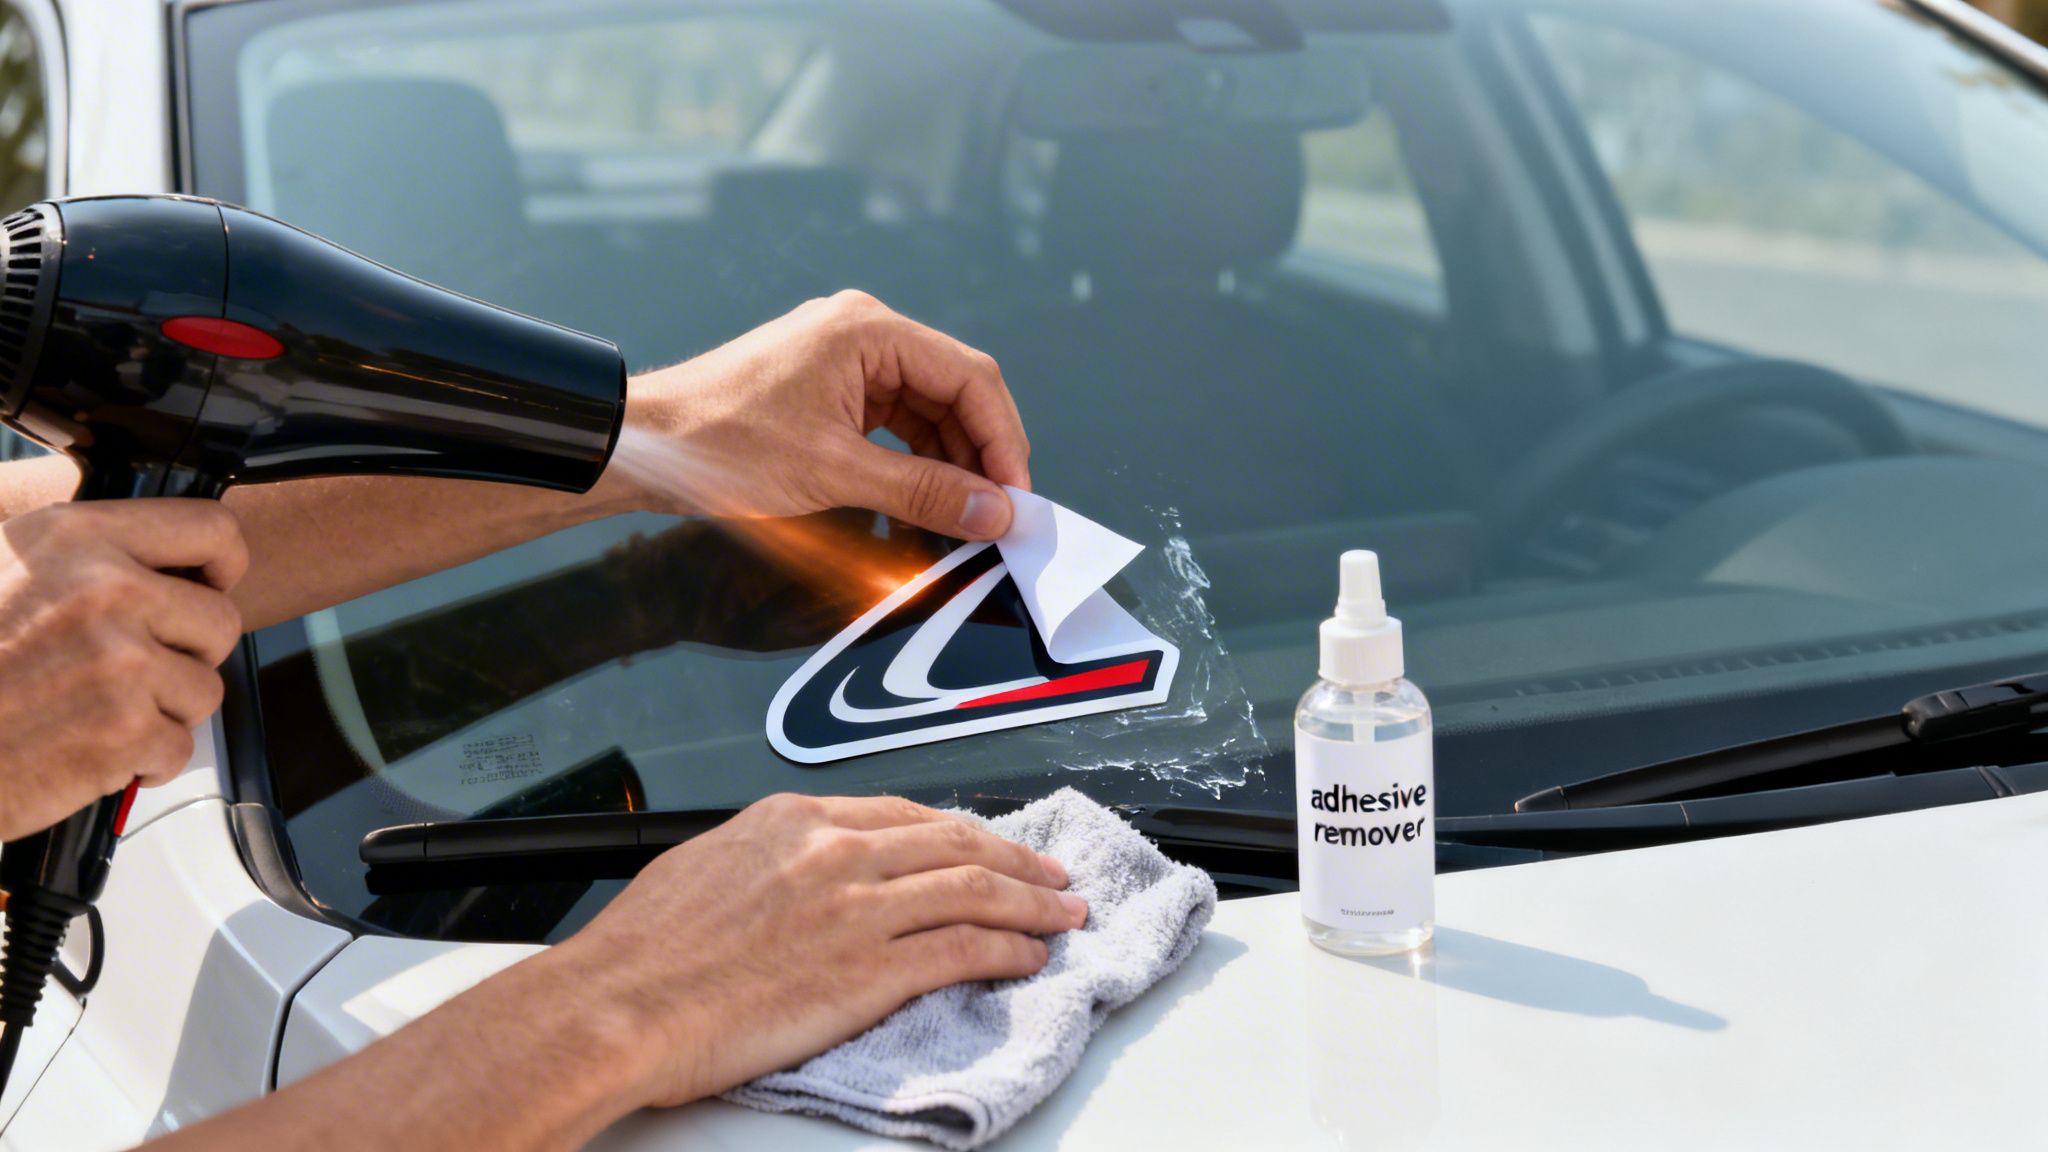
Safely Removing Your Old Decal
When it’s time for a new design or you're getting ready to sell your vehicle, taking off the old decal is a straightforward job that won't harm your glass. The whole trick is to soften the adhesive first. It makes the vinyl pliable and much easier to peel off in one clean piece.
Your best friend for this task is a standard hairdryer.
Turn your hairdryer to a medium or high heat setting and hold it a few inches from the vinyl. Move it back and forth over the whole sticker for a minute or two. This gentle warmth is all you need to loosen the adhesive's grip on the glass.
Once the vinyl feels warm, you can use your fingernail or a plastic razor blade to gently lift one of the corners. From there, you should be able to slowly peel the entire sticker off at a low angle. If it starts to tear, no big deal—just apply a little more heat to that spot and keep going.
After the vinyl is gone, you might find some sticky residue left behind. Just grab a microfiber cloth with a little rubbing alcohol or a citrus-based adhesive remover. It will wipe right off, leaving your window perfectly clean and ready for its next design.
This passion for automotive personalization is a massive force, especially right here in North America. The region is the epicenter for custom car window stickers, holding 37.4% of the USD 3,345 million global market and driving trends worldwide. You can dig into the data showing how the U.S. and Canada are powering the car decal market on cognitivemarketresearch.com.
Answering Your Top Questions About Car Window Stickers
When you're ready to personalize your ride, a few questions always seem to come up. Getting straight answers is the key to choosing the right sticker, installing it with confidence, and making sure it looks great for years to come. We've been doing this for over 22 years, so we've heard them all.
Let's tackle the most common questions we get from customers, from picking the right material to making sure your new decal survives the car wash.
What’s the Best Material for a Custom Window Sticker?
The only real answer is professional-grade outdoor vinyl. We use premium Oracal vinyl because it's engineered to handle years of brutal sun, rain, and temperature swings without cracking, peeling, or fading. It’s the same tough, high-performance material the pros use for commercial vehicle wraps and fleet graphics.
You might be tempted by cheaper indoor craft vinyl, but trust us, it's a bad idea. It looks fine for a week or two, but it lacks the UV protection and heavy-duty adhesive needed to survive outside. Before you know it, you'll have a brittle, faded mess on your window that's a nightmare to remove.
Can I Put a Sticker on My Windshield?
Yes, but you have to be smart about it, and you need to know your local laws. Putting anything in the driver's main line of sight is illegal everywhere for obvious reasons. Generally, you have a couple of safe zones for windshield decals.
- Windshield Banners: These are the long, narrow stickers that run across the very top of the windshield. Most states allow them as long as they stay above the AS-1 line—a small marking etched into the glass by the manufacturer.
- Corner Decals: Small stickers, like parking permits, state inspection stickers, or club logos, are usually fine in the lower corners of the windshield, far away from your central vision.
CRITICAL: Before you stick anything on your front windshield, do a quick search for your state's vehicle code or traffic laws. A few minutes of research can save you from a ticket down the road.
How Do I Make Sure My Custom Text is Easy to Read?
Readability from a distance boils down to two things: high contrast and clean fonts.
If you have dark tinted windows, a bright color like white, silver, or yellow will pop and make your text stand out. For vehicles with no tint or a very light factory tint, a darker color like black or navy blue works best. The goal is a powerful visual contrast that grabs the eye.
As for the font, clarity is king. A bold, simple sans-serif font is going to be way more legible to other drivers than a thin, complex, or super-ornate script font. Size matters, too—make it large enough to be read easily but not so big that it looks crowded and overwhelms the window.
Will a Car Wash Wreck My New Window Sticker?
Your new sticker will be perfectly safe in most automated car washes, but there's one golden rule: you have to wait at least 48-72 hours after applying it before washing your vehicle. This cure time allows the adhesive to fully bond with the glass, creating a connection that's built to last.
One word of caution, though. Be mindful of touchless car washes that use extremely high-pressure water jets. Repeatedly blasting the edges of the vinyl can, over time, cause them to start lifting. For the absolute best long-term results and maximum decal life, nothing beats a good old-fashioned hand wash.
Ready to find the perfect decal that tells your story? At Custom Sticker Shop, we use only premium Oracal vinyl to create durable, American-made graphics that last for years. Check out our huge collection and take advantage of our Buy 2 Get 1 Free offer today at https://customstickershop.us.