
So, what exactly is a custom vinyl sticker decal? It's a specific kind of graphic, cut directly from a solid sheet of colored vinyl. This makes it far more durable and professional-looking than your average paper sticker. Think of it as a silhouette of your design, which is why it has such a clean, "painted-on" look when you apply it to a surface like your truck’s rear window.
What Makes Vinyl Decals Different From Stickers

Ever wondered why some graphics on a vehicle look sharp and seamless, while others just look like a peeling sticker you'd get from a vending machine? The secret is knowing the difference between a real decal and a standard sticker. A traditional sticker is just an image printed onto a background material, like paper or white vinyl.
A custom vinyl decal, on the other hand, is a different beast entirely. It isn't printed at all. Instead, a machine precisely cuts your design out of a single sheet of durable, colored vinyl. This process gets rid of all the background, leaving only the individual letters and shapes of your design.
The Stencil Analogy
Think of it like using a stencil to paint. You lay down the stencil and paint through the cut-out areas, creating the image directly on the surface. A vinyl decal works a lot like that, but instead of paint, you’re applying the pre-cut vinyl shape itself. This “cut-not-printed” method is exactly why decals give you that clean, professional look—no awkward white or clear border around the edges.
This distinction is what’s driving the explosive growth of the global vinyl sticker market. Valued at roughly US$4.5 billion in 2026, the market is expected to hit US$7.1 billion by 2033. This boom is all about the rising demand for vehicle personalization, where tough vinyl decals turn an ordinary ride into a true expression of who you are.
Key Takeaway: A decal is cut from vinyl, while a sticker is an image printed onto a surface. This gives decals a superior, seamless appearance perfect for cars, trucks, and windows.
Why It Matters for Your Vehicle
This method is especially important for car and truck owners who want a high-quality finish that lasts. Whether you’re a Jeep enthusiast hitting the trails or a military family showing your pride, you need a graphic that looks like it belongs on your vehicle, not just stuck on as an afterthought.
That’s why professional-grade materials like Oracal vinyl are the industry standard. They ensure your decal can stand up to the elements without fading, cracking, or peeling off. This commitment to quality materials and the precision cutting process creates a few key advantages:
- No Background: The design stands completely on its own, creating that clean, painted-on effect.
- Enhanced Durability: Because it's cut from solid-colored vinyl, the color is part of the material itself—it won't fade or scratch off like printed ink.
- Sharp, Crisp Edges: The cutting process produces perfectly defined lines that look professional and intentional.
By choosing custom vinyl sticker decals, you're getting a premium product built for longevity and style. It’s hands-down the top choice for personalizing your ride.
Choosing The Right Vinyl for a Lasting Design
The secret to a decal that still looks sharp years down the road isn't just the design—it's the material. Picking the right vinyl is the single most important decision you'll make to ensure your custom decal can stand up to sun, rain, and whatever else the world throws at it. Not all vinyl is created equal, and knowing the difference will save you the frustration of a cracked, peeling decal just a few months after you put it on.
This is especially true for anything you put on a vehicle. There’s a reason vinyl decals dominate the personalized products market, holding over a 60% share according to industry reports on businessresearchinsights.com. It's prized for its incredible weather resistance, making it the go-to for truck owners, military families, and first responders who need graphics that won't fade or fail.
When it comes to professional-grade vinyl, one name is the undisputed benchmark: Oracal. This isn't the flimsy craft-store vinyl you'll find in hobby aisles. It's high-performance material engineered from the ground up for durability.
Understanding Oracal Vinyl Grades
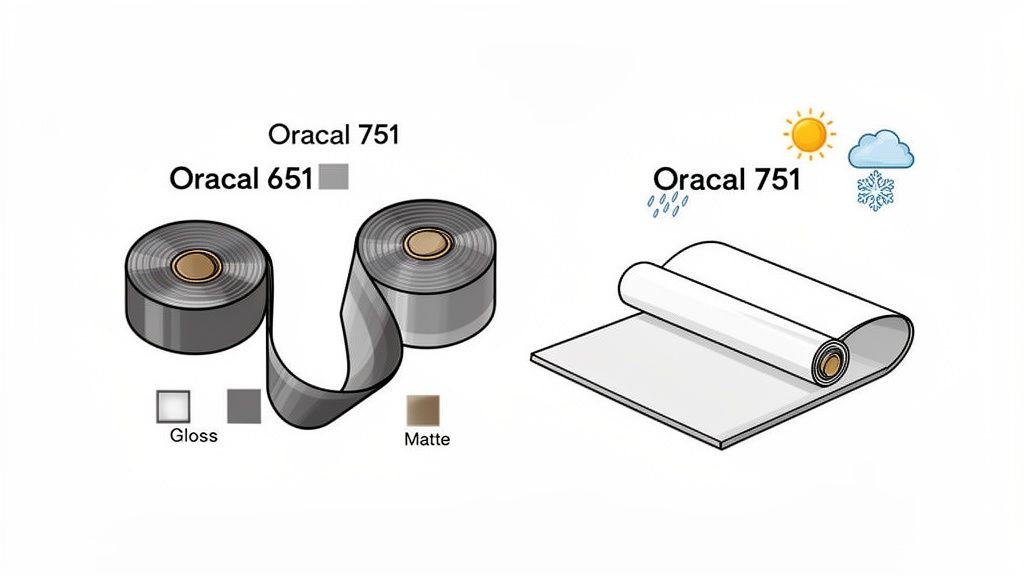
Oracal makes different "grades" of vinyl, each built for a specific job. Think of it like choosing tires for your truck—you wouldn't put racing slicks on an off-road rig. The two main grades you need to know are Oracal 651 and Oracal 751.
To help you decide, here’s a quick breakdown of how these materials stack up.
Oracal Vinyl Grades Compared
| Vinyl Grade | Type | Outdoor Durability | Best For |
|---|---|---|---|
| Oracal 651 | Intermediate Calendared | 6 Years | Flat or slightly curved surfaces like windows and body panels. |
| Oracal 751 | High-Performance Cast | 8 Years | Complex curves, rivets, and indentations found on vehicles. |
As you can see, the right choice depends entirely on where the decal is going and how long you need it to last.
Cast vs. Calendared Vinyl: What Is the Difference?
The manufacturing process is what really separates a standard vinyl from a premium one. This creates two distinct types—calendared and cast—and the difference directly impacts how they perform on a vehicle.
Calendared vinyl is made by rolling and stretching a heated chunk of vinyl into a thin sheet, a lot like rolling out pizza dough. This process creates "memory" in the material, meaning it constantly wants to shrink back to its original shape. It’s thicker, a bit stiffer, and works great on flat surfaces. Oracal 651 is a calendared vinyl.
Cast vinyl, on the other hand, is made by pouring liquid vinyl onto a casting sheet and letting it cure into a relaxed, stable film. This process creates a material with no memory. It's thinner, much more flexible, and conforms beautifully to complex curves without wanting to pull back, making it the top choice for vehicle wraps and tricky applications. Oracal 751 is a cast vinyl.
The term "outdoor rating" you see is the manufacturer's estimate for how long the vinyl will resist fading, shrinking, and cracking when exposed to the elements 24/7. A 6-year rating means your decal is built to endure years of brutal sun and harsh winters.
Gloss or Matte: The Finishing Touch
Finally, you have to decide on the finish. The same exact color can look completely different in gloss versus matte.
Gloss Finish: This is the most popular choice for vehicle decals. It has a shiny, reflective surface that makes colors pop. More importantly, it closely matches the clear coat on most factory paint jobs, giving it a seamless, painted-on look. A gloss black windshield banner for a Ford Mustang, for example, just blends right in.
Matte Finish: A matte finish gives you a flat, non-reflective surface that absorbs light. This creates a subtle, modern, and often more aggressive "stealth" appearance. It's a fantastic way to create a sharp contrast against a glossy paint job.
Choosing the right material, understanding how it's made, and picking the perfect finish are the keys to creating a custom decal you'll be proud to display for years to come.
How to Design and Size Your Perfect Decal
Getting the design and dimensions right is where the magic happens. This is the step where your idea goes from something in your head to a real-world plan for your vehicle. It’s all about making sure the decal you envision fits perfectly and looks just as good on your truck as it does on your screen.
The first and most important rule we tell every customer is to measure, then measure again. It's incredibly easy to misjudge size on a computer. A design that looks massive in the online tool can end up looking like a postage stamp on the side of a Jeep, and a small one might end up blocking your view.
Finding the Perfect Dimensions
The best way to know for sure is to grab a tape measure and some painter's tape. Go out to your vehicle and physically mark out the height and width where you want the decal. This simple step gives you a true feel for its footprint and prevents any surprises later.
Think about these common spots:
- Windshields: For banners, measure the width at the top of your glass. Just make sure to stay above the AS-1 line (it's usually marked on the side of your windshield) to keep things legal. For smaller decals in the corner, always check your local state laws first.
- Back Windows: This is prime real estate. Measure the whole window, but think about whether you want the decal dead center, off to one side, or tucked in a corner. And don't forget to account for your rear wiper blade’s path—you don’t want it scraping your new decal off.
- Body Panels: Doors, tailgates, and quarter panels are big, open canvases. Tape up your dimensions and then step back 10-15 feet. This gives you the best perspective on how the decal balances with the vehicle’s body lines, emblems, and door handles.
Mastering Your Decal Design
Once you’ve got your measurements locked in, it’s time to dial in the design. Whether you’re typing in custom text or uploading a logo, a few key practices will make a huge difference in how clean and durable the final product is.
The single most critical factor for a clean cut is the file type you provide. For the sharpest possible lines, vector files are the gold standard.
A vector file, like an SVG or EPS, uses math to draw lines and curves. Think of it as a set of instructions for our cutting machine. No matter how huge you make it, the edges stay perfectly crisp.
On the other hand, a standard image file like a JPG or PNG is made of tiny squares called pixels. When you try to enlarge a pixel-based image, it gets blurry and jagged. This results in a sloppy, unprofessional-looking cut. While we can sometimes work with a high-resolution image, vectors are the only way to guarantee a flawless result every time. For custom text, a good tool—like the one for our custom text windshield banners—handles all that vector stuff for you.
Why Simple Designs Are Often Better
It’s also helpful to understand a crucial part of our process called "weeding." After the plotter cuts your design from a sheet of vinyl, one of our technicians has to sit down and manually peel away all the extra material. This means painstakingly picking out all the tiny bits, like the centers of the letters 'A', 'O', and 'P'.
Designs that are super intricate with tons of tiny, separate pieces or ultra-thin lines are a real headache to weed. This not only takes more time but also increases the risk of small details getting torn or pulled up. Fonts with delicate, wispy serifs or complex scripts are especially tough.
For the best results, stick to:
- Bold, clear fonts that are easy to read from a few feet away.
- Designs that don’t have a million tiny, floating bits.
- Lines that are thick enough to be stable during weeding and application.
By keeping these sizing and design tips in mind, you'll end up with a custom vinyl sticker that not only looks awesome but is also built for a clean install and years of durability.
A Step-By-Step Guide to Bubble-Free Application
Getting a new custom vinyl sticker decal for your ride is exciting, but let’s be honest—that moment before you apply it can feel like high-stakes surgery. You've got one shot to get it right. But here’s the good news: getting a flawless, professional finish is way easier than you think.
With the right prep and a little patience, you can get a bubble-free result that looks like it was done in a custom shop. We’ll walk you through the whole process, step by simple step.
The real secret to success isn’t some magic application technique—it’s all in the prep work. In our experience, over 90% of application issues like peeling edges or bubbling come from a surface that wasn’t totally clean. Dust, oils from your fingers, or old wax residue will stop the decal’s adhesive from forming the tough, permanent bond it’s designed for.
Preparing the Surface
Before you even think about peeling that backing paper, your first and most important job is to create a perfectly clean slate. This one step is the foundation for a decal that lasts for years.
- Wash with Soap and Water: First, give the area a good wash with mild soap and water to get rid of any obvious dirt, mud, or road grime. Rinse it completely so there’s no soap film left behind.
- Final Wipe-Down with Alcohol: Once the surface is bone dry, do a final wipe with isopropyl rubbing alcohol on a clean, lint-free cloth. This is the critical part. The alcohol evaporates cleanly and strips away any leftover oils, waxes, or invisible gunk that soap and water can miss.
- Let It Dry Completely: Give the alcohol a minute or two to fully flash off. Trying to apply a decal to a damp surface is a guaranteed way to watch it fail later.
Of course, a great application starts with a great design plan. This flowchart breaks down the thinking that should happen long before you have the decal in your hands.
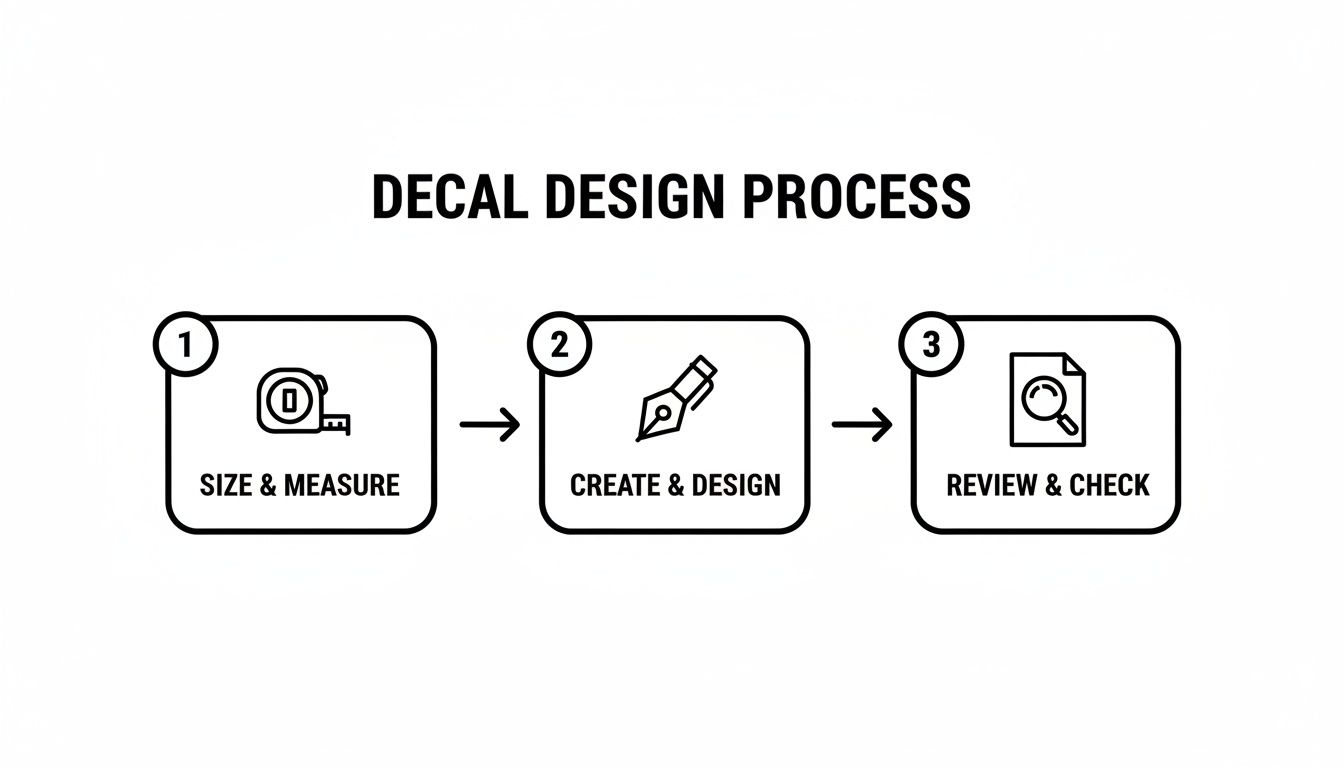
It’s a simple reminder that a few minutes of measuring and planning up front saves a world of headache on the back end.
The Hinge Method for Perfect Placement
Now, let’s get this thing on straight. The best technique for perfect, bubble-free placement is what the pros call the "hinge method." It takes all the guesswork out of lining things up and gives you total control.
Start by placing your decal on the clean, dry surface. Use a tape measure to get it perfectly level and centered where you want it. Once you’re happy, run a strip of masking tape or painter's tape right across the middle of the decal, sticking it down to the surface on both sides. This piece of tape is now your hinge.
Pro Tip: Never try to apply a decal in direct, hot sun or in freezing cold. Extreme heat can make the adhesive grab instantly and become impossible to manage, while the cold makes the vinyl brittle and prevents a solid bond. Find a shady spot and aim for temps between 50°F and 90°F (10°C and 32°C).
With that hinge in place, you can now focus on applying just one half of the decal at a time, which makes the whole process much more manageable.
Applying the Decal
Your surface is clean, your decal is hinged in place—it’s go-time. You’ll want a plastic squeegee or even a sturdy credit card to apply firm, even pressure.
- Lift One Side: Fold one half of the decal back over the hinge. Carefully peel the paper backing away from the clear transfer tape, stopping when you get to your tape hinge in the middle. Grab some scissors and cut away the loose backing paper.
- Squeegee Down: While holding the decal’s edge up and away from the surface, start applying it. Begin at the center hinge and work your way outward, using your squeegee to press the decal down. Use firm, overlapping strokes at a 45-degree angle. This forces any trapped air out toward the edges.
- Repeat for the Other Side: Now, carefully remove your center hinge tape. Fold the second half of the decal over, peel off the remaining backing paper, and repeat the process. Squeegee from the center outward to the edge.
- Final Burnish: Go over the entire decal one last time with the squeegee, giving it firm pressure. This is called "burnishing," and it ensures every last bit of the vinyl has made a solid connection with the surface.
- The Big Reveal: This is the satisfying part. Slowly peel the clear transfer tape away. The trick is to pull it back on itself at a sharp 180-degree angle, flat against the surface. If you see any part of the vinyl trying to lift up, just lay the tape back down, give that spot another good rub with the squeegee, and then continue peeling.
Don't panic if a tiny air bubble or two shows up. Most small ones can be pressed out with your finger. If you have a stubborn one, just take the tip of a pin or a sharp blade, poke a tiny hole right in the middle of it, and press the air out. The hole will be so small you’ll never see it.
Follow these steps, and your custom vinyl sticker decals will look sharp and stay put for years to come.
Ordering Your Decal and What to Expect
So you’ve got your design picked out and you're ready to make it real. Let’s pull back the curtain on what happens from the moment you click "buy" to when that fresh decal lands on your doorstep. Knowing the process helps you get the most bang for your buck and ensures there are no surprises.
We're all about giving you more value, which is why we have deals baked right into our checkout. The most popular one is our “Buy 2, Get 1 Free” offer. It’s automatic—just put three individual decals in your cart, and our system makes the cheapest one free. No codes, no hassle. Better yet, it stacks. Buy six, you get two free.
Maximizing Value with Your Order
Beyond the BOGO deals, a little planning can save you on shipping costs. We offer free US shipping on all orders over $25. If your cart is sitting at, say, $22, grabbing one more small decal to hit that threshold actually saves you money.
Here’s a quick checklist to make sure you’re getting the best deal:
- Bundle and Save: Take advantage of the "Buy 2, Get 1 Free" to outfit multiple vehicles or grab a few different designs at once.
- Hit the Shipping Threshold: Always check if adding one more small item gets you free shipping.
- Plan Ahead: It’s way more cost-effective to place one larger order than several small ones over time.
When you're ready to move forward, you can easily place your custom decal order and see exactly what to expect. Transparency is everything when you're buying something this personal.
From Digital File to Your Doorstep
Once your order is in, our team gets to work. It’s a hands-on process that turns your idea into a physical decal ready for its new home. First, we send your design to a cutting plotter that perfectly traces it onto a sheet of high-quality Oracal vinyl.
Next comes the part that takes a skilled hand: weeding. A technician meticulously removes all the tiny bits of excess vinyl from around and inside your design, leaving only the graphic you ordered. Finally, we apply a sheet of clear transfer tape over the top. This tape is crucial—it holds every piece of your decal together for a flawless, one-step application.
After production, your decal is carefully packaged and shipped out, usually via USPS. For most orders in the US, you can expect it to arrive within 5-8 business days from the time you place your order.
Important Considerations Before You Buy
Choosing the right shop is just as important as choosing the right design. You aren't just buying a sticker; you're investing in a piece of self-expression. The custom decal market is huge—it's part of an industry projected to hit $59.2 billion by 2032. With so many sellers popping up, you need to know what to look for.
Here are a few signs of a quality, trustworthy shop:
- Being US-Based: We're proud to be veteran-run and American-made. This means higher-quality materials and craftsmanship you can count on.
- Secure Payment Options: A professional shop will always offer secure checkout with trusted options like PayPal, Apple Pay, and all major credit cards.
- Clear Legal and Placement Guidance: A good seller cares about your safety. We’ll always remind you to check your local laws, especially for windshield placement, to make sure you’re good to go.
By understanding what goes into your order, you can confidently make your own custom sticker and know you’re getting a top-notch product from a business that stands behind its work.
Your Top Questions, Answered
Got a question? You're in the right place. We get a lot of the same great questions about our decals, so we've put together answers for the most common ones right here. This should help clear things up so you can order with total confidence.
What Makes Your Military And Jeep Decals Special?
Our military and Jeep decals aren't just random graphics we pulled from the internet. They're designed with a deep, personal understanding of the communities they represent—pride, service, and a love for adventure.
As a veteran-run business, we take our military collection seriously. We've lived the culture, and we know the meaning behind every insignia and emblem. Our goal is to create designs that genuinely honor the service and sacrifice of our troops and their families, with the accuracy they deserve.
Same goes for our Jeep graphics. We're part of that rugged, off-road world. These designs are made to be just as tough as the vehicles they're stuck on. Every single one of these specialized decals is proudly made in the USA from premium Oracal 7-year outdoor vinyl, so it’ll handle whatever the trail or highway throws at it. That blend of authentic design and no-compromise quality is what sets them apart.
How Does The Buy 2 Get 1 Free Offer Work?
This is one of our most popular deals for a reason—we made it dead simple. The "Buy 2, Get 1 Free" offer happens automatically in your cart. No coupon codes to hunt down or forget to enter.
It’s as easy as this:
- Add any three individual decals to your cart.
- The system automatically finds the lowest-priced decal of the three.
- It then knocks the full price of that item off your total. It's 100% free.
The best part? The deal stacks. Add six decals, and the two cheapest ones are free. Add nine, you get three free. It’s our way of saying thanks and helping you get all the designs you want, whether you're decking out one ride or the whole family's fleet.
Can I Get A Custom Decal From My Own Design?
Absolutely. We have a massive catalog of over 1,200 designs ready to go, but we love bringing a customer's unique vision to life. A one-of-a-kind custom vinyl sticker decal is what we do best.
If you just need custom text, you can usually use our on-site design tool. Just type what you want, pick a font and color, and the tool gets it ready for our cutters. Easy.
If you have a custom logo, artwork, or a specific image, you'll need to send us a design file. For the cleanest, sharpest cut, nothing beats a vector file.
Vector files (.SVG, .AI, .EPS) are the gold standard for a reason. They use math to draw lines and curves, which means the edges stay perfectly crisp no matter how big or small we make the decal. Our cutting plotters love them.
Don't have a vector file? No sweat. We can often work with high-resolution images like a .PNG or .JPG. Our team has seen it all and can check out your file to figure out the best way to turn your design into a durable, high-quality decal that's all yours.
Why Should I Care If My Decals Are Made In The USA?
Seeing "Made in the USA" on a decal is more than just a patriotic slogan—it's a stamp of quality. When you buy an American-made decal from a shop like ours, you know exactly what you’re getting and who stands behind it.
Here’s why it really matters:
- Superior Materials: We don't mess around with cheap, mystery vinyl that peels off after a few months in the sun. We use trusted, professional-grade materials from manufacturers like Oracal. It's the good stuff.
- Quality Control: The whole show happens under our roof—cutting, weeding the excess vinyl, and applying the transfer tape. This hands-on process means we catch any mistakes and ensure every decal is perfect before it goes in the mail.
- Real Support: We're a family and veteran-run business right here in Topeka, Kansas. If you have a problem, you’re talking to the actual people who made your decal, not some overseas call center.
This is a world away from the mass-produced, cheap imported stickers you see online, which are notorious for bad glue, quick fading, and cracked vinyl. Choosing a US-made decal means you're getting real craftsmanship and a premium product built to last for years.
Ready to find the perfect decal for your ride? At Custom Sticker Shop, we combine American-made quality with thousands of designs to help you express what matters most. Explore our collection and start creating your custom look today!