
You've found the perfect LEGO-style wall decal for a child's bedroom, playroom, or building corner. The colors look right, the design fits the theme, and you're ready to press it onto the painted wall. Then a practical question appears: will it come off cleanly later, or will it take paint with it?
That question matters more than the character or brick pattern. A wall sticker can look excellent on installation day and still become difficult to remove, reposition, or store months later. The result depends on the vinyl, adhesive, wall finish, paint condition, humidity, and the technique used during application.
LEGO decoration has a long connection with stickers. Independent LEGO database discussions identify 1971 as the year the first official LEGO stickers appeared, in Homemaker sets used to decorate furniture and other elements, showing that stickers have been part of LEGO's decoration approach since the early expansion of themed play systems (independent LEGO sticker history discussion). For wall décor, LEGO-inspired and licensed decals carry that visual language into bedrooms and playrooms, but they still behave like pressure-sensitive wall graphics, not like ordinary paper stickers.
Choosing the Right LEGO Wall Sticker Material and Size
The most common buying mistake is choosing a LEGO wall sticker by artwork alone. A bright brick pattern can be printed on materials with very different adhesive behavior, and the cheapest option may create the most expensive removal problem if it bonds aggressively to drywall paint.
Compare the main material choices
Calendered vinyl is widely used for general decals. It's economical and works well on smooth, flat walls, but it can be less forgiving around curves, uneven surfaces, or heavy texture. If the adhesive is permanent, removal may stress the paint film.
Cast vinyl is thinner and more conformable. It's useful when a decal needs to follow subtle surface variation, although it still won't turn a heavily textured wall into a smooth one. Cast vinyl can be a sensible choice for a detailed mural, provided the manufacturer specifies a wall-safe adhesive.
Fabric-based peel-and-stick material has a softer feel and is often selected for temporary children's décor. It can be easier to handle because it's less prone to sharp creases, but removability depends on the actual adhesive system, not the word “fabric” in the product description.
Ask the seller for four details before ordering:
- Adhesive type: Look for removable, low-tack, or wall-safe language rather than assuming every vinyl is suitable for painted drywall.
- Surface recommendation: Confirm whether the product is approved for matte, satin, semi-gloss, textured, or wallpapered walls.
- Finish: Matte reduces glare near windows and ceiling lights. Gloss makes colors look more vivid but can highlight reflections and surface imperfections.
- Panel construction: Large murals may arrive as separate pieces, so check whether alignment marks or overlap instructions are included.
Practical rule: “Removable” describes the intended adhesive behavior, not a guarantee that every paint layer will remain untouched.
Match size to the room
A small decal on a broad feature wall can look disconnected, while an oversized scene may collide with furniture, trim, or switches. Measure the usable wall rather than the full wall, subtracting baseboards, crown molding, doors, outlets, vents, and shelving.
For custom lettering, brick scenes, or vehicle graphics, request a proof at the intended dimensions. A design that looks sharp on a product page may reveal soft edges when enlarged. If you're comparing custom options, review the available vinyl decal format for vehicle graphics as an example of how professional shops present material and sizing information, then ask specifically whether the same construction is suitable for interior walls.
| Material Type | Best For | Removability | Durability | Typical Cost |
|---|---|---|---|---|
| Calendered vinyl | Smooth painted walls and standard graphics | Depends on adhesive | Good for indoor décor when properly applied | Varies by size and finish |
| Cast vinyl | Detailed graphics and mild surface variation | Depends on adhesive and paint | Strong and conformable | Usually higher than basic vinyl |
| Fabric-based peel-and-stick | Temporary children's décor and frequent design changes | Often designed for easier release, but test first | Good for indoor use, with limits on texture | Varies by supplier |
Measuring and Planning Your Wall Layout
Crooked decals usually result from poor planning, not poor hand skills. Before opening the backing paper, map the wall as though you were installing shelving. The usable area is the part that remains after accounting for furniture, switches, outlets, vents, trim, doors, and sight lines from the room entrance.

Build a full-size placement test
Measure the decal's width and height, then reproduce that footprint with painter's tape. Stand several steps back and view it from the doorway, the bed, and the main play area. Tape also helps reveal whether a minifigure's face, a brick edge, or a line of typography will disappear behind furniture.
For a 2.4 m by 3 m bedroom feature wall, a centered minifigure scene needs more than a center point. Mark the wall's vertical and horizontal centerlines, then position the artwork so its visual weight sits comfortably within the room. A character with a raised arm may need more clearance on one side than a symmetrical brick field.
A hallway strip needs a different treatment. Place the lower edge above the chair-rail or furniture line, and keep the artwork visually continuous through the walking path. For a playroom corner wrap, measure both walls from the inside corner and decide which panel will finish into the corner. Don't force a seam directly onto an uneven corner unless the material and design support it.
Plan panels before installation
For a multi-panel mural, draw a simple grid on paper. Record each panel's width, height, top edge, and relationship to the next panel. If the supplier specifies an overlap, include it in the layout rather than measuring each visible panel as though it were independent.
Keep large designs comfortably away from ceilings and adjacent furniture. A little breathing room usually looks more deliberate than a scene that touches every boundary. For broader guidance on positioning wall art and maintaining a balanced display, these tips from Colorado Art Services are useful before you finalize the tape mock-up.
Use removable tape only for the planning marks. Label the top of each panel, photograph the approved arrangement, and leave the mock-up in place long enough to notice conflicts with doors, lights, and daily movement.
Preparing Your Wall Surface for Perfect Adhesion
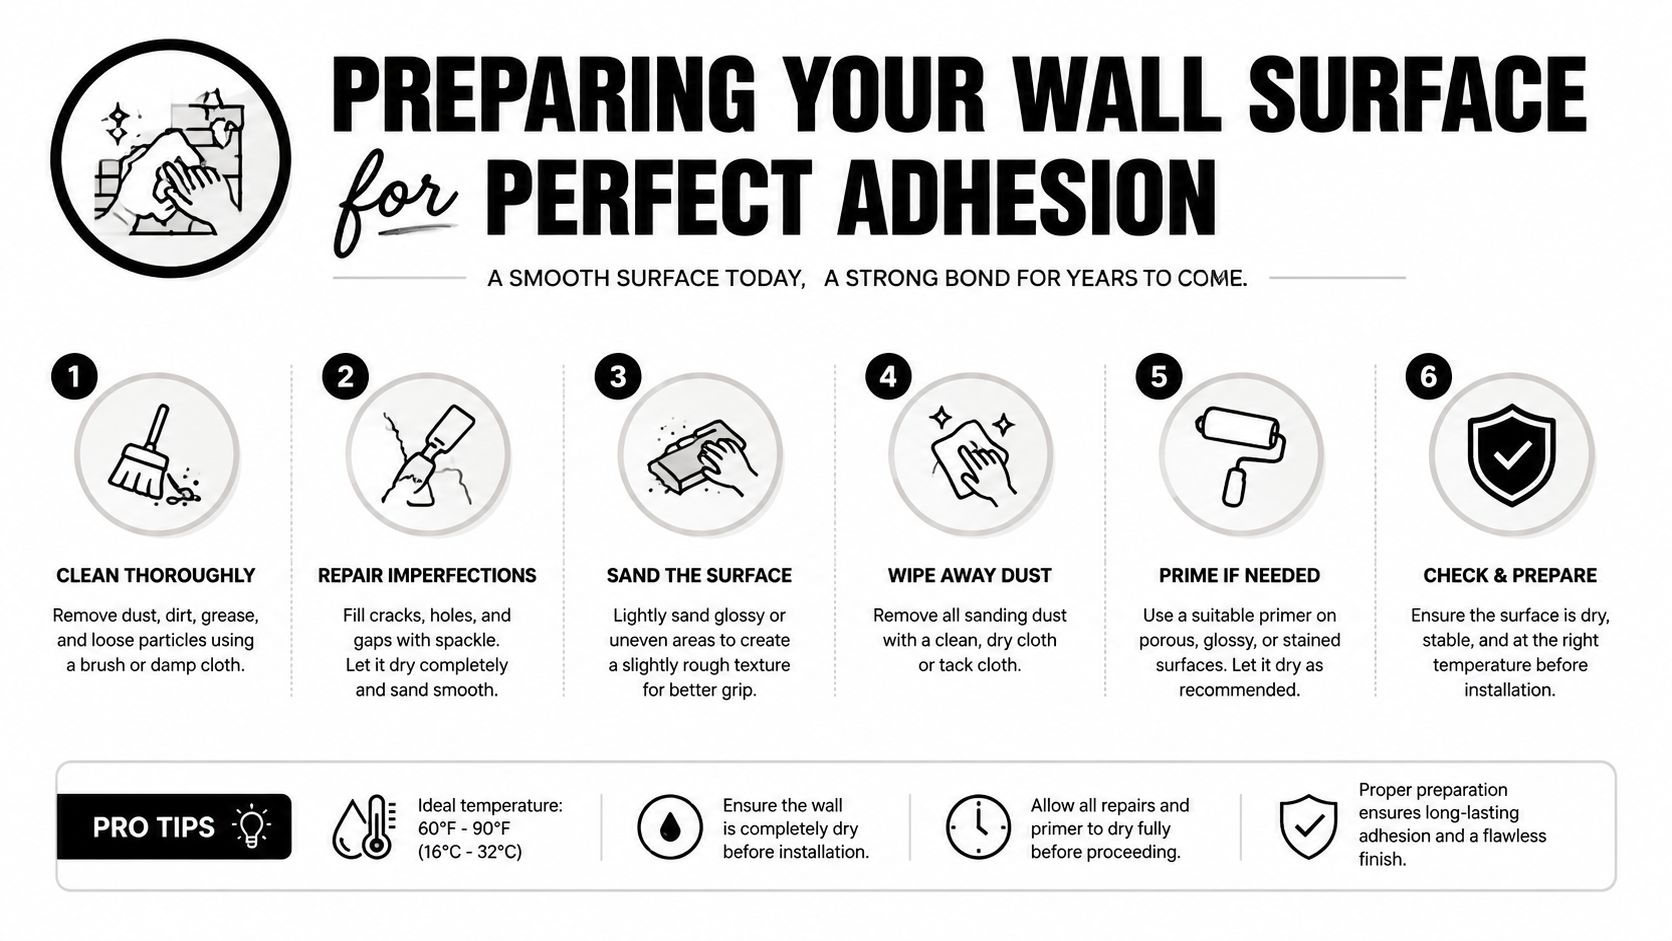
Surface preparation decides whether the decal settles smoothly or starts lifting at the edges. Dust, grease, moisture, textured paint, and uncured coatings all reduce reliable contact. Installation guidance recommends cleaning and fully drying the wall, avoiding freshly painted surfaces, and using a controlled alignment method before transfer tape removal (independent decal installation guide).
The exact paint cure period varies by coating and manufacturer. “Dry to the touch” doesn't mean the paint has developed a stable surface for adhesive. If the wall is newly painted, follow the paint maker's cure guidance and test a small area before committing to a large decal.
Use a controlled preparation sequence
- Inspect the coating: Look for flaking paint, chalky areas, fresh touch-ups, wallpaper seams, and heavy orange-peel texture.
- Clean gently: Remove dust and fingerprints with a suitable wall cleaner. For a small inconspicuous test area, many installers use diluted isopropyl alcohol, but confirm that it won't dull or soften the finish.
- Rinse if needed: Cleaner residue can create its own adhesion barrier, so follow the product instructions and allow the surface to dry fully.
- Address texture: Decals need contact with the wall, not just the peaks of the texture. Heavy texture can create channels where air and moisture remain trapped.
- Check the environment: Field guidance commonly recommends application temperatures in the roughly 50 to 90°F range and avoiding damp or textured surfaces (vinyl decal application guidance).
- Run a sample test: Apply a small piece in a hidden location. Leave it undisturbed, then remove it slowly and inspect both the decal and paint.
Surface warning: Low-VOC and stain-resistant paints can require additional time before transfer tape removal because the adhesive may lift or fail at the edges (installation instructions for wall decals).
Watch the preparation video only after you've assessed the wall itself, since no installation demonstration can predict how an older coating or textured finish will release. For a broader step-by-step wall preparation, use a painting-focused checklist and adapt it to the decal manufacturer's instructions.
If you're preparing a small custom text project, review the custom text window decal format for lettering considerations, but verify wall compatibility before ordering.
Applying LEGO Stickers Without Bubbles or Wrinkles
Large decals become difficult when too much adhesive is exposed at once. The reliable approach is to create a temporary hinge, expose a manageable section, and keep the squeegee ahead of the release point.
Start by placing the decal face-up on a clean table. Use painter's tape along the top edge to hold the artwork against the wall, then fold the lower portion away from the wall so the tape acts as a hinge. For a large graphic, add a vertical center hinge as well, which lets you work in controlled halves.
A dry application method for smooth walls
Peel back only part of the backing paper. Fold it firmly behind itself rather than allowing it to hang loosely. Align the first exposed section with your tape marks, then press the vinyl using a felt-edged squeegee or a wrapped plastic card.
Work from the center outward with overlapping strokes. Don't chase the edge with random pressure. Each stroke should push air toward an area that has not yet been bonded, while the backing paper continues to protect the remaining adhesive.
As the first section settles, pull the backing downward at a shallow angle and continue working ahead of the exposed edge. Keep the vinyl supported. If it folds back onto itself, stop and separate it carefully rather than stretching the material.
For large brick murals, a light wet application can help with positioning, but only when the product supplier permits it. Excess liquid can delay adhesion and trap moisture, especially on coatings that don't tolerate moisture well. A small amount of slip solution may help you float a compatible decal into place, but the wall and material must be allowed to dry completely before you judge the bond.
Finish the details before leaving
Small air pockets should be handled while the vinyl is still accessible. Press toward the nearest edge, and use a fine pin only for a stubborn bubble that cannot be worked out. Make the puncture tiny, then press the surrounding vinyl down so the air can escape.
Burnish every perimeter firmly, including corners, narrow brick studs, and small character details. These areas have less surface area and often become the first points of lift. If you're hiring help, a guide on how to vet wallpaper installers can help you evaluate whether a contractor understands alignment, surface condition, and finish protection rather than offering general decorating labor.
Removing and Repositioning Wall Decals Safely
A removable LEGO wall decal isn't automatically damage-free. The outcome changes with paint age, finish, texture, humidity, adhesive strength, and the length of time the graphic has been installed. Smooth, stable paint generally gives you a better chance than chalky, peeling, heavily textured, or wallpapered surfaces.
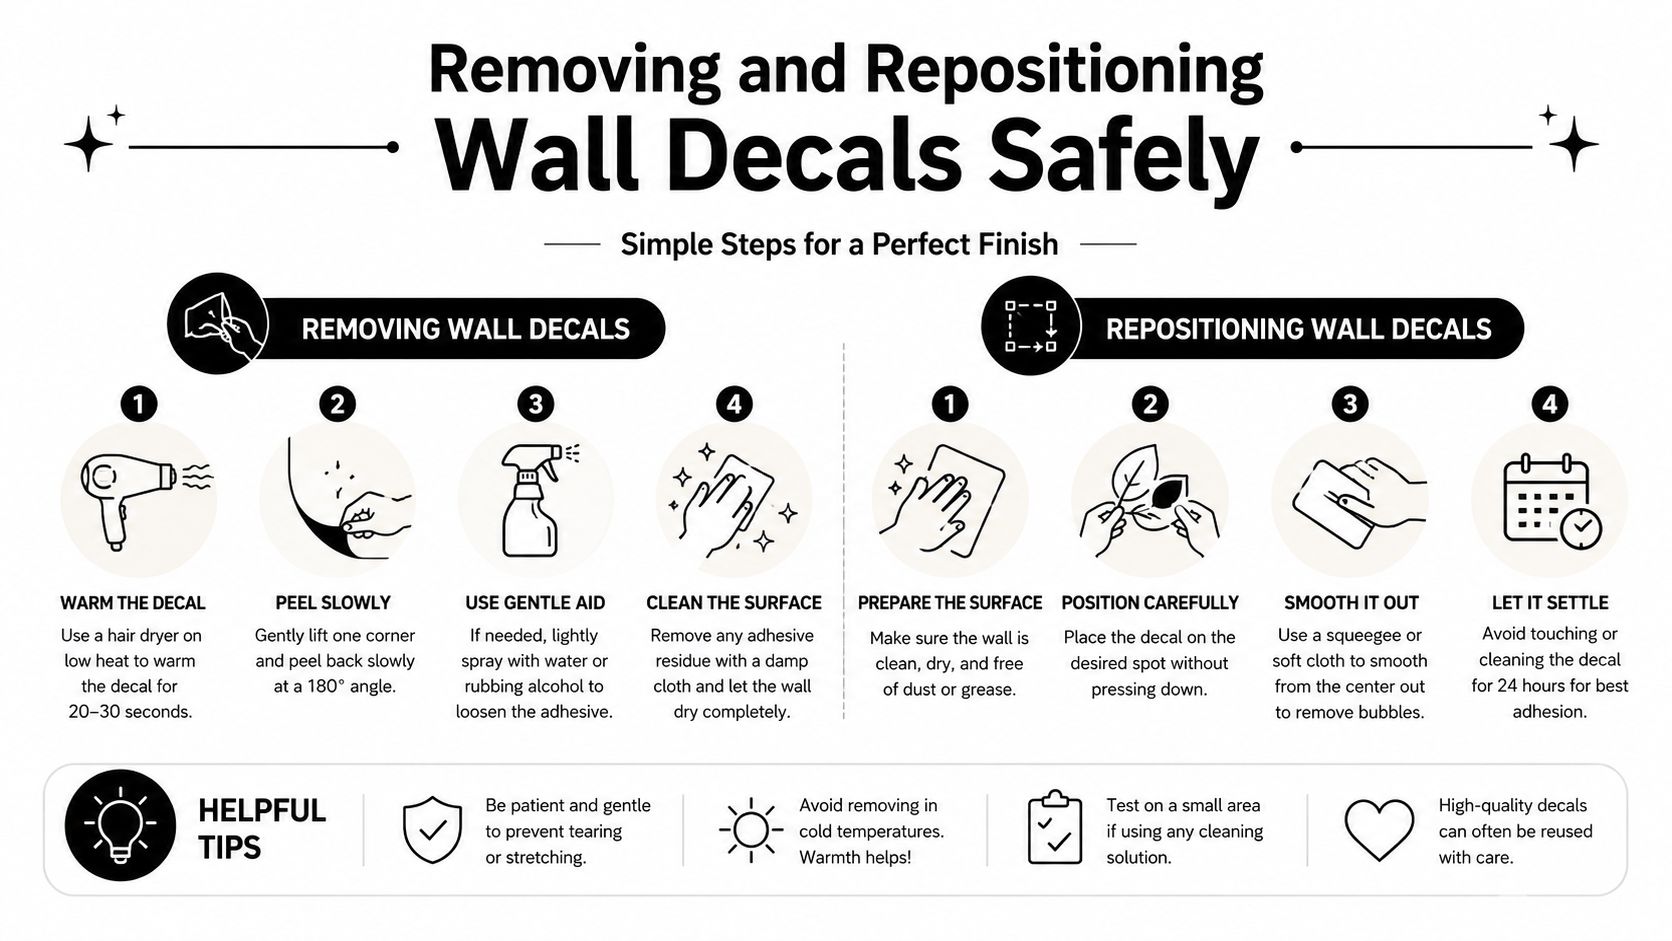
Start at a corner and warm a small area with a hairdryer on low or medium heat. Keep the airflow moving so you soften the adhesive without overheating one spot. Independent removal guidance recommends low-to-medium heat, slow peeling at a shallow angle, and testing any solvent before using it across the wall (wall decal removal guidance).
Pull against the wall, not away from it
Peel the decal back over itself, keeping the material close to the wall. A slow, controlled pull reduces the upward force that can lift the paint film. If the vinyl resists, apply a little more moving heat and continue in a short section rather than yanking the entire graphic.
Stop immediately if paint begins to come away. The wall may need a different approach, and continuing can turn a small repair into a broad patch. On textured walls, the adhesive may have gripped the high points while remaining unsupported in the low points, so removal can be uneven.
Residue and reuse require realistic expectations
For residue, begin with warm soapy water and a microfiber cloth. If that doesn't work, test a compatible adhesive remover in a hidden area first. Solvents can soften paint, alter sheen, or leave a visible cleaning mark even when the adhesive disappears.
Repositioning is most realistic while the decal is still being installed and the adhesive has not fully settled into the wall texture. Once you've pressed it firmly and left it in place, repeated lifting can stretch the vinyl, distort detailed brick lines, or reduce the adhesive's reliability.
If you remove a decal for possible reuse, keep it flat between clean wax paper sheets. That may preserve the shape, but it won't restore adhesive performance indefinitely. The practical decision is to treat reuse as possible for careful, short-term repositioning, not as a guaranteed life-cycle feature.
Sustainability also deserves a clear-eyed assessment. LEGO's official sticker help focuses on application and replacement, while the company has moved away from single-use plastic stickers in sets as part of a wider sustainability shift (LEGO sticker replacement guidance). For wall décor, a durable decal may reduce replacement frequency, but removal can still involve residue cleanup or paint repair.
Creative Design Ideas for LEGO Wall Decor
A LEGO wall design should give the room one clear focal point. In a child's bedroom, oversized bricks along the lower wall can define a playful building zone without crowding the entire room. Keep the main scene near the child's eye line, then add a minifigure, vehicle, tool, or shield so the arrangement feels intentional rather than like unrelated shapes.
Build the scene around a simple story. A vehicle near the floor, a character above it, and smaller accessory decals pointing toward a shelf or reading corner create visual movement. Bright primary colors suit active play spaces. A narrower palette works better where bedding, storage, and artwork already compete for attention.
Game rooms and teen spaces usually benefit from restraint. A grayscale or muted brick pattern can sit behind shelving or a gaming setup while leaving screens and hardware prominent. Use the brick texture as the background, then place stronger color on one character or emblem.
Use personalization with intention
Custom brick-style lettering can spell out a name, family word, or short phrase. Leave generous spacing around door frames, shelves, switches, and trim. Matte lettering also reduces glare, which makes the text easier to read under overhead lighting.
A flat decal backdrop can work with physical LEGO baseplates attached using removable hardware suited to the wall. The decal establishes the larger setting, while real builds add depth and can change with the child's interests. Support heavy models independently. Wall vinyl provides visual context, not structural support.
You can explore custom decal design options when a ready-made character scene does not match the room's proportions. Ask for a scaled proof before approving artwork, and check each edge against furniture, switches, shelving, and trim. That planning matters because a large decal may be difficult to reposition after firm application, especially on textured paint.
The children's wall decal category remains commercially relevant because it combines recognizable toy-inspired designs with home décor. Industry estimates place the category among active areas of children's room decoration, giving buyers more choices in materials, sizes, and personalization. Greater choice does not remove installation risks. A design that looks good in a product preview can still crowd a small wall or leave awkward gaps around permanent fixtures.
Custom Sticker Shop offers custom vinyl decals prepared for smooth-wall applications, including personalized text and brick-inspired designs. After measuring the wall, testing the paint, and choosing a removable adhesive, visit Custom Sticker Shop to review options that fit the room's proportions instead of forcing the layout around the artwork.