
You're probably here because you typed vinyl car decals near me and got the usual mix of local sign shops, wrap installers, generic marketplaces, and a few pages that tell you almost nothing about the vinyl, the install method, or how long the decal will hold up on your vehicle.
That's the core problem with this search. It sounds simple, but it isn't. The right answer isn't always the closest shop, and it isn't always the cheapest listing either. A clean, durable decal comes down to three things: the right material, the right prep, and the right application method.
Vehicle decals aren't a small hobby category anymore. They're part of a mature graphics market built on durable film technology. Signs.com describes clear vehicle decals as printed on clear 3 mil vinyl with UV-resistant ink, waterproof, and available in sizes from 3" x 3" up to dimensions where one side can reach 1176" if the other stays under 52", which shows how scalable modern vehicle graphics have become for cars, trucks, and fleet use (Signs.com clear vehicle decals).
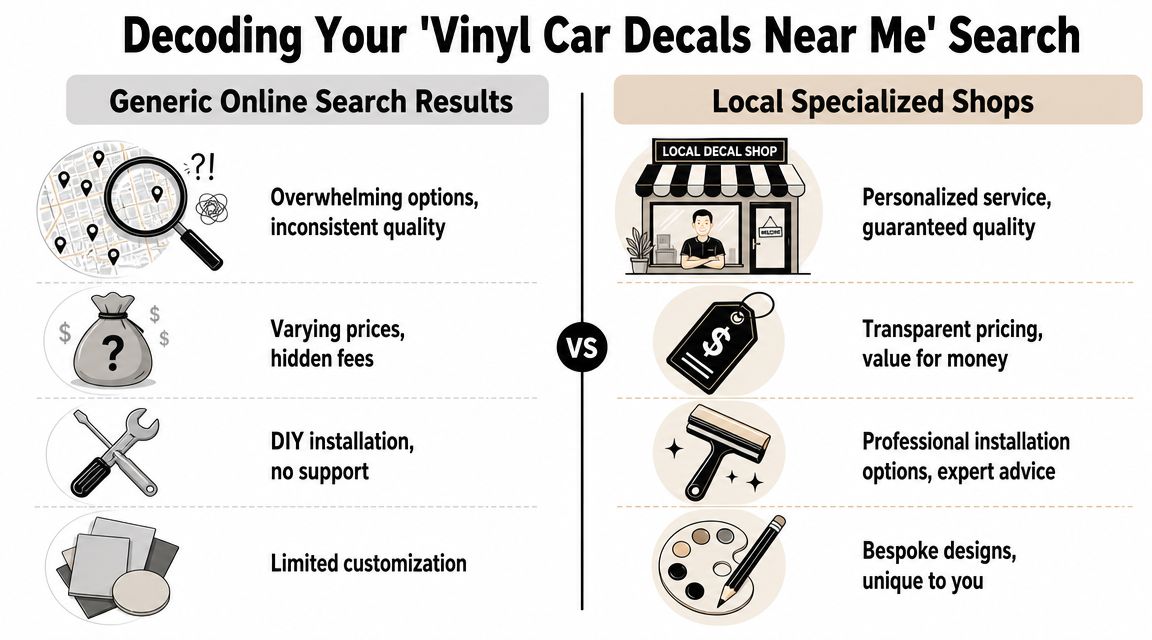
Decoding Your 'Vinyl Car Decals Near Me' Search
A local search usually mixes together very different kinds of businesses. One listing may be a full service wrap shop. Another may be a general sign store that also does decals. Another may just broker jobs out to someone else. If you want a good result, you need to sort providers by fit, not by map pin.
In major markets, you can see how established this category is. Chicago alone has multiple providers advertising vehicle graphics and decal services, including FASTSIGNS and other specialized shops. That concentration tells you two things. First, decals are a standard option for branding and customization. Second, buyers need to separate general sign shops from specialized decal makers when comparing materials, install support, and turnaround (FASTSIGNS Chicago custom decals).
What local shops do well
A good local shop can make life easier when your job needs hands-on help.
- In-person measuring helps when you're placing graphics on a curved hood, a windshield banner, or a panel with trim and body lines.
- Installation services matter if the decal is oversized, multi-piece, or going onto a tricky surface.
- Fast pickup can be useful if you need the decal for an event, a gift, or a fleet vehicle on a deadline.
- Material discussion face to face is still valuable, especially if you want to compare gloss, matte, metallic, or specialty films in person.
That said, local doesn't automatically mean precise. Some shops focus on big signage and treat smaller automotive decals like a side job. That's where quality starts to drift.
Where local results can fall short
The weak spots usually show up in the details.
| Option | What often works | What often goes wrong |
|---|---|---|
| General sign shop | Can handle basic cut vinyl and simple lettering | Limited decal-specific guidance, fewer standard automotive designs |
| Wrap installer | Strong install skills, good on contoured surfaces | May prefer full wraps over small decal orders |
| Generic online listing | Easy to find, broad selection | Hard to verify actual vinyl series or install prep |
| Specialized decal maker | Better fit for repeatable decal production | You need to verify sizing and application instructions |
Buy from the shop that answers your technical questions clearly. If they can't tell you what vinyl they use, how it's taped, or how they expect you to install it, keep looking.
Redefine what “near me” should mean
For decals, “near me” should really mean easy to buy from, easy to verify, and easy to install. That can be a local shop. It can also be an online provider that gives you exact sizing options, material details, and prepped decals that arrive ready to apply.
If you're buying a straightforward windshield, window, hood, or body-panel decal, the best source is often the one that gives you clean production, predictable sizing, and proper transfer tape, whether the box comes from across town or from a well-run decal shop shipping to your door.
How to Judge Decal Quality Before You Buy
A decal can look clean in a listing photo and still be the wrong buy for your vehicle. The smart move is to judge three things before you pay: the vinyl itself, how well it fits the panel, and whether it arrives ready for a proper install.
Start with the vinyl, not the artwork
Good design sells the decal. Good film keeps it on the car.
Custom Sticker Shop states it uses professional-grade Oracal vinyl rated for up to 7 years outdoors, which is the kind of specific answer you want from any seller because decal value comes from material grade and outdoor durability, not just price (video discussion of Oracal outdoor rating and buying questions).
Ask these questions before you order:
- What vinyl brand and series are you using?
- How long is it expected to last outdoors?
- Does it arrive weeded, masked, and ready to install?
A shop that answers clearly usually knows its process. A seller who hides behind phrases like "premium vinyl" usually does not.
Match the vinyl to the panel
Vehicle graphics fail when the material and the surface do not match.
Rear glass, doors, rocker panels, and windshields all install differently. Flat sections are forgiving. Long stripes, curved body lines, and tight edges expose weak material and sloppy sizing fast. A windshield banner, for example, has to clear trim, sit straight, and hold at the edges without crowding the glass. If you are comparing options for that kind of placement, study a product sized for the application, such as this vinyl windshield banner decal for Chevy Malibu.
Measure the usable area, not the whole panel. Leave room for seals, moldings, wiper sweep, body contours, and a little visual margin so the decal looks intentional once it is on the vehicle.
Practical rule: A decal that technically fits can still look wrong. Buy for the visible, usable space.
Cheap vinyl usually shows its weakness at the edges
Low-grade film often looks fine out of the box. Problems start after heat, cold, washing, or a little time in the sun. The first sign is usually edge lift. Then dirt gets under the film, the line stops looking crisp, and the job ages in a hurry.
Use the listing and the seller's answers to spot the difference:
- Good sign: The seller names the vinyl brand or series and explains where it works best.
- Bad sign: The listing only says “high quality vinyl” or “commercial grade” with no details.
- Good sign: The decal comes transfer-taped and spaced for placement.
- Bad sign: Installation prep is barely mentioned, or you are expected to assemble separate pieces yourself without guidance.
Judge install readiness before you buy
This part gets missed all the time.
A well-made decal should arrive cut cleanly, excess vinyl removed, and transfer tape applied correctly for the size and detail level of the design. Fine text, thin strokes, and multi-part layouts are much harder to place if the masking is cheap or the spacing is off. You are not just buying vinyl. You are buying production quality.
If a shop cannot tell you how the decal ships, how small details are handled, or what surface prep they expect, keep looking. The right “near me” result is the seller that gives you enough detail to predict a clean result, whether that shop is local or shipping from out of town.
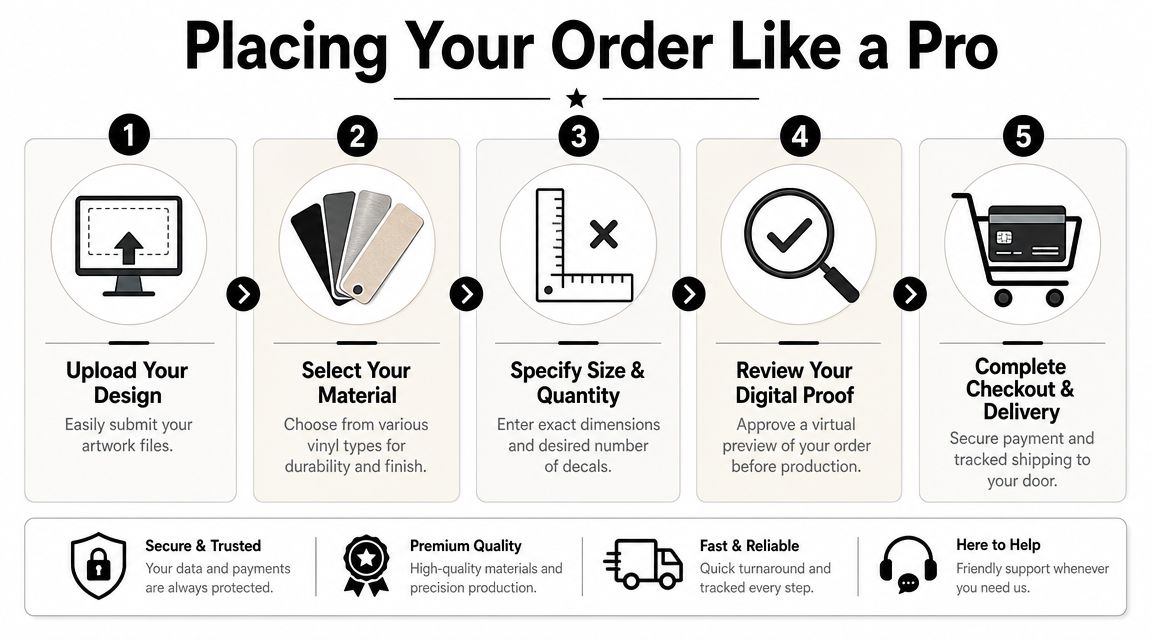
Placing Your Order Like a Pro
Ordering a decal goes smoother when you make the choices in the right order. Most buying mistakes happen because people start with style and only later think about size, panel shape, or whether they're installing it themselves.
Build the order around the vehicle first
Start with the exact spot where the decal will go. Rear glass, quarter window, hood edge, rocker, tailgate, and windshield all behave differently. Once you know the location, the rest gets easier.
A clean ordering workflow looks like this:
- Choose the panel first. Decide where the decal is going before you pick the design.
- Measure the space. Use real dimensions, not guesses from product photos.
- Pick the right style. Text, racing stripes, tribute graphics, family decals, and off-road themed designs all place differently.
- Confirm the installation format. Ask whether it arrives pre-spaced and transfer-taped.
- Review your order details one last time. Spelling, orientation, color, and size errors are expensive because they're avoidable.
Use categories to narrow the field
A well-organized decal catalog saves time because it helps you shop by use case instead of scrolling blindly. That matters if you're looking for a military tribute, a Jeep graphic, a family window decal, or something with custom text.
If you want a made-to-order layout instead of a stock design, a product page like this make your own custom car decal listing is the kind of format to look for because it lets you start with your vehicle and message, not somebody else's finished graphic.
What to confirm before checkout
Some sellers make ordering easy but leave the hard parts vague. Don't let that slide. Before you pay, confirm:
- Sizing format so you know whether dimensions are width-based, height-based, or proportional.
- Color expectations if the decal is cut vinyl rather than printed.
- Application prep so you know whether transfer tape is included.
- Shipping timing if the decal is for a trip, gift, or event.
- Surface compatibility if you're placing it on glass, paint, or a panel with noticeable curve.
If the order page is clear about production and install prep, the seller usually has their process under control. If it's vague, expect surprises.
A good order feels boring. That's what you want. No guesswork, no mystery vinyl, no “we'll figure it out after purchase.”
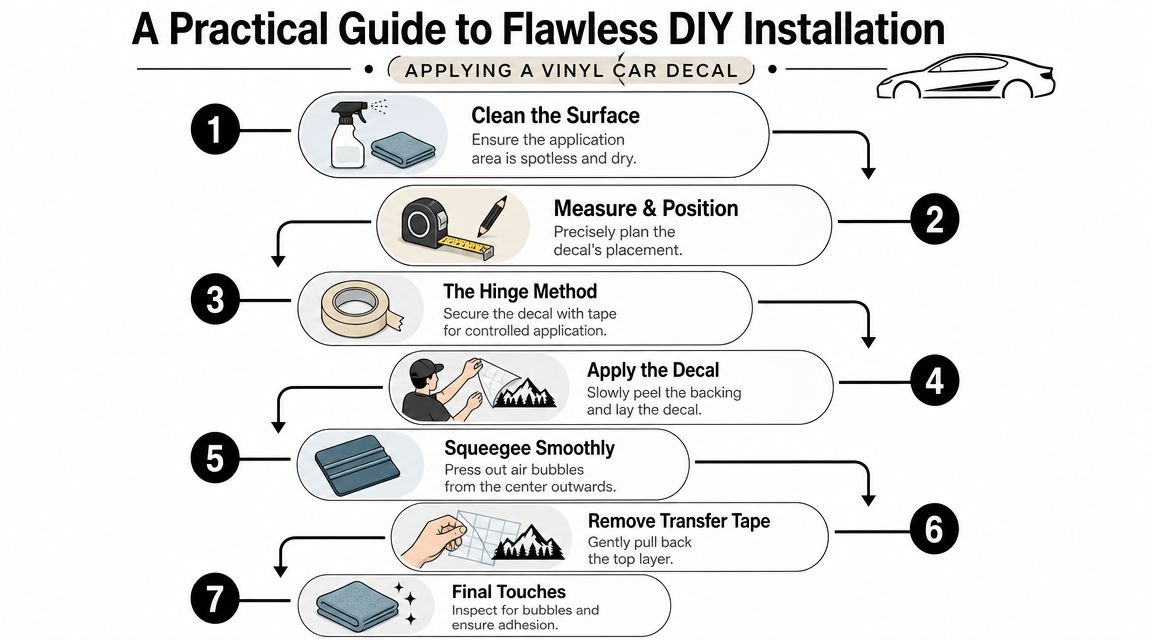
A Practical Guide to Flawless DIY Installation
Most decal problems happen before the vinyl ever touches the vehicle. The fix isn't fancy. It's careful prep, straight placement, and steady pressure.
Prep the surface like you mean it
Wash the area first. Then dry it fully. Don't apply over dust, wax residue, road film, or moisture hiding around trim.
Glass is usually simple. Painted panels need more attention because tiny contamination shows up fast once the vinyl is down. If the surface feels slick from wax or detail spray, clean it again before you continue.
The secret to a great decal isn't magic. It's a clean surface and patience.
Why transfer-taped decals install cleaner
Professional workflows follow a stepwise process because alignment errors get expensive fast. In one production example, the emphasis is on proper vinyl tracking through the cutter, since even slight skew can ruin dimensional accuracy on long decals. That's also why buyers should confirm the decal arrives pre-spaced and with transfer tape, which makes bubble-free DIY installation much more manageable (step-by-step decal production and installation workflow).
That prep work matters on your end too. If the decal is already weeded, spaced correctly, and taped, you're not trying to line up separate letters or fight stretched pieces one by one.
A ready-to-apply format is especially useful on longer graphics, such as Ford Mustang fender hash decals, where spacing and straightness make the look.
Here's a visual walkthrough if you want to see the motion before you start applying:
Use the hinge method on anything with length
For larger decals, don't freehand it.
Use this sequence:
- Test position first. Hold the decal in place with masking tape and step back several feet.
- Create a hinge. Run a strip of masking tape across the top or down the center.
- Peel the backing slowly. Keep the decal under control instead of letting it flop onto the panel.
- Lay it down in stages. Don't rush the full width all at once.
- Squeegee from the center outward. Use overlapping passes.
What works and what doesn't
A few habits separate clean installs from frustrating ones.
Works well. Firm, even squeegee pressure.
Works well. Pulling the transfer tape back at a low angle.
Works well. Rechecking level before the backing comes off.
Doesn't work. Starting on a hot panel in direct sun.
Doesn't work. Trying to save time by eyeballing alignment.
Doesn't work. Yanking transfer tape upward when the vinyl hasn't fully grabbed.
If a small bubble appears, don't panic. Most tiny ones settle down better than people expect. What ruins installs is constant lifting and re-laying of the vinyl after it has started bonding.
Protecting Your Investment Long-Term Decal Care
A clean install can still fail early if the decal gets treated like paint, trim, and glass all at once. Vinyl has edges, and edges are where abuse shows up first.
Good long-term care is simple. Wash it gently, keep an eye on problem spots, and adjust your expectations to the climate the vehicle lives in.
Wash with the decal in mind
Hand washing gives you the most control. Use a soft wash mitt, plenty of water, and normal automotive soap. Let the soap loosen road film before you touch the surface, especially around corners and cut lines.
Automatic washes are harder on decals than many drivers realize. Stiff brushes can catch an edge, and even touchless washes can hit the same spot with enough force to start weakening a poorly sealed corner over time.
Pressure washers are not automatically a problem. Bad technique is the problem. Keep the spray back, avoid aiming directly into decal edges, and never concentrate the nozzle on a lifting corner.
Climate changes decal life more than the calendar
The key question is not how old the decal is. Rather, it's what it has been exposed to.
A daily driver parked outside in full sun, washed often, and driven through winter salt will age graphics faster than a garage-kept truck that only comes out on weekends. Heat bakes the film. Freeze-thaw cycles work on the edges. Salt, grime, and repeated washing add wear that has nothing to do with the date on the invoice.
This is one place where a smart "vinyl car decals near me" search needs some judgment. A nearby seller is only the right choice if they understand your conditions. If they cannot speak clearly about outdoor life, sun exposure, or cold-weather use, distance does not help much. As noted earlier, climate and use matter just as much as the cut itself.
Catch small problems early
A decal rarely goes from perfect to ruined overnight. Usually it starts with a tiny lifted point, a dirty edge, or a corner that gets hit over and over during washing.
Handle those issues early.
- After washing, run your eyes over the edges on corners, door seams, and leading surfaces.
- In winter, keep ice scrapers and stiff snow brushes away from decals on glass or near trim lines.
- After highway trips, rinse off grit that collects along the front edge of larger graphics.
- If the vehicle stays outside, expect faster fading and inspect sun-facing panels more often.
One rule from the shop floor applies here. Do not keep scrubbing a lifting edge and hope it settles back down. Once dirt and water get underneath, the adhesive bond usually gets worse, not better.
The goal is not to baby the decal. The goal is to avoid the handful of habits that shorten its life for no benefit.
Get the Perfect Look with Confidence
A smart vinyl car decals near me search isn't really about finding the closest shop. It's about finding the right process. That means buying from someone who can tell you what vinyl they use, how the decal is prepared, and whether the design fits your panel and your climate.
The shops that get repeat business usually do the same fundamentals well every time. They use the right film for the job. They cut accurately. They weed cleanly. They tape the decal properly. They give the buyer enough install guidance to avoid preventable mistakes.
That's also why a high-quality online provider can make more sense than a random local listing. If the ordering is clear, the material is named, the decal arrives pre-spaced and transfer-taped, and the sizing matches the vehicle, you're already ahead of most “near me” search results.
Keep the buying framework simple:
- Ask what vinyl series they use
- Ask how they prep the decal for install
- Measure the exact panel before ordering
- Match the material to your climate and surface
- Install patiently on a fully cleaned surface
Get those five decisions right and the rest becomes straightforward.
One option in that lane is Custom Sticker Shop, a veteran-friendly, family-run decal maker in Topeka, Kansas, operating since 2001 with American-made automotive graphics, more than 1,200 car and truck designs, prices starting at $7.99, free U.S. shipping on orders over $25, and typical delivery in 5–8 days via USPS or UPS, according to the company's publisher information above. Those details matter because they describe the exact things serious buyers should compare: material, design range, install prep, shipping, and fit for the vehicle.
If you want the decal to look professional, don't shop by distance alone. Shop by answers, process, and preparation. That's how you get a decal that looks right on day one and still looks right after real use.
If you're ready to stop guessing and order a decal that's built for real vehicle use, browse Custom Sticker Shop and compare by design, fit, and application style. A clear product page, the right vinyl, and proper transfer-taped prep will get you closer to a clean result than a map listing ever will.