
You walk up to your car, Jeep, or truck and it still feels too much like every other one in the lot. The shape is right. The color is fine. But it does not yet look like yours.
That is how stripe decals for cars earn their place. A well-designed stripe changes how a vehicle reads from across the street. It can make a muscle car look sharper, a Jeep look tougher, a minivan look cleaner, or a truck carry a tribute that means something personal.
The key is getting three things right. Style, material, and installation. Get those right and stripes look intentional. Get them wrong and even a good design can look cheap fast.
Transform Your Ride from Stock to Standout
Most owners start in the same place. They are not looking for a full wrap or a complete repaint. They want a visible change that does not bury the vehicle’s original character. Good stripes do that.

A stripe kit can sharpen the centerline of a hood, stretch the profile of a truck, or add motion to a body shape that looked flat before. On some builds, stripes are about performance styling. On others, they are about identity. That might mean a subdued side stripe on a daily driver, a bold hood treatment on a tuner, or a service-themed graphic on a veteran’s truck.
Why stripes work so well
Stripes succeed because they work with the body lines there. They draw attention to length, width, stance, or a key panel. They also let you personalize a vehicle without committing to permanent paintwork.
Three practical reasons owners choose vinyl stripes:
- They are accessible: You can make a major visual change without repainting panels.
- They are versatile: Stripes fit muscle cars, Jeeps, off-road trucks, sedans, and family vehicles.
- They are replaceable: If your taste changes later, you can remove or update the look.
Tip: The best stripe is not the boldest one. It is the one that matches the vehicle’s proportions and the way you use it.
The difference between a decal and a good decal
In the shop, the biggest mistake people make is treating all vinyl the same. They are not the same. Design matters, but execution matters more. Width, spacing, alignment, edge prep, and where the stripe starts and stops all change the final result.
A proper stripe should look like it belongs on the vehicle. It should not fight door gaps, cut awkwardly across body creases, or end in random places. It should feel planned.
That applies whether you want classic dual stripes, a lower body stripe on a pickup, or something more specialized like integrated military tribute graphics. The right stripe package does not decorate the car. It gives the vehicle a point of view.
Choosing Your Stripe Style and Type
Not every stripe says the same thing. Some shout horsepower. Some add class. Some lower the visual center of a truck and make it look more planted. Picking the wrong style is not a quality problem. It is a design mismatch.
The main stripe families
Here is the simplest way to think about stripe decals for cars.
| Stripe type | Best visual effect | Common fit |
|---|---|---|
| Dual racing stripes | Adds symmetry and a performance look | Muscle cars, sports cars |
| Rally or offset stripes | Feels more aggressive and modern | Tuners, hatchbacks, sporty sedans |
| Pinstripes | Adds detail without dominating | Sedans, classics, family vehicles |
| Side stripes | Stretches the body visually | Trucks, Jeeps, coupes |
| Hood and roof graphics | Focuses attention on upper surfaces | Performance builds, custom looks |
| Rocker stripes | Grounds the vehicle and adds toughness | Trucks, SUVs, off-road builds |
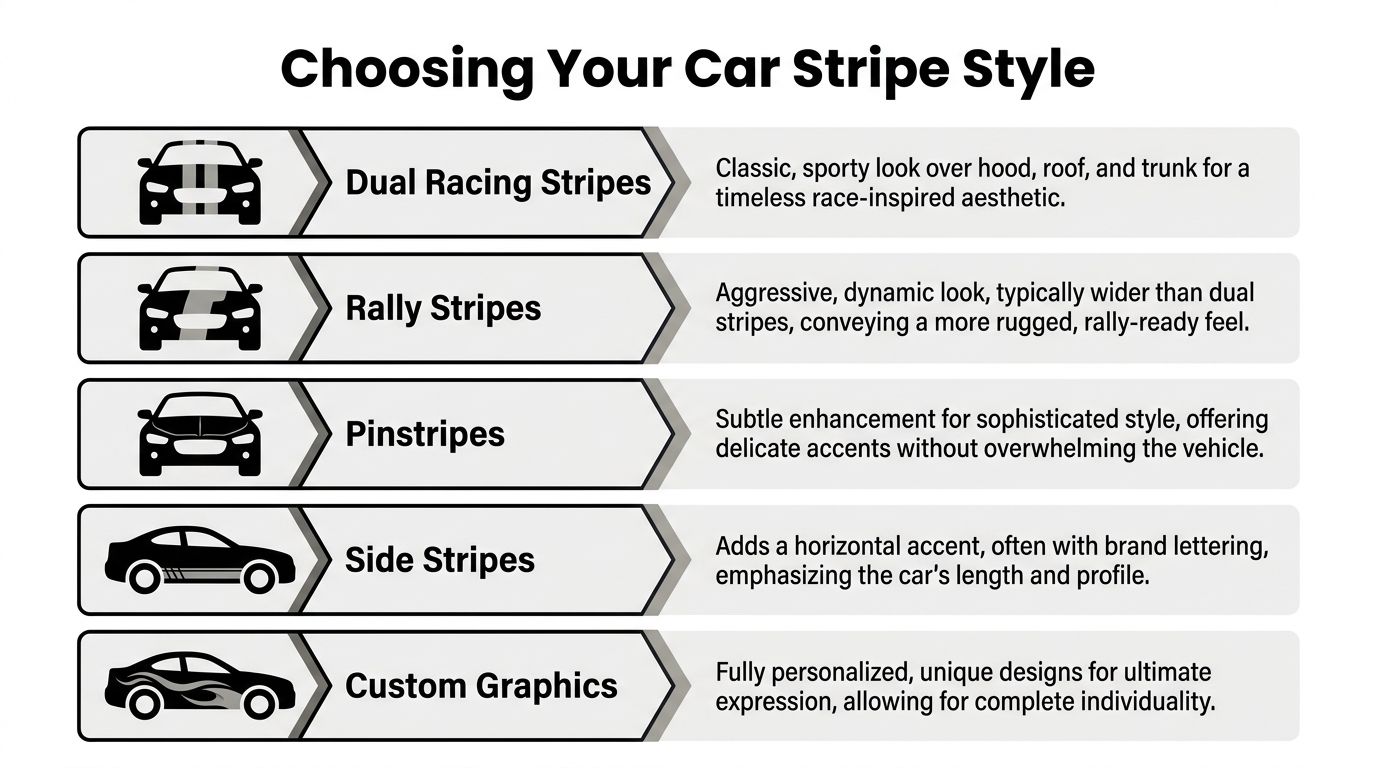
Dual racing stripes
These are the most recognizable. Two parallel stripes running over the hood, roof, and rear deck create instant symmetry. They suit cars with strong center sections and long hood lines.
On muscle cars, this style carries weight in the market. According to Ravoony’s summary of automotive market data, cars with high-quality racing stripes generally sell for 8-15% more than equivalent models without them. The same source notes that modern Dodge Challengers with factory-style stripes spend 40% less time on dealer lots and can retain up to 15% more value at resale.
That does not mean every striped car becomes more valuable. It means buyers respond well when the stripes look factory-correct, high quality, and right for the vehicle.
Pinstripes and subtle accents
Pinstripes are the opposite move. They do not try to dominate the car. They clean up body lines and add a finished feel.
This style works well when the owner wants personalization without a race-inspired look. A dark pinstripe on a silver sedan, or a thin contrast line on a minivan, can make the body look more finished without turning the vehicle into a project car.
Side stripes and rocker graphics
Side stripes change the profile more than the face of the vehicle. They are excellent on trucks, Jeeps, and long-door coupes because they emphasize length and can visually lower the vehicle.
Rocker panel graphics, especially lower on the doors, help bulky vehicles feel more planted. They also hide dust and road grime better than some hood-focused designs. For owners browsing universal truck stripe kit options, this style gives the biggest visual return without covering too much paint.
Hood, roof, and partial body kits
Often, tuner and JDM-inspired builds go this route. A hood stripe can highlight vents or power bulges. A roof stripe can break up a tall cabin. Combined kits can create a stronger custom identity than a simple side stripe.
The trade-off is precision. Large upper-body graphics are less forgiving. If the roof line tapers, if the hood crown is pronounced, or if the panel alignment is off, the stripe can reveal every mistake. On these jobs, panel mapping matters.
Key takeaway: Match the stripe to the vehicle’s body shape first, and your personal taste second. The body has to carry the design.
Specialized graphics most guides skip
A lot of stripe guides stop at racing themes. Buyers, however, do not. Some want branch-inspired accents, memorial elements, family names, off-road styling, or a stripe that ties into an existing windshield banner or fender decal.
This highlights where custom planning matters. A stripe can act as the backbone of a larger design, not a standalone decoration. When that is done well, the whole vehicle looks coherent instead of layered with unrelated stickers.
Why Vinyl Material and Durability Matter
A stripe can have a great design and still fail early if the vinyl is wrong. In practice, most bad decal jobs are material problems first and design problems second.
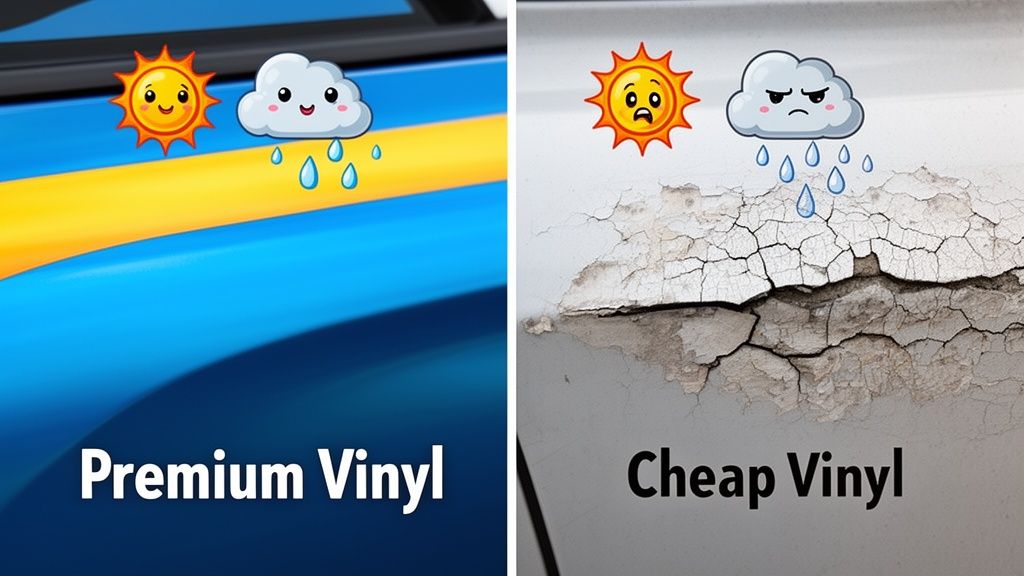
What premium vinyl means
The useful benchmark is marine-grade vinyl. According to Vinyl Striping’s material specifications, premium stripe decals are made from 2-mil to 3.5-mil marine-grade vinyl films, including products such as 3M Scotchcal Series 50 and professional-grade Avery, with 5-7 years of outdoor durability depending on exposure.
Those details matter.
- Thickness matters: Thicker films in the 3 to 3.5 mil range hold shape better over curves.
- Marine-grade matters: Better resistance at edges and seams helps stop moisture intrusion.
- Outdoor rating matters: Sun, rain, salt, and heat cycling are what kill weak vinyl first.
What cheap vinyl does wrong
Low-grade vinyl looks acceptable on day one. Then the problems start.
You see edge curl first. Then shrinkage at the seams. Then color fade. On hoods and upper panels, heat speeds all of it up. On trucks and Jeeps, wash cycles and road spray expose poor adhesive faster.
A cheaper decal is not a bargain if it starts failing while the rest of the vehicle still looks solid.
Thickness and body shape
A stripe that goes over a flat door skin is one thing. A stripe that has to follow a crowned hood, a fender flare, or a contoured quarter panel is another.
Here is the trade-off in plain terms:
| Vinyl trait | What it helps with | Limitation |
|---|---|---|
| Thinner film | Easier on flatter surfaces | Can distort more easily |
| Medium to thicker film | Better dimensional stability | Needs proper technique on curves |
| Better adhesive system | Stronger edge hold | Surface prep becomes more critical |
Tip: Do not buy by color alone. Buy by film quality, outdoor rating, and how well the material suits the panels you are covering.
Why durability is really a finish issue
Most owners think durability means “how many years until it falls off.” In practice, durability is also about how the stripe looks during those years.
A premium stripe should keep clean edges, stable color, and a consistent finish. It should not turn chalky, brittle, or uneven while the paint around it still looks good. That is why professionals stay picky about film type. The stripe has to age with the vehicle, not ahead of it.
Designing and Customizing Your Perfect Stripes
The best stripe packages do more than add contrast. They organize the whole look of the vehicle. That is why design is not choosing a color and clicking order. Good customization means balancing body shape, theme, spacing, and what the vehicle says about the owner.
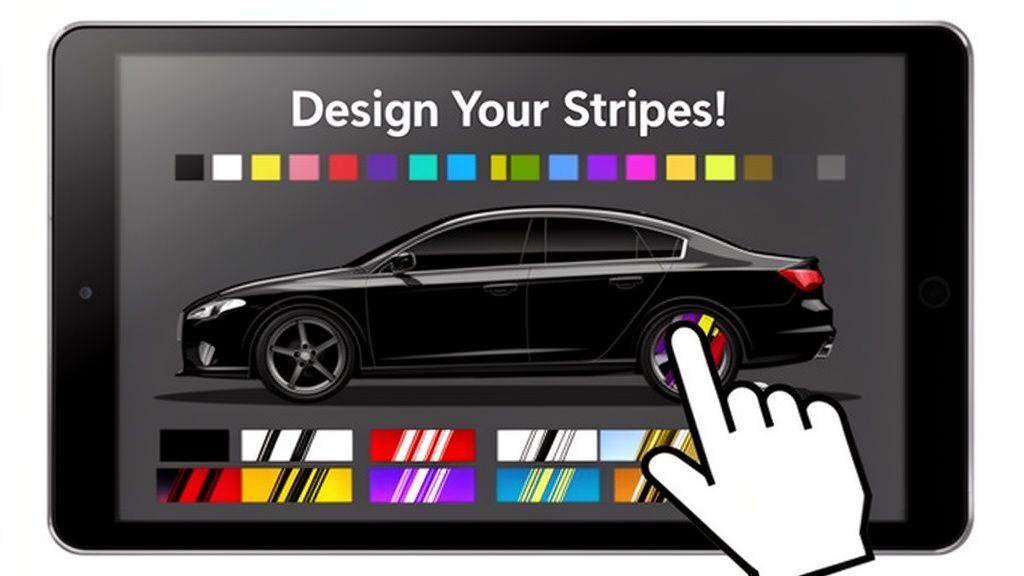
Start with contrast and restraint
If you want stripes people notice from across a parking lot, use contrast. Black on white, silver on red, matte charcoal on bright paint, or white on dark green all read clearly. If you want a lower-key effect, use a tone close to the body color. That gives you a ghosted look that appears more in sunlight than in shade.
The common mistake is overcorrecting. Owners either go too timid and the stripe disappears, or they stack too many bold elements and the vehicle looks busy.
Use this checklist before locking in a color:
- High contrast: Best for muscle cars, sporty builds, and vehicles meant to stand out.
- Low contrast: Better for executive styling, subtle trucks, and cleaner family vehicles.
- Matte on gloss: Good when you want texture contrast more than color contrast.
- Accent colors: Best used in narrow borders or secondary elements, not everywhere.
Size has to match the body
A stripe that looks perfect in a product photo can look wrong on your exact vehicle if the proportions are off. Width is where that happens.
Narrow stripes can get lost on large hoods. Overwide stripes can make a compact car look top-heavy. On pickups and Jeeps, side stripes need to account for door breaks, bedside shapes, and wheel arch interruptions. If the stripe ignores those hard points, the whole design looks pasted on.
A good rule from the shop floor is simple. Let the body lines do some of the work. Follow a crease. Echo the hood bulge. End the stripe at a natural break instead of floating it in open space.
Stripes work better when they are part of a system
This highlights where many generic articles fall short. They treat stripes like isolated graphics. Vehicles need a coordinated look.
That may include:
- A windshield banner that ties into hood accents
- Fender hash marks on a Camaro or Challenger-style build
- A lower side stripe that supports door lettering
- A service-themed emblem integrated into a longer stripe path
- Family names or icons placed so they complement, not interrupt, the main graphic
For example, Camaro-style fender hash decals can work as a secondary element when the center stripe would be too much. They add attitude without forcing a full hood-to-trunk treatment.
Military tribute designs need more thought than most guides give them
This is a gap in the market. Most stripe content stays generic, yet market-gap analysis summarized here notes a lack of practical guidance around military tribute decals, even though a 2025 SEMA report noted a 15% rise in veteran-owned vehicle customizations.
That matters because tribute graphics are easy to get wrong. A branch seal, rank reference, memorial text, flag element, or POW-MIA motif should not feel dropped onto a random stripe. It should be integrated.
Three design approaches work better than the rest:
Tribute first, stripe second
If the message carries the emotional weight, the stripe should support it. Keep the stripe simpler and let the emblem or text be the focal point.
Stripe first, tribute integrated
This works well on trucks and Jeeps. The stripe establishes motion and placement. Then the military element is built into the stripe’s field or termination point.
Tone-on-tone honor builds
These are the strongest. Instead of loud contrast, use restrained colors and sharp placement. The result feels respectful, not theatrical.
Here is a useful visual reference for thinking through combinations and placement:
Tip: If the vehicle already has aftermarket wheels, off-road accessories, window tint, or factory badges with strong visual weight, simplify the stripe package. Let one feature lead.
Good custom design also serves ordinary vehicles
Not every customer drives a Challenger or a lifted Jeep. Family minivans, commuter sedans, and work trucks can wear stripes well if the design respects the role of the vehicle.
On a minivan, a subtle side stripe can clean up the slab sides and make the profile look intentional. On a commuter car, a roof and hood accent can create interest without turning the car into a caricature. On a work truck, a stripe can frame service lettering and make the graphics package look complete.
A key advantage of customization. You are not buying “racing stripes.” You are choosing a visual language that fits your vehicle and your life.
A Step-by-Step Installation Guide for Flawless Results
A clean install is what separates “that looks factory” from “that looks homemade.” The process is not complicated, but it is unforgiving if you rush.
The single biggest advantage for first-time installers is pre-applied transfer tape. According to the installation guidance summarized from this YouTube source, using transfer-taped stripe decals can reduce installation time by an estimated 40-60% while improving alignment consistency.
Step 1 clean the surface properly
Wash the panel first. Then remove wax, road film, and any leftover detail spray. A stripe needs direct contact with clean paint, not a layer of contamination.
Pay extra attention to:
- Hood fronts
- Rocker areas
- Panel edges
- Around badges or washer nozzles
If the surface feels slick from wax, clean it again. If it feels gritty, wash again before final prep.
Step 2 test fit before peeling anything
Hold the stripe in place with masking tape and inspect it from different angles. Check the gap to the hood edges, the body lines, and the panel transitions. Reviewing it at this stage helps you catch mistakes cheaply. Once the adhesive touches down, your room for correction drops fast.
Step 3 use the hinge method
Tape the stripe in position so it can pivot from one side or from the center. This creates a controlled starting point and keeps the layout from wandering during install.
The hinge method is especially useful on long hood stripes, windshield banners, and multi-piece kits such as a Cadillac windshield banner decal where straightness is obvious from a distance.
Step 4 start from the anchor point
Peel the backing gradually, not all at once. Set the front section first, then work outward with a squeegee using firm, overlapping strokes.
Do not mash air toward random directions. Push it toward an edge on purpose. That is how you avoid trapped pockets.
Step 5 manage curves with heat
Curved panels need patience. Medium and thicker stripe films respond better when gently warmed so they conform instead of fighting the panel.
A few shop rules matter here:
- Use moderate heat: Warm the vinyl. Do not cook it.
- Press after warming: Heat alone does not set the film. Pressure matters.
- Watch for stretch: If you pull too hard, the stripe may shrink later and expose edges.
Wet install versus dry install
Install method depends on the kit and material.
| Method | Best use | Watch out for |
|---|---|---|
| Dry application | Transfer-taped stripes and most cut vinyl work | Alignment has to be right early |
| Wet application | Some larger graphics where slip time helps | Trapped fluid can slow bond |
| Hybrid approach | Careful placement with dry finishing technique | Requires judgment |
For most transfer-taped stripe decals for cars, dry application is cleaner and more predictable. Wet methods can help on some large pieces, but too much fluid can create its own headaches.
Step 6 seal the edges
Edge sealing is where lifespan starts. Once the stripe is down, go back over edges and termination points with firm pressure. Moisture and wash spray attack these areas first.
Key takeaway: Most failures do not start in the middle of the stripe. They start at the edge you did not fully seat.
Common mistakes that ruin installs
A lot of bad installs follow the same pattern.
- Cold panel application: Vinyl stays stiff and resists curves.
- Dirty paint: Adhesive bonds to residue instead of paint.
- Pulling individual stripe segments by hand: This is how spacing drifts and segments distort.
- Skipping alignment marks: Straight on one side can still be crooked across the full vehicle.
- Not checking from a distance: Close-up alignment can still look visually off from ten feet away.
Transfer tape solves several of these problems at once because it keeps spacing fixed and lets you place the stripe as one unit rather than chasing separate pieces across the panel.
If you are patient on prep and disciplined on alignment, you can get a result at home that looks far more professional than many expect.
Caring For and Safely Removing Your Decals
Once the stripes are on, care is straightforward. Abuse is what shortens life, not normal use.
How to keep stripes looking sharp
Wash the vehicle with normal automotive soap and a soft mitt. Rinse dirt off first so you are not grinding debris across the edges.
A few habits help a lot:
- Hand wash carefully: This gives you the most control around stripe edges.
- Be cautious with pressure washing: Keep direct high-pressure spray away from decal edges.
- Dry with a clean towel: Water sitting at edges over and over is not ideal.
- Use mild products: Harsh solvents and aggressive compounds can dull the finish.
If you wax the vehicle, be gentle around decal edges and avoid building residue along the cut lines. Clean edges always make stripes look newer.
Removal takes technique, not force
Owners worry most about the end of the decal’s life. That concern is valid. Removal can be clean, or it can become a scratching and residue mess if handled badly.
According to the removal guidance summarized from this source on long-term vinyl removal, proper use of heat, 90% isopropyl alcohol, and a plastic scraper can result in 92% residue-free removal within 5 years, while that result can drop to 65% after 7 years as the vinyl degrades.
That tells you two important things. First, removal is easier when the vinyl is not left on forever. Second, tools and technique matter.
Safe removal sequence
Warm the vinyl
Use a hairdryer or controlled heat source to soften the adhesive. You want the film pliable, not scorching hot.
Lift with plastic, not metal
Start at an edge or corner and use a plastic scraper or fingernail to raise the vinyl. Metal tools invite scratches.
Peel slowly at a low angle
Do not yank upward. Pull back along the surface. That puts less stress on the paint and leaves less adhesive behind.
Use alcohol on residue
Apply 90% isopropyl alcohol to remaining adhesive and let it work before wiping or scraping. Patience saves the clear coat.
Tip: Curved panels and heavily exposed areas hold adhesive more stubbornly. Slow down there instead of pulling harder.
About ghosting
Sometimes owners call any visible outline “damage.” It is not always damage. Paint around a stripe may have weathered differently than the paint underneath it. That can leave a faint visual difference after removal.
A wash, decontamination, and paint correction can reduce that contrast. What matters most is avoiding scratches and adhesive smearing during removal. Technique gives you the best shot at a clean finish.
Get Your American-Made Stripes from Custom Sticker Shop
If you want stripe decals for cars that look right and install cleanly, supplier choice matters as much as design choice. A family-run shop that handles automotive graphics every day gets the details right. Better vinyl, cleaner cutting, proper spacing, and transfer-taped kits all make the difference once the package lands on your doorstep.
Custom Sticker Shop builds its decals in the USA using premium Oracal vinyl rated for outdoor use, and the catalog is broad enough to cover more than a few standard racing looks. That matters if you want something specific, whether that is a Jeep graphic, a JDM-inspired accent, a family design, or a military tribute.
The range is also practical. There is a wide selection of designs, including many military tributes, Jeep graphics, and family options, according to the publisher information provided for Custom Sticker Shop. Orders are shipped pre-spaced and transfer-taped, which helps first-time installers avoid the most common alignment problems.
For buyers watching cost, the offer is straightforward. Prices begin affordably, free U.S. shipping applies to orders above a certain amount, and there is a Buy 2 Get 1 Free deal. Orders typically arrive within a week to ten days, and checkout supports major cards, PayPal, Venmo, and Apple Pay, according to the publisher details.
That combination is hard to fake. Good materials, wide design coverage, installation-friendly prep, and responsive service all matter more than flashy marketing. If you are putting stripes on a vehicle you care about, those basics are what protect the final look.
If you are ready to give your vehicle a cleaner, bolder, or more personal look, browse Custom Sticker Shop and pick a stripe kit built to last, ship fast, and install the right way.