
Ready to give your ride a personality that’s all its own? This guide is your complete roadmap for transforming your car or truck with custom vinyl decals stickers. These aren't just trendy graphics—they're a powerful way to put your passions and personality right on the pavement.
Personalize Your Ride With Custom Vinyl Decals
Think of your vehicle as a blank canvas. Custom vinyl decals are the tools you use to turn that canvas into a personal statement that tells your story.
Maybe you want to honor your military service, show off your love for JDM culture, or just add a fun family graphic. The right decal makes your vehicle stand out from the sea of lookalikes on the road. It’s an easy and affordable way to add serious character without the cost or commitment of a new paint job.
This desire for individuality isn't a small trend, either. Personalization has become the main reason people buy custom decals, reflecting a huge shift toward self-expression. The market for these stickers is set to jump from USD 5.12 billion in 2026 to a massive USD 8.45 billion by 2035. That's a clear sign that drivers everywhere are ready to make their rides their own.
Why Choose Vinyl for Vehicle Customization?
Not all stickers are created equal, and when it comes to vehicles, vinyl is king for a few very important reasons. Unlike those paper-based stickers that fade, peel, and fall apart after the first car wash, high-quality vinyl is built to last. It’s a durable, flexible material engineered to take a beating from the elements.
The real secret to vinyl is its resilience. It’s specifically designed for outdoor use, holding up against brutal sun, pounding rain, and wild temperature swings. That means your design will look great for years, not just weeks.
To get you started, we've put together a quick-glance table summarizing the key features to look for in a quality decal.
Key Decal Features At a Glance
| Feature | What to Look For | Why It Matters |
|---|---|---|
| Material Type | Outdoor-rated cast vinyl | Resists shrinking, cracking, and peeling for 5-7+ years. |
| Adhesive | Removable, pressure-sensitive | Bonds securely but won't damage factory paint upon removal. |
| UV Protection | Built-in UV inhibitors | Prevents colors from fading or yellowing in direct sunlight. |
| Durability | Weatherproof and waterproof | Stands up to car washes, rain, snow, and extreme temperatures. |
This table covers the essentials, ensuring you choose a decal that’s built to last and looks professional from day one.
In this guide, we’ll walk you through everything you need to know to get it right. We'll explore:
- Material and Durability: Getting a handle on why professional-grade vinyl is a must.
- Design and Placement: How to pick a graphic that perfectly complements your vehicle's lines.
- Installation and Care: Applying your decal like a pro for a flawless, bubble-free finish.
From bold and expressive custom text windshield banner decal stickers to more subtle window accents, the options are practically endless. If you're looking to personalize surfaces beyond traditional vinyl, you can also explore the unique possibilities and durability of UV DTF Stickers.
Our goal is simple: to give you the confidence to choose and apply the perfect custom vinyl decals that truly show the world who you are.
Choosing the Right Vinyl Material for Your Decal

The material you pick for your custom vinyl decals stickers is the most important decision you'll make. It’s what separates a decal that looks great for years from one that cracks, peels, and fades after just one summer.
Not all vinyl is the same. The two main types, calendered and cast, are made in completely different ways. Knowing the difference is the key to getting a decal that lasts.
Calendered Vinyl: The Stretched Dough
Think of calendered vinyl like pizza dough. It starts as a chunk of material that gets squeezed and stretched through hot rollers. This process is cheap and fast, but it creates a lot of tension in the vinyl. That tension means the material always wants to shrink back to its original shape, especially when it gets hot.
Because it wants to shrink and it’s thicker and less flexible, calendered vinyl is a poor choice for vehicles. It's best for short-term, flat indoor signs—not the curves and contours of a car.
Cast Vinyl: The Poured Liquid
Cast vinyl is made more like pancake batter. A liquid vinyl formula is poured onto a super smooth sheet and baked. It settles naturally without any stress or stretching. The final product is a thin, flexible, and extremely stable film.
This process means cast vinyl has no "memory"—it doesn't want to shrink. It’s perfect for conforming to complex curves, rivets, and body lines on a car or truck. This is exactly why professionals only use cast vinyl for high-quality vehicle wraps and durable custom vinyl decals stickers.
For any decal going on a vehicle, cast vinyl is the only way to go. We use materials like Oracal 651 and Oracal 751 because they’re the industry standard, offering up to 7 years of outdoor durability. They're engineered to fight off UV rays, cracking, and peeling, making sure your decal looks sharp for the long haul.
It’s no surprise that more and more people are demanding high-quality materials like this. The global vinyl sticker market is expected to more than double, growing from about USD 1,304.04 million in 2024 to almost USD 2,994.94 million by 2034. This just shows how many people are choosing quality to personalize their gear.
Selecting the Perfect Finish
Once you've got the material dialed in, the finish is what sets the mood. Each one gives your decal a different character that can match your vehicle's style.
Gloss Finish: This is the go-to for most vehicle decals. Its shiny, reflective surface looks just like automotive paint, giving your decal a clean, factory-finish appearance.
Matte Finish: For a more modern and subtle look, matte is a great choice. It has a flat, non-reflective surface that absorbs light, creating a high-end aesthetic that stands out by being understated.
Specialty Finishes: If you want to make a statement, options like chrome, metallic, and reflective vinyl are perfect. Chrome delivers a mirror-like shine, while reflective vinyl adds a massive boost in nighttime visibility—a fantastic safety feature.
Getting the right combination of material and finish is how you create a decal that not only looks incredible but also stands up to the elements. For example, a gloss black vinyl windshield banner for Ford models made from cast vinyl gives you a durable, OEM-style look that enhances the whole vehicle.
Alright, you’ve picked out the perfect vinyl and finish. Now for the fun part: deciding on the design, size, and placement that will bring your vision to life. Getting these three things right is the difference between a custom vinyl decal sticker that looks slapped on as an afterthought and one that looks like it was part of your vehicle's original design.
The first, and most critical, step is to measure. It sounds obvious, but getting this wrong is the fastest way to end up disappointed. A decal that’s too big for the spot will look cramped and awkward, while one that’s too small will just get lost on a big door or window.
Grab a tape measure and get the exact height and width of the area where you want the decal. You’re measuring the usable, mostly flat surface area, so keep an eye out for any weird curves, emblems, or body lines that could mess up a clean application.
Measuring for a Perfect Fit
Thinking about a big windshield banner? You’ll want to measure the glass from just inside the rubber seals, not from the absolute edge. For a rear window, you have to account for the path of the wiper blade and any defrost lines that might cut right through your design.
Here’s a pro tip: use painter's tape to mock up the decal's outline directly on your vehicle. This is the single best way to see how it looks in the real world. You can step back, check the proportions, and adjust the tape until it feels perfectly scaled. Once you've got it, you have the exact measurements you need for your order.
Achieving Visual Balance
Balance is all about making the decal look like it belongs on your vehicle. Cars and trucks have their own natural lines that create a sense of flow and speed. A well-placed decal should complement these lines, not fight against them.
Think like a car designer for a second. Consider the "visual weight" of your graphic. A huge, loud decal on one side of your truck might need a smaller, complementary design on the other side to feel balanced. Or, you could go with a single, perfectly centered decal to create a powerful focal point.
The goal is to make it look intentional. A decal shouldn't clash with the vehicle's body lines or curves. It should flow with them, pulling everything together and making your ride look more dynamic and personalized.
For instance, a long, horizontal decal with custom text looks awesome running along the bottom of a side window or a rocker panel, since it follows the length of the car. A more vertical design? That might look great on the pillar between your front and rear doors.
Popular Placement Strategies
Where you put your custom vinyl decals stickers says a lot. Some spots have become classic choices for certain types of vehicles for a simple reason: they just work.
Here are a few popular go-to strategies to get you started:
- For Trucks and 4x4s: Those rear side windows (quarter windows) are prime real estate for rugged off-road or hunting-themed decals. The upper part of the windshield is another classic spot for brand logos or custom text banners.
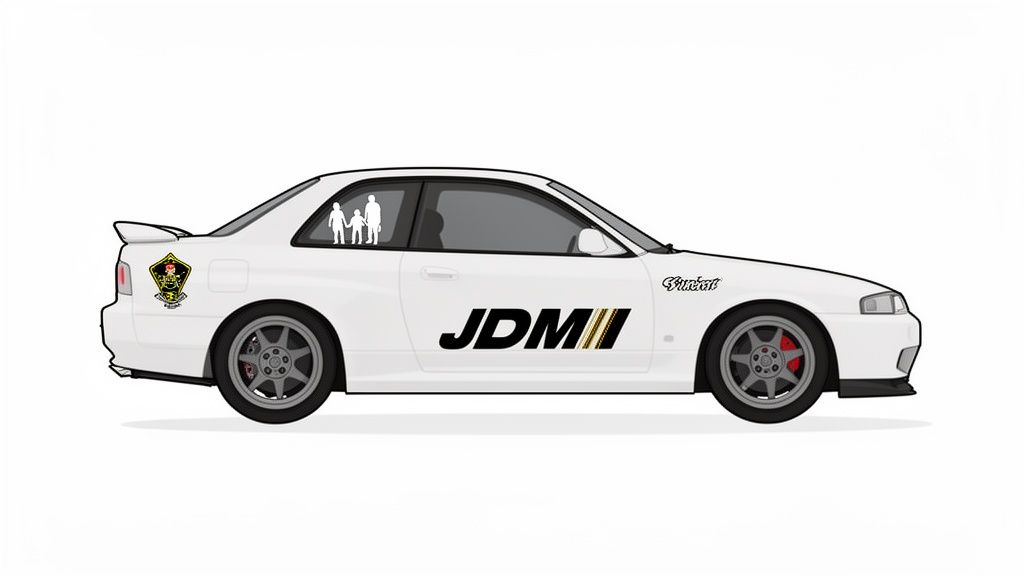
- For JDM and Tuner Cars: An angled decal on the front or rear windshield is a signature of the tuner scene. Small, subtle logos on the lower corners of the side windows or even on the side mirrors add an authentic JDM touch.
- For Family and Tribute Decals: You can't beat the rear window. It’s a big, flat canvas that’s easy for other drivers to see, making it the perfect spot for family stick figures, memorial tributes, or military service emblems.
Ultimately, the best placement is whatever fits your style and looks good on your specific vehicle. Don't be afraid to play around with that painter's tape mock-up. Find the spot that makes you smile every time you walk up to your ride.
Your Step-by-Step Guide to a Flawless Application
Putting on your new custom vinyl decals stickers might look a little intimidating, but trust me, getting that perfect, bubble-free finish is easier than you think. It’s a lot like painting a room—the final result is all about the prep work. A perfectly clean surface is what lets the decal’s adhesive form a tough, lasting bond.
First things first, and this is the most critical part: clean the area where the decal is going. Any speck of dirt, dust, wax, or oil will stop the vinyl from sticking right, and that’s what leads to peeling and bubbling down the road. You don’t need any fancy chemicals for this. A simple 50/50 mix of isopropyl rubbing alcohol and water is all it takes.
Just wipe the surface down with a clean, lint-free microfiber cloth and your alcohol solution. Follow up with another clean, dry cloth to make sure it's bone dry. This quick step gets rid of any contaminants and gives you the perfect canvas for your new decal.
The Pro-Grade Hinge Method for Perfect Alignment
With your surface prepped and ready, it's time to nail the placement with what we call the "hinge method." This is the foolproof technique pros use to take all the stress out of getting your alignment just right. It lets you lock in the decal’s position before you ever even think about exposing the sticky side.
Here’s the basic idea for getting your placement perfect before you start peeling.
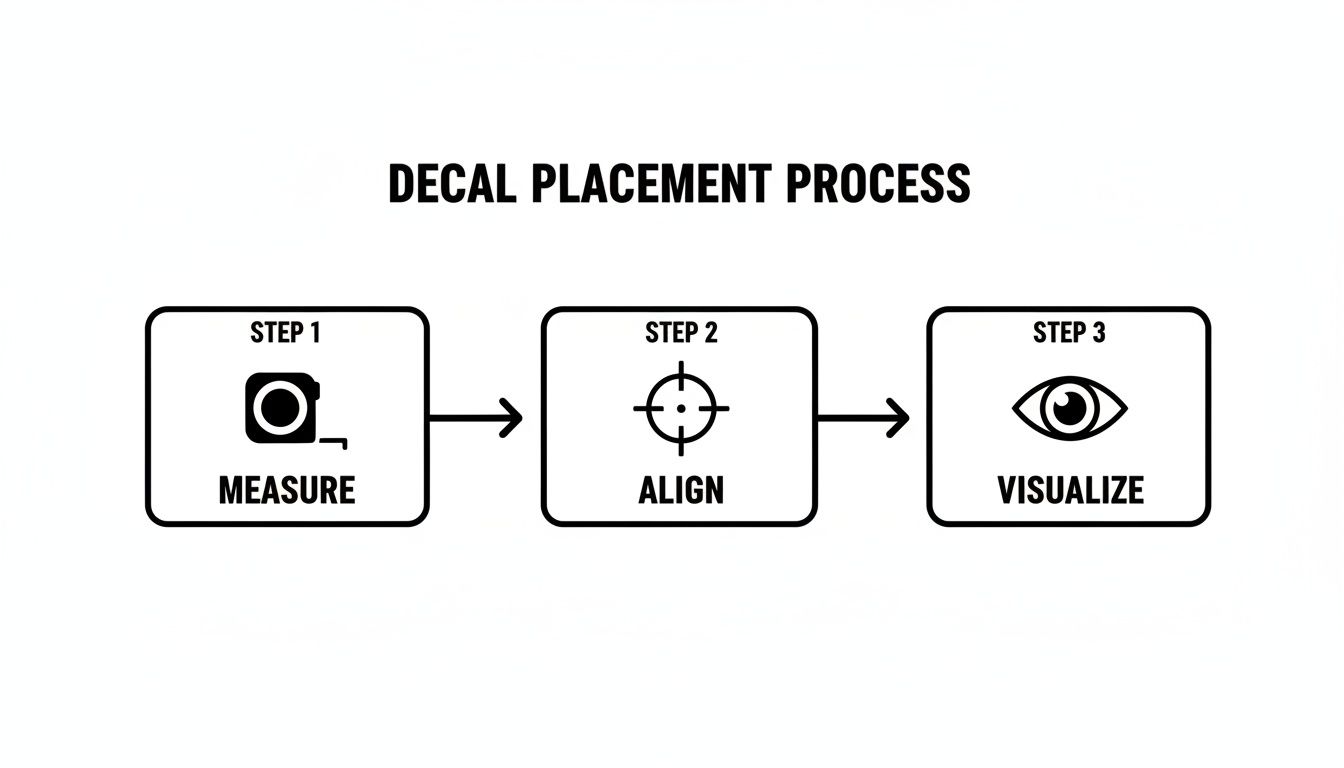
This visual shows you the core of what you're doing: measuring your space, aligning the decal, and taking a step back to visualize how it will look. Following this process is your best defense against crooked decals and making sure you love where it ends up.
Now, let's turn that idea into action with the hinge:
- Position the Decal: Hold your decal up against the clean surface. Step back and look at it from a few angles. Make sure it’s exactly where you want it.
- Create the Hinge: Once you’ve found the perfect spot, run a single piece of painter’s tape across the horizontal center of the decal. This piece of tape is your hinge, holding everything securely in place.
- Peel the Backing: Lift one half of the decal (top or bottom) and start peeling the paper backing away from the transfer tape, stopping right at your hinge. Use scissors to cut away that exposed piece of backing paper.
- Squeegee It Down: Grab a squeegee or even a credit card. Starting from the center hinge, press outward with firm, overlapping strokes. This method forces any air out from under the vinyl and bonds it to the surface.
Pro Tip: Always, always apply pressure from the center and work your way out. This systematic motion is the secret to preventing air bubbles from getting trapped. Take your time and be deliberate—it pays off.
The Final Peel and Fixing Any Issues
After you've squeegeed the first half, you can remove the painter's tape hinge. Now, lift the other side of the decal and carefully peel off the rest of the paper backing. Squeegee this second half down exactly like you did the first, always working from the center out.
Run your squeegee over the entire decal one last time with firm pressure to be sure. Now for the satisfying part: slowly peel the clear or paper transfer tape off at a sharp, 180-degree angle—almost flat against the surface. Pulling it back on itself like this is what ensures the vinyl decal stays put.
So, what happens if you spot a small bubble? Don't panic. Most tiny bubbles will actually disappear on their own after a few warm days in the sun. If you have a larger, more stubborn one, just prick it at the very edge with a fine needle. Then, use your finger to gently push the trapped air out toward that tiny pinhole. Your custom vinyl decals stickers will look like they were installed by a pro.
Popular Decal Themes and Design Inspiration
Your vehicle is a blank canvas, and a custom vinyl decal is one of the best ways to make a statement. Once you have a handle on the right materials and where you want to put your decal, the real fun begins: finding a design that feels like you. The possibilities are just about endless, whether you're honoring military service, celebrating a hobby, or showing off your family pride.
This need for personal expression is huge. The global custom printing market was valued at USD 33.84 billion in 2025 and jumped to USD 37 billion in 2026—that’s a growth rate of 9.4%. It all comes down to people wanting products that tell their story, which is great news for those of us dedicated to making quality decals.
Let's dig into some of the most popular themes out there to get your own creative ideas flowing.
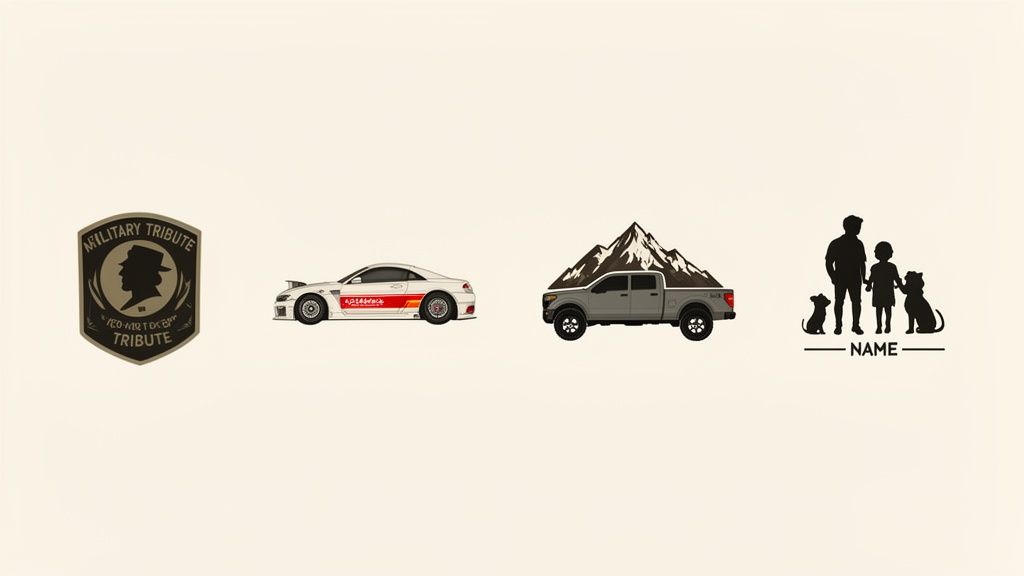
Honoring Service With Military Decals
For veterans, active-duty personnel, and their families, a military decal is way more than a sticker. It's a badge of honor. These designs are a powerful tribute to the sacrifice and pride that come with serving your country, creating an instant bond with others who know what that service means.
Some of the most popular military-themed designs include:
- Branch Insignias: You can't go wrong with the classic, bold logos for the Army, Navy, Air Force, Marines, and Coast Guard. They're timeless.
- Unit and Division Crests: Want to get more personal? A specific unit crest shows exactly where you stood and connects you with your brothers and sisters in arms.
- Memorial Tributes: An “In Memory Of” decal is a quiet, powerful way to honor comrades who made the ultimate sacrifice.
- Patriotic Emblems: American flags, eagles, and phrases like “Proud Veteran” are unmistakable statements of patriotism.
JDM and Automotive Enthusiast Graphics
The Japanese Domestic Market (JDM) and tuner car scenes are all about a certain look—clean lines, authentic brands, and a nod to racing history. The right custom vinyl decals are a non-negotiable part of nailing that aesthetic and showing you know your stuff.
For car enthusiasts, decals aren't just for looks; they're a huge part of the culture. They show your loyalty to certain brands, styles, and a shared obsession with tuning vehicles to perfection.
Common styles you'll see in the JDM and tuner world are:
- Authentic Brand Logos: Displaying logos from legendary Japanese performance brands like HKS, GReddy, or Spoon Sports.
- Windshield Banners: Custom text or logos stretched across the top of the windshield is a signature of the scene.
- "JDM As F*ck" Graphics: A bold statement that’s become a classic inside the community.
- Rising Sun Designs: A classic and instantly recognizable symbol tied to Japanese automotive style.
Rugged Designs for Trucks and Off-Road Life
If you spend your weekends hitting the trails, deep in the woods, or out on the water, your truck or 4×4 needs graphics that match that grit. Decals for off-roaders and outdoorsmen are all about showing your love for adventure and a rugged lifestyle. They tell everyone your vehicle is more than just transportation—it's a tool for getting out there.
Hunters, anglers, and 4×4 junkies often go for designs like mountain ranges, wildlife silhouettes, or bold logos from off-road brands. These look great on the rear quarter windows or tailgate of a truck. And for those who live for the water, you might want to check out our dedicated fishing decals like the "Rather Be Fly Fishing" design to show off where your passion lies.
Personalized Family and Pet Decals
The classic stick-figure family has been around forever, but today’s family decals are so much more personal. You can now create custom designs that perfectly capture your family’s unique personality. Add names, symbols for hobbies, and of course, your four-legged family members to create a one-of-a-kind display for your rear window.
These decals are a fun, lighthearted way to share a little bit of your life with the world. Whether it's a simple lineup of your crew or a funny take on your family dynamic, these designs add a personal touch that is 100% you.
To give you a better sense of the possibilities, we've put together a table of popular themes and ideas to spark some inspiration.
Popular Decal Themes and Ideas
| Theme Category | Popular Designs | Ideal For |
|---|---|---|
| Military & Service | Branch insignias, unit crests, memorial tributes, patriotic flags | Veterans, active-duty members, military families, first responders |
| Automotive & JDM | Brand logos (HKS, GReddy), windshield banners, racing stripes | Car enthusiasts, tuners, racers, fans of Japanese car culture |
| Off-Road & Outdoors | Mountain ranges, wildlife (deer, fish), 4×4 logos, hunting/fishing graphics | Truck owners, Jeep enthusiasts, hunters, anglers, campers |
| Family & Pets | Custom stick figures with names/hobbies, pet silhouettes, monograms | Parents, pet owners, anyone wanting to personalize their family vehicle |
| Hobbies & Sports | Team logos, sports equipment (bats, balls), musical notes, gaming icons | Athletes, sports fans, musicians, gamers, and hobbyists of all kinds |
No matter what you're into, there's a decal out there that can help you express it. Your vehicle is an extension of your personality, so don't be afraid to put your mark on it and tell your story.
We believe ordering a custom decal should be just as straightforward as installing one. Knowing what to expect from start to finish is important, so here’s a quick walkthrough of our process, from designing your sticker to its arrival at your door.
The first step is where you get to be creative. After you pick a design you like—whether it's a JDM graphic or a tribute to a fallen soldier—you'll head into our personalization tool. This is where you make it yours by adding text, picking your colors, and dialing in the perfect size. Our online editor lets you see a live preview of your changes, so you know exactly what you're getting before you commit.
How Pricing and Value Work
The price of a custom decal comes down to two simple things: its size and how complex the design is. A bigger, more detailed decal naturally uses more vinyl and takes a bit more time to produce, which is reflected in the final cost. We keep our pricing clear and upfront, with no surprises.
We’re committed to making custom work affordable for everyone. That’s why our decals start at just $7.99. We also run a Buy 2, Get 1 Free deal on everything in the shop, so you can get more for your money whether you're outfitting one car or the whole family's.
To make it an even better deal, we offer free shipping on all U.S. orders over $25. This means the price you see is what you pay, making it easy to plan your project without worrying about last-minute shipping costs popping up at checkout.
Secure Payments and What to Expect for Shipping
Once you’ve finalized your design, you’ll move to our secure checkout. We accept all the usual payment methods to make it easy for you:
- Major Credit Cards (Visa, MasterCard, etc.)
- PayPal
- Venmo
- Apple Pay
As soon as your order is in, our team gets to work. We're a family-run shop right here in Topeka, Kansas, and every single decal is made in the USA. We produce your order and ship it out via USPS or UPS. You can expect your new custom vinyl decals stickers to show up on your doorstep within 5-8 days, ready to go on your vehicle.
Frequently Asked Questions About Vinyl Decals
As you get ready to personalize your ride, it's totally normal to have a few questions. Whether this is your first time using custom vinyl decals stickers or you’ve been doing this for years, getting straight answers is the key to feeling good about your choice.
We get these questions all the time, so we've put together the answers to the most common ones. We'll cover everything from how long your decals will hold up to whether they can survive the local car wash. Our goal is to give you practical, no-fluff info so you can get your project started with confidence.
How Long Do Custom Vinyl Decals Last on a Car?
This is usually the first question people ask, and for good reason. You want to know your investment is going to look sharp for years, not just a few months.
High-quality outdoor vinyl decals, especially the professional-grade stuff like Oracal vinyl, are built for the long haul. These decals are rated to last up to 7 years, even when they’re getting hammered by the elements day in and day out. We're talking direct sunlight, heavy rain, snow, and even road salt.
The secret is the material. We use cast vinyl, which is incredibly stable and fights off shrinking, cracking, and fading. Cheaper materials just can't hang and will start to look terrible in as little as a year. This is why choosing a supplier that uses premium materials is the most important decision you'll make for a look that lasts.
Are Vinyl Decals Easy to Remove?
Another big concern is what happens when you’re ready for a change or want to sell your vehicle. Is taking the decal off going to wreck your paint?
The short answer is no. Quality custom vinyl decals stickers are made to be removed without messing up your vehicle's factory paint. The process is surprisingly simple—it just takes a little patience.
To get a decal off, all you really need is a hairdryer. Gently heat the vinyl to soften the adhesive underneath. Once it's warm, you can slowly peel it back at a sharp angle. If you have any sticky stuff left over, a little rubbing alcohol or an adhesive remover will clean it right up.
As long as your car's paint is in good shape to begin with (meaning it's not already chipping, peeling, or sun-damaged), the decal will come off clean. The surface underneath will look just like it did before you applied it. If you're swapping out old designs and want a full walkthrough, check out this great guide on vinyl decal removal.
Can I Put a Vinyl Decal Through a Car Wash?
Life gets busy, and not everyone has the time for a hand wash every weekend. So, the big question is: can your new decal handle an automatic car wash?
Absolutely. Once a high-quality vinyl decal has had time to properly cure—which takes about 24 to 48 hours after application—it's perfectly safe to run through a standard automatic car wash. The pro-grade vinyl and its strong adhesive are designed to handle the water pressure and soft brushes.
A small word of caution, though. We’d recommend avoiding high-pressure power washers aimed directly at the decal's edges for a long time. That kind of focused blast could eventually cause the edges to lift. But for all normal washing and daily driving, your decal will hold on tight.
What Is the Difference Between a Decal and a Sticker?
You’ve probably heard people use "decal" and "sticker" like they’re the same thing, but there are some important differences, especially when it comes to vehicles.
Stickers: Think of a sticker as a single piece. The design is printed on vinyl or paper, and the whole thing—design, background, and all—peels off the backing paper. They're simple and work great for a lot of things.
Decals: A vinyl decal, especially the die-cut kind we use for cars, is a bit more advanced. It has three layers: a paper backing, the vinyl design itself, and a top layer of transfer tape. The design is cut out from a solid sheet of colored vinyl, and all the extra material is weeded away. The transfer tape holds all the individual pieces of your design perfectly in place so you can apply it in one shot. Once it’s on the surface, you peel away the transfer tape, leaving only the clean vinyl graphic with no background.
That three-layer system is what allows for those intricate, professional graphics that look like they were painted on. It's the standard for any quality vehicle lettering or custom graphic.
Ready to create a design that’s uniquely you? At Custom Sticker Shop, we make it easy to bring your vision to life with thousands of designs and endless personalization options. Start designing your perfect decal today and enjoy our Buy 2, Get 1 Free offer on all orders.