
Putting a decal on your truck is one of the fastest ways to make it your own, turning a stock vehicle into a real statement piece. This isn't just about slapping on a sticker; it’s about adding a layer of identity, whether you're branding a work truck or just showing the world who you are.
Why Truck Decals Are More Than Just Stickers
First things first—a high-quality vinyl decal is a completely different animal from a cheap, paper-based sticker you'd find at a gas station. A real decal is an engineered piece of art made for the long haul. Think of it as a professional-grade modification, not just a temporary decoration.
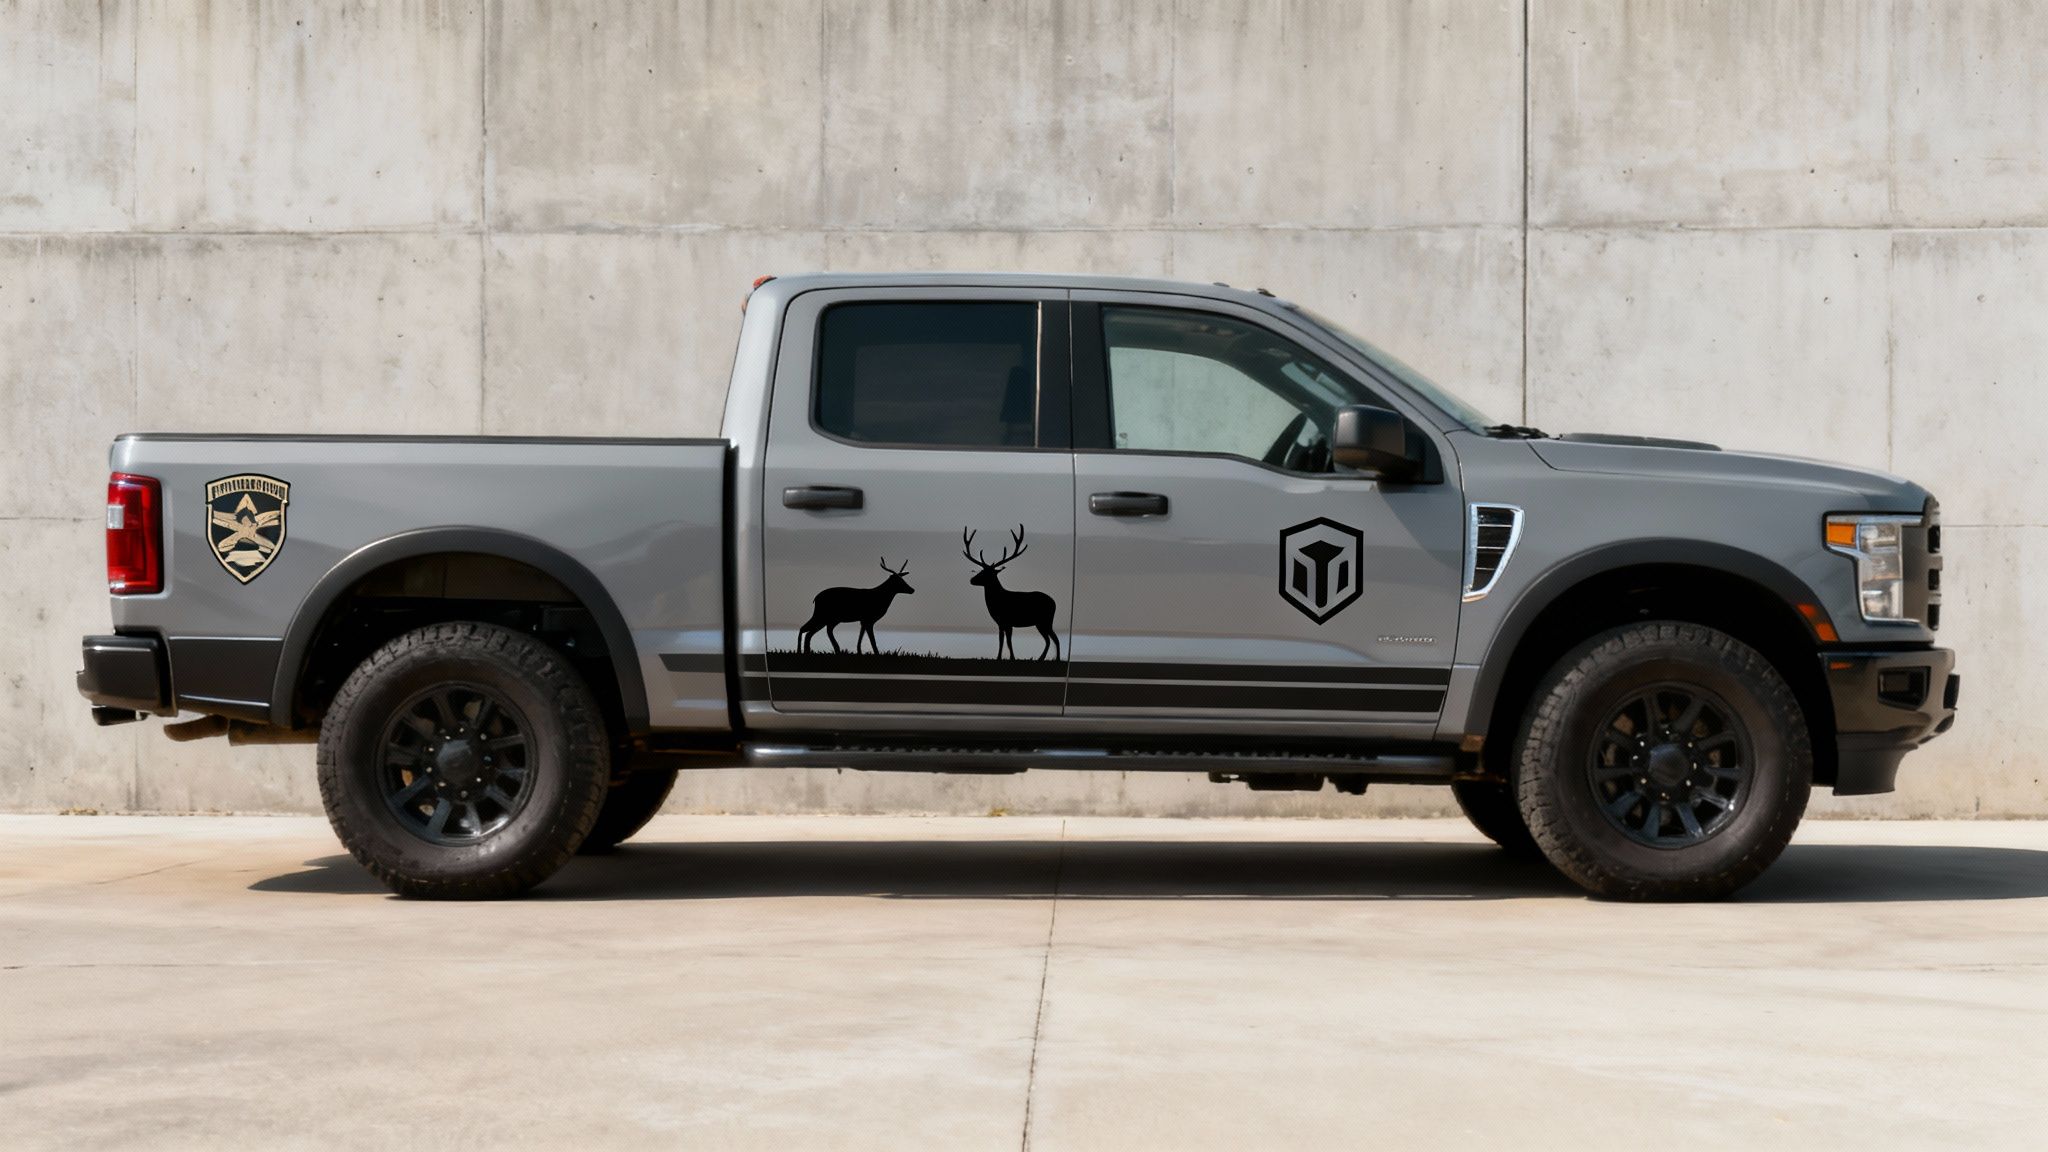
Truck decals tell a story without you having to say a word. They’re a powerful way to express your passions, affiliations, or even your sense of humor. For a lot of truck owners, it's how they connect with a community and make their ride stand out from the crowd.
A Statement of Identity
Your truck is an extension of your personality, and the graphics you choose broadcast that identity to everyone on the road. We see it all the time. Some of the most common themes include:
- Military Pride: Honoring service with decals for specific branches, units, or memorials.
- Outdoor Passions: Showing off a love for hunting, fishing, or hitting the trails with related imagery.
- Automotive Culture: Repping a specific truck brand, local club, or performance affiliation.
- Family and Humor: Sharing a bit of fun with family stick figures or a witty quote on the tailgate.
This level of personalization is a huge part of modern truck culture. With the US being the world's biggest truck market, moving 8.7 million units in 2024, vehicle graphics have become a massive industry. It's all tied into the larger sticker market, which hit a value of $4.61 billion in 2024 and is only getting bigger.
Professional Upgrade vs. Simple Decoration
The difference between an amateur job and a pro-level look often boils down to one thing: material quality. Using a premium vinyl like Oracal 751, which is rated for over seven years of outdoor exposure, makes all the difference. It's built to withstand sun, rain, and car washes without peeling or fading, giving you that clean, painted-on appearance.
Choosing the right decal is an investment in your truck's aesthetic. A high-quality vinyl graphic is a durable, long-lasting modification that reflects your standards and makes your vehicle stand out for all the right reasons.
To make a real statement and get quality that lasts, you might want to consider professional decal printing services. And when you want to show some state pride, something like a clean and sharp Texas State Silhouette Sticker can integrate perfectly with your truck's design, turning a simple idea into a lasting part of your vehicle's identity.
Choosing the Perfect Decal For Your Truck
Putting decals on your truck is about more than just a cool design. It's a three-part puzzle: picking the right material, nailing the design, and finding the perfect spot for it. Get these three things right, and your truck will not only turn heads but also keep looking sharp for years.
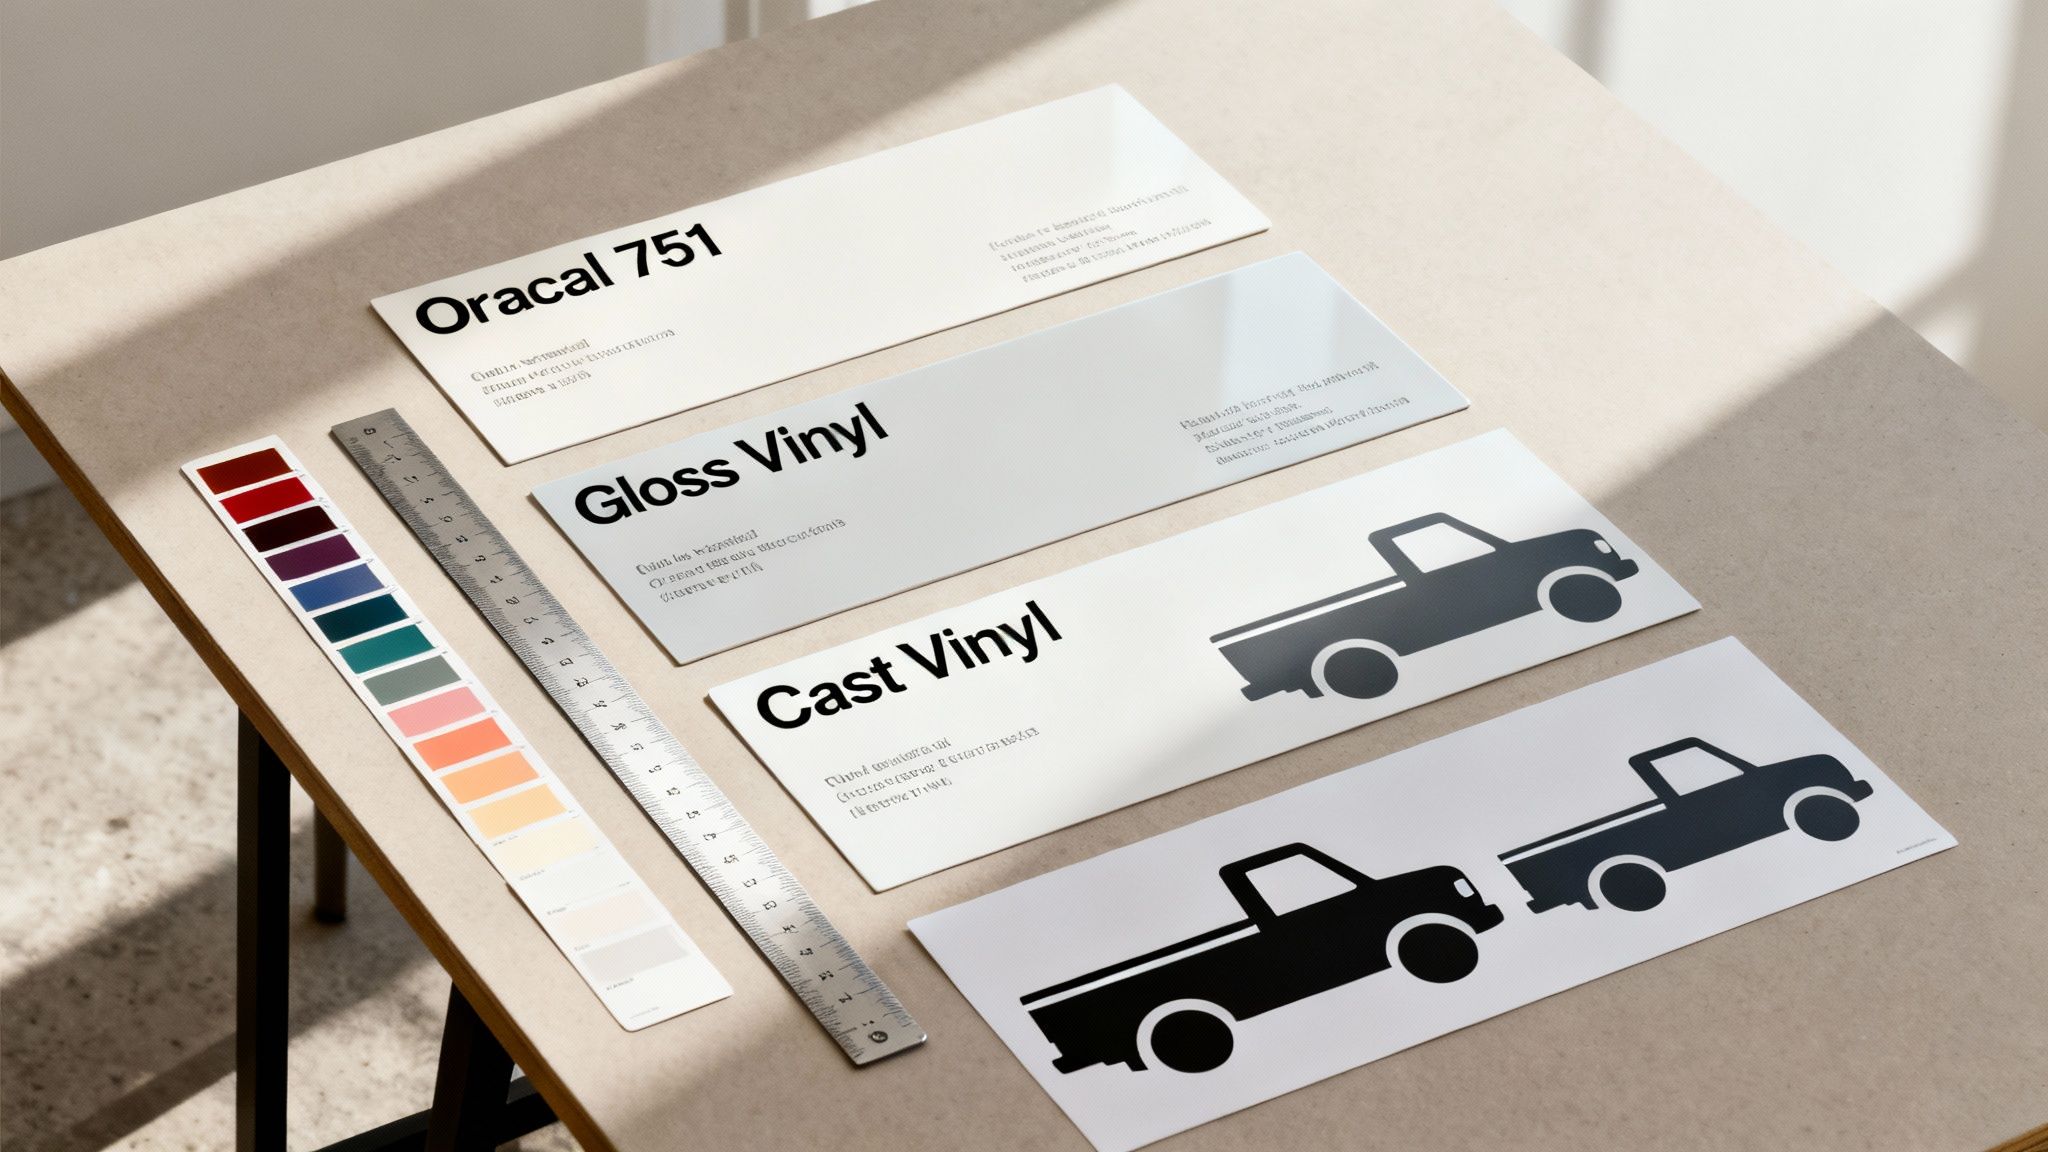
First things first, let's talk material. Your truck lives a tough life, battling everything from scorching sun and heavy rain to road salt and ice. This is no place for a flimsy, cheap sticker. The undisputed champion for vehicle graphics is cast vinyl, and the top name in the game is Oracal.
Unlike the cheaper calendered vinyl that shrinks and peels, cast vinyl is a premium material that stretches and conforms to curves beautifully. We build our decals using Oracal 751 and 951 series vinyl, which are rated for a minimum of 7-8 years of outdoor life. That’s not just a marketing number; it's a real-world promise that your decal will fight off fading, cracking, and peeling.
Material Makes The Difference
The vinyl you choose is everything. It's the difference between a decal that looks painted on for a decade and one that's a peeling, faded mess in less than a year. Turning a cool upgrade into an eyesore is the last thing you want.
To help you see why pro-grade material is non-negotiable for any serious truck owner, here’s a quick rundown of what you’ll find out there.
Comparing Vinyl Decal Materials for Your Truck
Here's a look at the common vinyl decal materials, helping you see why we stick with the best for durability and a clean look on your truck.
| Vinyl Type | Best For | Outdoor Durability | Flexibility | Common Use Case |
|---|---|---|---|---|
| Cast Vinyl (Premium) | Complex curves, long-term outdoor use, vehicle wraps | 7-12 years | High | Full vehicle wraps, professional fleet graphics, permanent decals |
| Calendered Vinyl | Flat, simple surfaces, short-to-mid-term use | 3-6 years | Moderate | Storefront windows, temporary signage, simple truck lettering |
| Printed Vinyl | Full-color graphics, detailed images, logos | 3-7 years (with laminate) | Varies | Bumper stickers, company logos with complex colors |
As the table shows, putting your money into a high-performance cast vinyl means you install it once and you're done. No worrying about it for a long, long time. When you're ready to check out options that meet this high standard, you can find durable vinyl decal stickers that fit GMC trucks right here.
Defining Your Design And Message
With the material handled, now comes the fun part: the design. This is where you get to tell your story. Are you going for a subtle tribute to your military service, or a massive graphic that screams you're ready for the trail?
Think about the message you want to put out there. A single line of clean text on the rear window can look incredibly sharp. On the other hand, a big, detailed graphic on the hood makes a powerful statement. For business owners, it’s all about looking professional and building brand recognition. It's a huge market, with global truck labels reaching $8,846.92 million in 2021, all driven by the need for tough, eye-catching graphics on commercial fleets.
Pro Tip: Work with your truck, not against it. A great decal design should complement the vehicle's existing lines and colors. Try matching the color to your truck's trim, or pick a contrasting color that pops without being obnoxious.
If you've got a completely custom idea in mind, you can always connect with a local specialist. Shops like Davis Vinyl Signs Decals can often help bring unique concepts to life.
Strategic Placement For Maximum Impact
Finally, where you put the decal is just as crucial as the design itself. Different spots serve different purposes and come with their own set of rules.
- Rear Window: This is prime real estate. It's highly visible to everyone behind you and gives you a flat, easy surface to work with. It's perfect for anything from your business info to patriotic statements.
- Side Windows/Quarter Glass: These smaller spots are great for club logos, brand affiliations, or subtle tribute decals. Just make sure they don't block your line of sight.
- Body Panels (Doors, Fenders, Tailgate): These areas are for the bigger, more integrated graphics. A well-placed decal here can follow the truck's body lines and achieve that custom, painted-on look.
- Windshield: Be careful here. Most states have strict laws limiting decals to a small strip across the top (often marked as the "AS-1" line). Always check your local regulations before putting anything on the front windshield.
Keeping these three factors in mind—material, design, and placement—will put you on the right track to choosing a decal you’ll be proud to have on your truck for years to come.
Prepping Your Truck for a Flawless Application
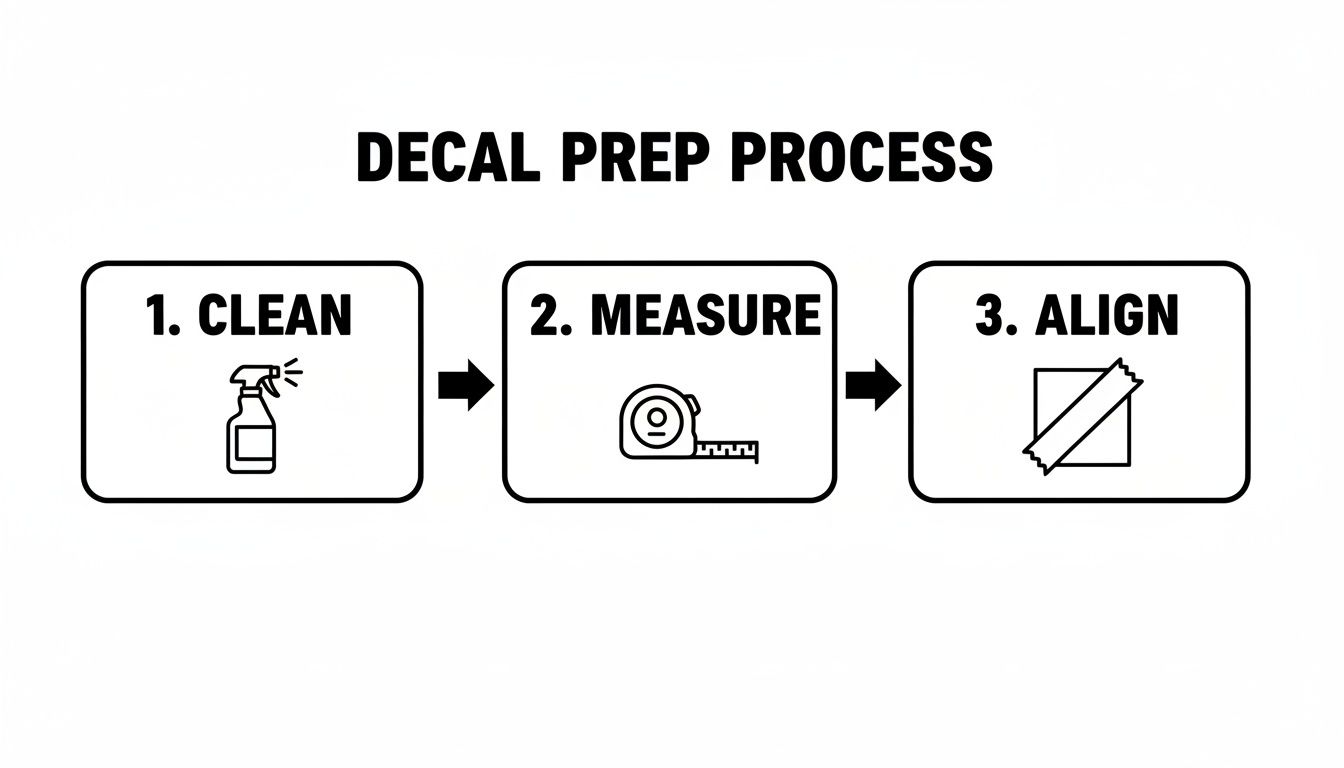
Here’s a secret that separates the pros from the amateurs: the final look of your truck decal is determined long before you ever peel off the backing paper. A successful, bubble-free application is 90% preparation and only 10% the actual work.
Skipping these prep steps is the single biggest reason for decal failure. It’s what leads to those frustrating peeling corners, trapped air bubbles, and decals that just won't stick right.
Getting the surface perfectly clean and ready isn't just a suggestion—it's non-negotiable. Over time, your truck’s paint accumulates a tough, invisible film of wax, road grime, oil, and silicone. Vinyl adhesive simply cannot form a strong, lasting bond with those contaminants. This is why just a quick trip through the car wash isn't enough; you need to do a deeper clean.
Gathering Your Essential Tools
You don't need a professional garage full of fancy equipment to get this right. In fact, your prep toolkit is surprisingly simple and affordable. Having these items on hand before you start will make the entire process smooth and stress-free.
- Isopropyl Alcohol (70% or higher): This is your most important cleaning tool. It acts as the final wipe-down, stripping away any lingering oils or waxes without a hint of damage to your paint.
- Microfiber Cloths: You’ll need at least two—one for cleaning and one for drying. They’re lint-free and won't scratch your clear coat.
- Tape Measure and Masking Tape: Absolutely essential for precise measuring and positioning. The masking tape is key for creating a "hinge" that guarantees perfect alignment.
- Squeegee or Credit Card: A firm, plastic edge is what you'll use to press the decal onto the surface and push out any stubborn air bubbles.
- Spray Bottle with Soapy Water (Optional): This is for the "wet application method," a great trick for beginners. A few drops of baby shampoo or gentle dish soap in water works perfectly.
With these tools ready, you’re set to create the ideal surface for your new graphic.
Creating the Perfect Application Environment
The environment where you apply your decals on a truck is just as critical as the surface cleanliness. Vinyl is sensitive to temperature, and trying to work in the wrong conditions is a recipe for disaster.
The sweet spot for applying vinyl is between 50°F and 90°F (10°C to 32°C).
If it's too cold, the vinyl becomes stiff and brittle, and the adhesive won't activate properly, leading to a weak bond. On the flip side, if it's too hot or you’re working in direct sunlight, the truck's metal surface can heat up, making the adhesive overly aggressive. It will grab instantly, giving you zero chance to reposition it if you make a mistake.
The golden rule is to always work in a shaded, controlled area, like a garage or carport. Make sure the truck’s body panel is cool to the touch before you even think about starting. This simple step gives you the best possible chance for a perfect, professional-looking result.
The Cleaning and Positioning Process
Once you're in a suitable location, the real prep work begins. Start by giving the application area a good wash with regular car soap and water to remove any loose dirt and dust. After drying it completely, it’s time for the most crucial step.
Generously apply the isopropyl alcohol to a clean microfiber cloth and wipe down the entire area where the decal will go. This final pass removes any residual wax, grease, or silicone, leaving a pristine surface for the vinyl to grab onto. You might be surprised what the cloth picks up from a truck that looks perfectly "clean."
Next up is positioning. Whatever you do, don't just eyeball it!
Use your tape measure to find the exact center or desired alignment. Place the decal (with its backing still on) onto the truck and use small pieces of masking tape to hold it in place. Step back, look at it from a few different angles, and make absolutely sure it’s level and exactly where you want it.
For larger designs, like the ones you'll find in our collection of Chevy Vortec hood sticker sets, creating a tape "hinge" across the middle or top of the decal is a game-changing pro tip. This technique locks in your alignment, making the final application nearly foolproof.
Your Guide to a Bubble-Free Installation
This is where the magic happens. After all that prep work, you're finally ready to get that decal on your truck and looking like it was done by a pro. Don't be intimidated by this step—it’s all about being methodical, not rushed. A little patience here goes a long way.
We're going to walk through the two main ways to apply a decal: the wet method and the dry method. We'll also break down the "hinge method," which is a foolproof technique the pros use to make sure the decal lands exactly where it's supposed to, every single time.
This whole process really comes down to three key stages: cleaning the surface, measuring for placement, and aligning the decal.
Nailing these prep steps is what allows the decal’s adhesive to form a permanent bond, giving you that smooth, painted-on look.
Choosing Your Application Method: Wet vs. Dry
First things first, you need to decide if you're going to apply your decal wet or dry. Neither method is better than the other; they just serve different purposes and are suited for different situations.
Dry Application
This is the go-to method for most professionals because it’s fast and the adhesive grabs immediately. You just peel, stick, and squeegee.
- Best For: Smaller decals (anything under 12 inches), seasoned installers, or working in a cool, climate-controlled garage.
- Pros: The bond is instant and strong. Plus, it’s much quicker since you don’t have to wait for anything to dry.
- Cons: It’s completely unforgiving. The second that vinyl touches the surface, it's stuck for good. There's zero room to reposition, which can be nerve-wracking if you're new to this.
Wet Application
For this method, you'll use a simple soapy water solution to lightly spray both the truck's surface and the sticky side of the decal before applying it.
- Best For: Large decals, beginners who want a safety net, and applying decals in hot weather.
- Pros: The soapy water gives you a slick surface to work with, allowing you to slide the decal around until it's perfectly positioned. It also makes pushing out air bubbles a breeze.
- Cons: It needs time to cure. You have to wait for all the water to evaporate before the adhesive fully bonds, which means you can’t pull the transfer tape off right away.
For first-timers, I almost always recommend the wet method. It takes all the pressure off and dramatically cuts down the chances of getting those annoying air bubbles. All you need is a spray bottle with water and two or three drops of baby shampoo.
Executing The Hinge Method Step-by-Step
Whether you go wet or dry, the hinge method is your secret weapon for perfect alignment. You should have already positioned your decal and created a tape hinge across the middle during the prep phase. Now it’s time to put it to use.
Set Your Hinge: Make sure that horizontal strip of masking tape is pressed down firmly over the center of the decal. This is your pivot point.
Peel Back One Side: Lift one half of the decal and fold it back over the tape hinge. Now, carefully start peeling the waxy backing paper away from the vinyl, stopping right at the tape. Grab a pair of scissors and cut that loose piece of backing paper off.
Apply the First Half: Holding the edge of the decal, begin laying it down on the truck. Start from the center hinge and work your way out. Using your squeegee at a 45-degree angle, apply firm, overlapping strokes from the middle to the outer edges. This motion is key—it forces all the air (or water) out from the center.
Repeat for the Other Side: Once the first half is smooth and secure, you can remove the center tape hinge. Lift the remaining half of the decal and peel away the rest of the backing paper.
Finish the Job: Just like before, apply the second half using that same center-out squeegee technique. Keep your strokes overlapping and maintain consistent pressure to guarantee a seamless finish across the entire graphic.
Following this process ensures that even massive decals on a truck go on straight and bubble-free every time.
The Final Step: Removing The Transfer Tape
After you've squeegeed the whole decal, it’s tempting to just rip the transfer tape off and admire your work. Don't do it. This final peel is a delicate step that locks everything in place.
If you used the dry method, you can pull the tape off almost right away. If you went with the wet method, you need to be patient. Give the water at least 30 minutes to an hour to start evaporating. In cooler or more humid weather, it might take even longer.
To remove it correctly, start at a corner and pull the transfer tape back on itself at a sharp 180-degree angle. Never pull it straight up and away from the truck. Pulling it flat against the surface ensures the vinyl decal stays put without any risk of lifting or stretching. Go slow, and keep an eye on the design. If a small piece tries to come up with the tape, just lay it back down, press the spot firmly with your finger, and then continue peeling.
Keeping Your Decals Looking Great
Once your new decal is smoothed into place, the job isn't quite done. The real secret to making that investment last comes down to a few simple but crucial care habits. Good maintenance is what keeps decals on a truck looking sharp for years, fighting back against everything the weather and the road can throw at them.
The most critical time is right after you finish the installation. That adhesive needs time to fully cure and lock onto your truck's surface. Think of it like letting fresh paint dry—if you rush it, you’re just asking for trouble later on.
Give your new decal a minimum of 48-72 hours to cure before its first wash. This rest period is non-negotiable for a strong bond, preventing peeling edges or moisture getting trapped underneath.
If you can, try to keep the truck out of any extreme weather during this time. That means avoiding heavy rain, the scorching afternoon sun, and definitely any car washes. Just letting the vinyl settle down undisturbed is the single best thing you can do for its long life.
Smart Cleaning Practices For Decal Longevity
After that initial curing window, you can wash your truck like you normally would, but with a couple of key adjustments. Vinyl is tough, but it's not bulletproof. The biggest threat to its lifespan is a high-pressure washer aimed directly at the edges.
When you're cleaning, especially with a pressure washer, always keep the nozzle several feet away from the decal. More importantly, never spray directly at the edge of the graphic. That focused blast of water can easily lift the vinyl and force moisture underneath, which is the beginning of the end for any decal.
Here are a few best practices to keep in mind:
- Hand Washing is Safest: Nothing beats a gentle hand wash. A soft microfiber mitt and your favorite car soap are the best tools for preserving your decals.
- Avoid Abrasive Polishes: Steer clear of harsh rubbing compounds or abrasive waxes on the vinyl itself. They can scratch the surface or dull the colors over time.
- Wipe Spills Quickly: Things like gasoline, oil, or bird droppings need to be cleaned off ASAP. If left to sit, their acidic nature can stain or even damage the vinyl.
Following these simple rules will dramatically extend the life of your graphics, keeping them looking as crisp as the day you put them on.
Safely Removing Old Decals Without Damaging Paint
One of the great things about vinyl decals is that they aren't a lifelong commitment. When it's time for a new look, you can remove them without hurting your truck’s paint—as long as you do it the right way. The goal here is to soften the adhesive, not to fight it.
Whatever you do, don't just try to rip an old decal off. You'll probably leave behind a sticky, frustrating mess of residue or, even worse, take a chunk of your clear coat with it. The process is actually pretty simple and only requires a couple of common tools.
Your removal toolkit should include:
- A standard hair dryer or a heat gun on its lowest setting
- A plastic razor blade or an old gift card
- An adhesive remover like Goo Gone or 3M Adhesive Remover
- A clean microfiber cloth
Start by gently heating one corner of the decal with the hair dryer. Keep it moving so you don't concentrate the heat in a single spot. After about 30-45 seconds, you'll notice the vinyl getting soft and pliable. Use your plastic razor blade to carefully lift up that heated corner.
Once you've got a good grip, keep applying low heat just ahead of where you’re pulling. Peel the decal back on itself at a low, sharp angle. This slow and steady motion, combined with heat, is the secret to getting the vinyl and most of its adhesive to come off together in one clean piece.
After the decal is gone, you'll likely have a bit of adhesive residue left over. Just apply your adhesive remover to a microfiber cloth, let it sit on the sticky spot for a minute to do its work, and then gently wipe it away. A quick wash of the area will have your truck looking brand new, ready for its next design.
Got Questions About Truck Decals? Let's Cover Them.
Alright, let's wrap this up by hitting some of the most common questions I hear. This is your go-to spot for clearing up those last-minute doubts or tackling issues that might pop up later. These are real-world questions with straight answers, designed to make you feel completely confident with your project.
Think of it as the final check-in. We've gone over the what, why, and how, but these specific scenarios are the ones that always seem to come up right when you’re about to lay that new vinyl down.
Can I Apply Decals on My Truck in Cold or Hot Weather?
Temperature is probably the single most critical factor for a good, clean vinyl application. The sweet spot you're aiming for is between 50°F and 90°F (10°C to 32°C). This isn't just a suggestion; it's a rule of thumb that can absolutely make or break your installation.
If you try to put a decal on in the cold, the vinyl gets stiff and brittle. The adhesive loses its tackiness, too, which means it won't form a strong, lasting bond with the surface. It might look like it’s sticking at first, but it’ll probably start peeling or failing way sooner than it should.
On the flip side, extreme heat causes the opposite headache. When your truck's surface is hot enough to fry an egg, the vinyl’s adhesive becomes super aggressive. It'll grab instantly with zero room for error, making it almost impossible to position correctly. The heat can also stretch the vinyl as you apply it, which can distort your whole design.
My best advice: always work in a garage or at least in the shade. Before you even start, just place your hand on the truck panel. If it feels really hot or cold, it's best to wait until things cool down or warm up for a professional result.
What's the Best Way to Clean My Truck After Applying a Decal?
Once your decal is on and looking sharp, proper cleaning is what will keep it that way. The most important rule here is to give the adhesive at least 24-48 hours to fully cure before you even think about washing that area. That initial period is when the bond really sets in.
After that waiting period, hand washing is always going to be the safest bet. But, I get it, sometimes a pressure washer is just easier. You can use one, but you have to be smart about it.
- Keep Your Distance: Stand back several feet from the truck. You’re cleaning it, not sandblasting it.
- Stay Away from the Edges: Never aim that high-pressure stream of water directly at the edges of the decal. It’s the fastest way to lift the vinyl and force water underneath, causing it to peel right off.
- Use Gentle Soaps: Stick with pH-neutral car wash soaps. Avoid harsh degreasers or chemicals, especially directly on the vinyl.
- Skip Abrasive Waxes: You’ll want to avoid applying any abrasive waxes or polishing compounds over the decal itself. They can easily scratch the surface or make the finish look dull.
What Do I Do if I Get Air Bubbles During Application?
Seeing an air bubble pop up can be infuriating, but don't panic! It’s usually an easy fix. For most small bubbles, you can just use your squeegee or even a finger to gently push the trapped air toward the closest edge of the decal.
What if a bubble is trapped right in the middle? Honestly, your best bet is to just leave it alone for a few days. High-quality vinyl like the Oracal we use is designed to "breathe," and a lot of those small bubbles will just vanish on their own as the vinyl settles. Parking the truck in the sun for a bit can speed this whole process up.
For a bigger, more stubborn bubble that just won't go away, here's a little pro trick. Grab a very fine pin or a needle and poke a tiny hole right in the center of the bubble. Then, use your finger to gently press the air out through that nearly invisible hole. The vinyl will seal itself right back down, and you’ll never even know the pinprick was there.
Are Truck Window Decals Legal?
This is a big one, and the answer can change from state to state, so you should always check your local vehicle regulations. That said, there are some general guidelines that apply pretty much everywhere.
Decals on your rear and rear-side windows are usually fine, as long as they don't block your critical field of vision. The real restrictions are on the front windshield. Most states will only allow decals in a small strip at the very top of the windshield, often marked with an "AS-1" line etched into the glass. Never, ever place anything on the windshield that could interfere with your view of the road.
Your front side windows—the driver and passenger windows—are also heavily regulated. Putting decals here is almost always a no-go because it can create a massive blind spot. When you're deciding on placement, safety and visibility have to be your top priorities.
Here at Custom Sticker Shop, we're all about helping you get that perfect look with decals that are built to last. From our veteran-friendly shop right here in Topeka, Kansas, we deliver American-made quality you can count on. We've got over 1,200 designs, including military tributes and fully custom options, all made from professional-grade Oracal vinyl.
Check out our collection at https://customstickershop.us and don't forget about our Buy 2 Get 1 Free offer.
Drafted with Outrank app