
The best way to think about custom vinyl decals is to see them as high-quality, long-lasting 'tattoos' for your vehicle—not just flimsy stickers. They’re a way to turn your car, truck, or Jeep into a canvas that shows the world who you are, using professional-looking graphics that are built to last for years.
Giving Your Vehicle a Voice with Custom Decals
Your vehicle is more than just a machine that gets you from point A to point B; it’s a reflection of your personality. With custom vinyl decals, you give it a voice, transforming a stock car into a statement piece that tells your story. Whether it's showing pride for your family, supporting a cause, or displaying a favorite hobby, a decal makes it happen.
It's no surprise that this kind of personalization has taken off. The custom vinyl decal market is expected to jump from about $5 billion in 2026 to around $7 billion by 2033. That growth is all about our increasing desire to make our vehicles unique, and it's powered by digital printing tech that delivers incredible quality. You can dive deeper into this trend in this vinyl decal market analysis.
What Makes a Decal Different from a Sticker?
People often use the terms "sticker" and "decal" interchangeably, but there's a big difference. A sticker is just one piece you peel and stick. A vinyl decal, on the other hand, is built in three layers: the paper backing, the vinyl design itself, and a top layer of transfer tape.
This three-part construction is the secret sauce. It's what allows for incredibly intricate designs and clean, stand-alone lettering. The transfer tape holds every single part of the graphic in perfect position so you can apply it as one solid piece, giving you that sharp, "painted-on" look.
This is exactly why decals are the superior choice for vehicles, where you want a clean look that feels integrated with the car itself.
Two Main Types of Vinyl Graphics
When you start shopping for a custom decal, you'll mainly run into two styles. Knowing the difference will help you zero in on the right one for your vision.
- Die-Cut Vinyl Decals: These are precision-cut from a single sheet of solid-colored vinyl. There’s no background at all—just the letters or shapes you want. It's the perfect choice for custom text, logos, and silhouette-style graphics where you want a crisp, clean outline.
- Printed Vinyl Graphics: If your design has multiple colors, gradients, or even a photograph, this is the way to go. The artwork is printed directly onto a sheet of white or clear vinyl, and then the machine cuts it to your desired shape. This method opens the door to full-color, vibrant imagery.
By choosing custom vinyl decals, you're not just sticking something on your car; you're investing in a durable, high-impact form of self-expression. And as a family-run, veteran-friendly American business, we’re committed to delivering a quality product that helps your vehicle tell your story.
Choosing Vinyl That Lasts as Long as Your Passion
The secret to a custom vinyl decal that looks incredible for years isn't just the design—it's the vinyl itself. We've all seen it: a once-proud decal that’s now a cracked, peeling mess. Choosing the wrong material is like putting a paper sticker on your bumper and hoping it survives a car wash. It just won’t.
To make sure your decal lasts, you need to understand the difference between the two main types of vinyl: cast and calendared. This single choice is the most important factor in determining how long your decal will last and how good it will look on your vehicle.
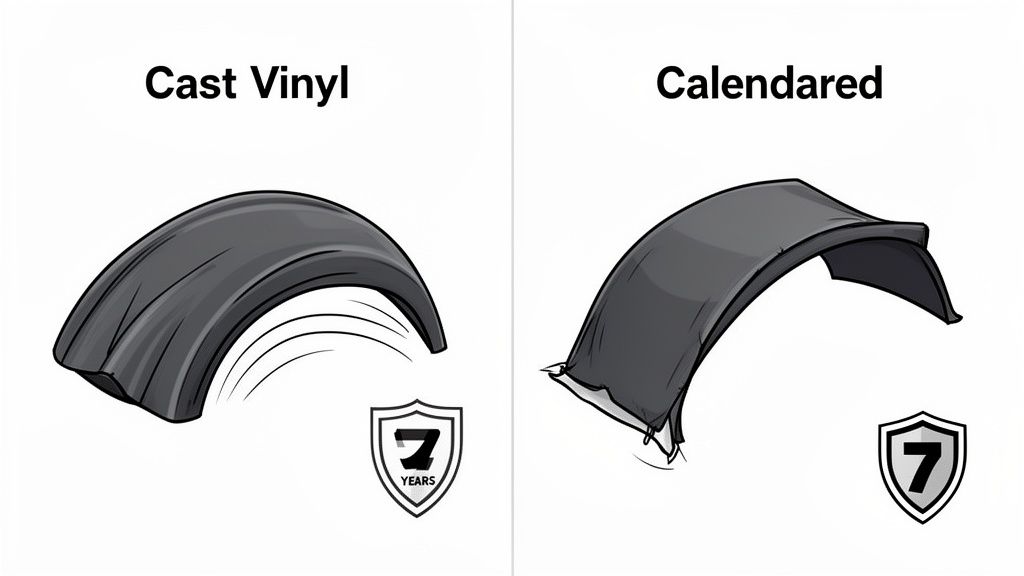
Cast vs. Calendared Vinyl Explained
Think of it like this: you can make pizza dough by either rolling it out or tossing it.
Calendared Vinyl: This is the "rolled-out" dough. A lump of vinyl is heated and squeezed through rollers to stretch it into a thin sheet. This process creates tension. Over time, especially when exposed to sun and heat, that vinyl wants to shrink back to its original shape. That’s what causes the cracking, peeling, and pulling away at the edges.
Cast Vinyl: This is the "tossed" dough—or better yet, think of it like pancake batter. The vinyl starts as a liquid that’s poured onto a smooth surface and baked to cure. Because it was never stretched, it has no tension or "memory." This makes it incredibly stable. It hugs the curves of a vehicle perfectly without trying to pull back, looking like it was painted on.
For any custom vinyl decal going on a vehicle, cast vinyl is the only professional choice. Its manufacturing process creates a premium, dimensionally stable film that can withstand years of abuse from the elements without failing.
The Gold Standard for Durability
After more than two decades in this business, we’ve learned what works and what doesn’t. That's why we exclusively use Oracal 651 and Oracal 751 cast vinyl. This material is recognized across the industry as the benchmark for outdoor graphics. It simply performs.
Oracal vinyl is engineered to last, boasting an outdoor durability rating of up to 7 years. This means your decal is built from the ground up to fight back against the biggest enemies of vehicle graphics.
Understanding Key Durability Terms
When you're shopping for custom vinyl decals, you'll see terms like "outdoor rated" and "UV resistant." These aren't just marketing fluff; they are critical features that protect your investment.
Outdoor Rated: This means the vinyl is made to handle real-world conditions. It won't get brittle and crack in the freezing cold or turn soft and gummy in the summer heat. It's also designed to hold up against rain, snow, and the abrasion of a car wash.
UV Resistance: The sun’s ultraviolet rays are what bleach the color out of everything, from your dashboard to cheap decals. Quality vinyl has UV-blocking additives mixed in—think of it as a powerful, built-in sunscreen for your decal. This is what keeps the colors sharp and vibrant for years, while cheaper materials can start to fade in a matter of months.
Vinyl Material Comparison: Professional vs. Craft Grade
The difference in performance between professional-grade material and what you might find in a craft store is night and day. The table below breaks down exactly why we’re so insistent on using only the best for vehicle decals.
| Feature | Professional-Grade Vinyl (e.g., Oracal) | Standard Craft-Store Vinyl |
|---|---|---|
| Durability | Rated for up to 7 years of outdoor use | Typically lasts 1-2 years outdoors, if that |
| Resistance | High resistance to shrinking, cracking, and peeling | Prone to shrinking and cracking, especially in the sun |
| Conformity | Stretches and conforms to curves without tension | Stiff and struggles with anything but flat surfaces |
| Appearance | Maintains a smooth, "painted-on" look for years | Can look brittle and aged after just a few months |
This is why settling for cheaper, craft-grade vinyl for a vehicle is always a mistake. It might save a few bucks upfront, but it will fail quickly and end up looking worse than no decal at all.
Ultimately, choosing a decal made from high-quality cast vinyl is about getting what you paid for. It’s the difference between a temporary sticker and a lasting statement that represents your passion with the sharpness and longevity it deserves.
Finding the Perfect Size and Placement for Your Decal
Even the best-looking custom vinyl decal will fall flat if it’s the wrong size or stuck in a weird spot. It’s just like hanging a picture in your house—a tiny print gets swallowed by a big wall, and a massive canvas overwhelms a small room. The same goes for your ride. It’s all about balance.
Getting that clean, professional look means making the decal feel like it belongs, not like it was just slapped on as an afterthought. This is where a little planning goes a long way. Before you even think about peeling off the backing, take a minute to measure and visualize.
Measure Twice, Apply Once
Trust us on this one. The most common mistake we see is people just guessing the size they need. A decal that looks huge on your monitor can look like a postage stamp on the side of a truck, and vice versa. Always, always grab a tape measure.
Before you hit "order," go out to your vehicle and physically measure the spot. Use painter's tape to mark out the corners of the size you're thinking of. This gives you a real-world look at how it will fit and saves you from any nasty surprises.
That one simple step can be the difference between a perfect fit and ordering a custom vinyl decal that’s so big it blocks your view or so small you can’t even see it.
Common Placement Areas and Sizing Tips
Some spots on a vehicle are just classic locations for decals. They offer great visibility and a nice, clean surface to work with. Here are a few of the most popular areas and some sizing guidelines to get you started.
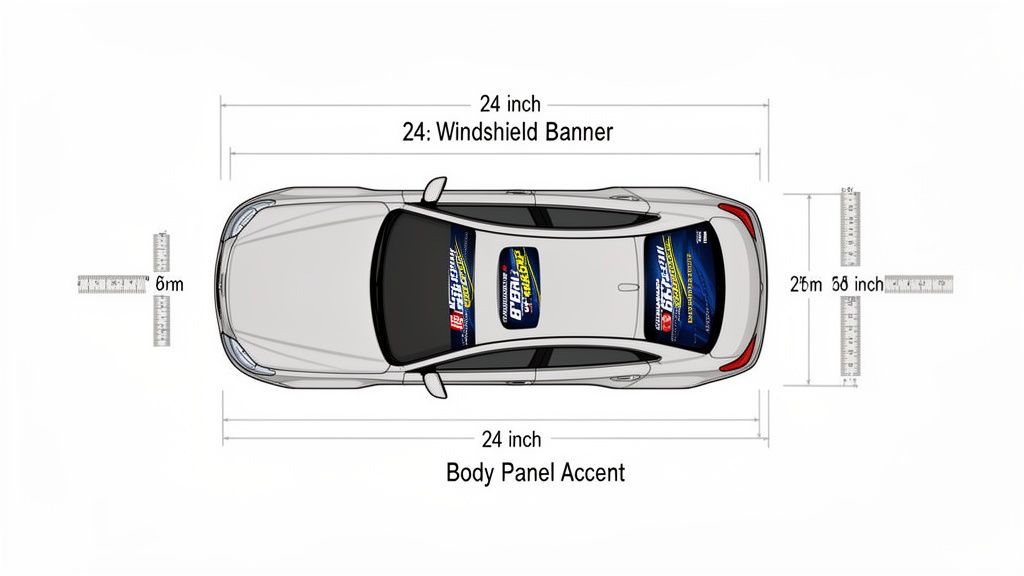
- Windshield Banners: These go right at the top of the front or rear windshield. For most sedans, something around 24 to 30 inches wide is a safe bet. If you’re driving a bigger truck or SUV, you’ll likely need to step up to 36 inches or more. Measure your glass to be sure. This vinyl windshield banner for Ford Mustangs is a great example of a vehicle-specific fit.
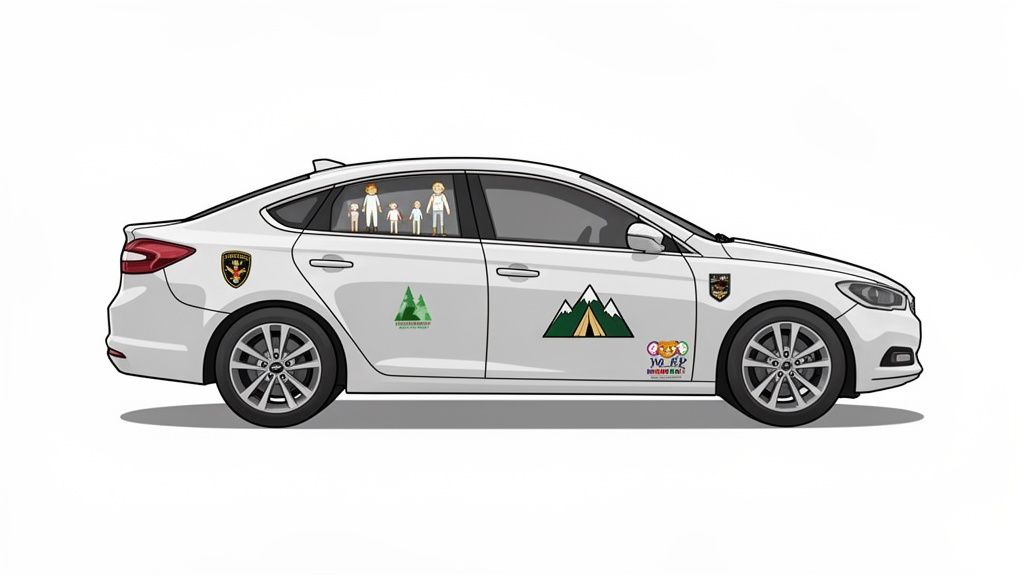
- Rear Window Graphics: Your rear window is prime real estate. For a big graphic in the center, 12 to 24 inches usually works great, depending on how intricate the design is. If you're going for smaller decals in the corner—like family stick figures or a memorial—keep it subtle, around 4 to 6 inches.
- Body Panels and Doors: The sides of your vehicle are a massive canvas. Big, bold graphics can run the entire length of a door, often measuring 30 to 50 inches wide. For smaller accent pieces near the wheel wells or on the back pillar, something in the 6 to 12-inch range is all you need to make an impact.
Vehicle-Specific Placement Ideas
The perfect spot for your decal also depends on what you drive and the look you're going for. What looks killer on a JDM tuner might look totally out of place on a family SUV.
For Jeep and Off-Road Enthusiasts:
- Hood: Nothing says you're serious like a blackout hood decal or a cool topographical map graphic. It's a bold look that works perfectly with the rugged lines of a Jeep or truck.
- Lower Doors/Rocker Panels: This is the ideal home for "trail rated" badges, rock-slider graphics, or your off-road club logo. They’re visible but also placed right where the action happens.
For Military and Memorial Tributes:
- Rear Window (Passenger Side): Placing a tribute on the rear window is a classic, respectful choice. A corner spot keeps it prominent without blocking the driver's view.
- Truck Tailgate: The center of a tailgate gives a memorial or service branch decal a place of honor, making it impossible to miss.
For JDM and Tuner Cars:
- Windshield Banner (Lower): In tuner culture, a brand or crew banner running along the bottom of the windshield is a popular and aggressive look.
- Quarter Panel: A small, angled decal tucked in just behind the rear wheel adds that subtle, race-inspired flair that defines the JDM style.
Take a few minutes to measure your space and think about the lines of your vehicle. It ensures your custom vinyl decal not only fits like it was made for it—because it was—but also enhances the whole look of your ride.
Bringing Your Unique Decal Design to Life
This is where the fun really begins. Taking an idea—whether it's a fully-formed concept or just a spark of inspiration—and turning it into a real, high-impact custom vinyl decal is what it's all about. This is your chance to make something that is 100% you.
And you don't need to be a graphic designer to do it. The process is for anyone who wants to put their own stamp on their ride. From a simple line of text with your favorite quote to a complex, multi-layered graphic, modern tools and shops make it incredibly easy to get a professional-looking result.
This drive for personalization is a huge force in the automotive world. The market for personalized stickers, which includes custom vinyl decals, is expected to jump from $5.12 billion in 2026 to $8.45 billion by 2035. That massive growth is being fueled by drivers just like you who want their vehicles to be more than just transportation. You can dig into the numbers and trends yourself by checking out the full report on the vinyl sticker market.
From Simple Text to Custom Graphics
The easiest and most popular starting point is custom text. It could be a meaningful phrase, a funny inside joke, your business name, or a personal motto. The beauty of a text decal is its directness—it sends a clear message instantly.
When you're designing with text, you've got a few levers to pull:
- Font Choice: The font does the heavy lifting for the tone. A bold, blocky font feels rugged and tough, perfect for a 4×4. A clean, flowing script can feel more elegant or aggressive, a great fit for a tuner car.
- Text Effects: Adding an outline or a shadow can make your text "pop" off the surface. This gives it depth and makes it way easier to read against a tinted window or busy paint job.
- Arrangement: You can run the text in a straight line, or you can arch it to perfectly follow the curve of your windshield or rear window for a factory-finish look.
Of course, if you already have a logo, a piece of artwork, or even a specific drawing you love, that can absolutely become a stunning decal. A good decal shop can work with most common file formats to turn your digital design into a precision-cut vinyl graphic. For a deep dive into turning your idea into reality, our guide on how to make your own custom sticker for your car is a fantastic resource.
Design Inspiration for Every Driver
The best decals connect with the driver’s lifestyle. Your vehicle is a rolling canvas, and the design should say something about the community you belong to or the passions that get you going.
For the Jeep and Off-Road Adventurer
Jeep owners are part of a tribe built around adventure and freedom. Their decals are often a nod to the outdoors and that rugged, go-anywhere attitude.
- Adventure Themes: Think mountain ranges, compass graphics, or topographical map patterns. These designs immediately signal a love for exploration.
- Personalized Touches: Add the name of your favorite trail, the coordinates of a special spot, or a fun nickname for your Jeep.
- Humorous Slogans: Phrases like "It's a Jeep Thing" or "If you can read this, roll me over" are iconic badges of honor within the community.
For the Proud Military Veteran
Displaying military service is a profound statement of pride, sacrifice, and belonging. These custom vinyl decals aren't just decorations; they're symbols of honor that connect you with others who served.
A memorial or tribute decal should be placed with respect. It’s a quiet nod to a significant part of your life or a way to honor a loved one's service. The design should be clean, clear, and dignified.
Popular elements we see a lot include:
- Unit Insignias and Crests: Displaying your specific unit, battalion, or squadron creates an instant bond with fellow service members who recognize the symbol.
- Service Branch Logos: The official emblems of the Army, Navy, Air Force, Marines, or Coast Guard are timeless and powerful.
- Adding Personal Details: Including your years of service, a specific campaign ribbon, or the name of a fallen brother or sister makes the tribute deeply personal.
For the JDM and Tuner Enthusiast
The JDM (Japanese Domestic Market) and tuner scene is all about precision, performance, and a very specific style. Decals in this world are often a hat-tip to the culture, to specific brands, and to a racing-inspired aesthetic.
- Brand Allegiance: Showcasing your favorite aftermarket brands, whether it's for tires, suspension, or engine parts, is a core part of the culture.
- Cultural References: Kanji lettering, rising sun motifs (when used respectfully), or phrases like "Built Not Bought" are staples of the scene.
- Subtle Placement: Sometimes, a small, perfectly placed decal on a quarter window or lower windshield says more than a giant one. It’s an authentic touch that true enthusiasts will spot and appreciate.
Ultimately, the design process is about creating something that feels authentic to you. By mixing powerful imagery with personal details, you can craft a custom vinyl decal that does more than just decorate your vehicle—it tells your story.
How to Install Your Vinyl Decal for a Perfect Finish
Getting that clean, bubble-free finish on your new decal comes down to two things: a little patience and the right prep work. Rushing the job is the surest way to get a crooked, bubbly mess. But if you take your time, you can get a result that looks like it was done by a professional.
First, understand what you’re working with. This isn’t a simple peel-and-stick bumper sticker. Your custom vinyl decal is a three-layer sandwich designed for a perfect transfer. The bottom is the wax paper backing that protects the adhesive. The middle is your vinyl decal itself. The top layer is the transfer tape, which holds the entire design together so you can place it perfectly.
Prepare Your Surface for a Flawless Bond
You wouldn’t paint a dirty wall, and the same logic applies here. The single most important step for a long-lasting decal is starting with a perfectly clean surface. Any dirt, dust, or wax will keep the adhesive from grabbing on, which leads to peeling down the road.
- Clean Thoroughly: Mix up a simple solution of mild soap and water, or use a 50/50 mix of isopropyl alcohol and water. Grab a clean, lint-free cloth and wipe down the entire area where you plan to apply the decal.
- Rinse and Dry: If you used soap, wipe the area again with a water-dampened cloth to remove any soap film. Then, dry the surface completely with another clean, lint-free cloth.
- Final Check: Run your hand over the surface. It should feel completely smooth and dry. Any leftover moisture or grime will ruin the application.
Pro Tip: Never use Windex or other ammonia-based glass cleaners before applying a decal. They leave behind an invisible residue that fights the vinyl adhesive and stops your decal from sticking properly. Stick to the simple soap and water or alcohol solution.
The Hinge Method for Perfect Alignment
Once the surface is clean, it's time to get your decal positioned just right. The "hinge method" is a trick of the trade that pros use to guarantee the decal goes on straight and exactly where you want it. This method takes all the guesswork and stress out of trying to eyeball it.
Hold the decal up to your vehicle. Once you have it perfectly placed, run a piece of masking tape or painter's tape horizontally across the center. Make sure the tape sticks to both the decal and the vehicle surface. This tape is now your "hinge."
Next, lift one half of the decal (either top or bottom) and fold it back over the hinge. Carefully peel the wax paper backing away from the transfer tape, stopping at the hinge. Use scissors to cut away the loose piece of backing paper.
Now, using a squeegee or a credit card, slowly apply that exposed half of the decal. Start from the center hinge and work your way outwards with firm, overlapping strokes. This pushes all the air out from under the vinyl.
With the first half applied, you can remove the painter's tape hinge. Lift the other side of the decal and peel off the rest of the wax paper backing. Continue squeegeeing from the center outwards until the entire decal is flat against the surface.
Let the decal sit for a few minutes to bond. Finally, slowly peel the clear transfer tape off. Pull it back on itself at a sharp, 180-degree angle. If any part of the vinyl tries to lift up with the tape, just lay it back down, squeegee it firmly one more time, and then continue peeling.
Fixing Minor Mistakes and Safe Removal
Don’t sweat it if you find a small air bubble after you’re done. It’s an easy fix. Just take a pin or the very tip of a sharp craft knife and poke a tiny hole in the middle of the bubble. Use your finger to gently press the trapped air out through the hole.
When you're ready for a change, a little heat makes removing old decals a breeze. Gently warm the decal with a hairdryer to soften the vinyl and the adhesive. Once it’s warm, you can slowly peel it off without damaging your paint or glass. Any sticky residue left behind can be cleaned off with a bit of isopropyl alcohol or an adhesive remover.
Pricing, Shipping, and Getting Your Decals
When you order a custom vinyl decal, you’re paying for more than just a sticker. You're investing in a durable, American-made product designed by people who are just as passionate about this stuff as you are. Let's break down what goes into the price so you know exactly what you're getting.
The final cost comes down to a few key things: the size of the decal, how complex the design is, and the quality of the vinyl we use. A massive, intricate graphic is naturally going to cost more than a small, simple text decal. But we’ve built our shop on transparency and making personalization accessible to everyone.
What Goes Into the Price
Our pricing is straightforward. We deliver professional quality without the premium price tag, with many of our decals starting at just $7.99. To make it an even better deal, we have two core offers our customers use all the time:
- Free US Shipping: Every order over $25 ships for free, anywhere in the United States.
- Buy 2, Get 1 Free: This is an unlimited offer that applies to your entire order. It’s the best way to save big when you're grabbing multiple designs.
This isn't just a marketing gimmick; it's central to how we run our family-owned, veteran-friendly business. You get a top-tier product made with professional-grade materials at a great price.
From Our Shop to Your Door
Once you’ve locked in your design, we handle the rest. Your order is cut and shipped directly from our shop right here in Topeka, Kansas. We use trusted carriers like USPS and UPS to make sure your decals show up safe and sound.
From the time you click "order" to the decal arriving at your door, you can typically expect it to take 5-8 days.
When your package arrives, you'll find everything you need for a perfect, bubble-free installation. It really boils down to three simple steps.
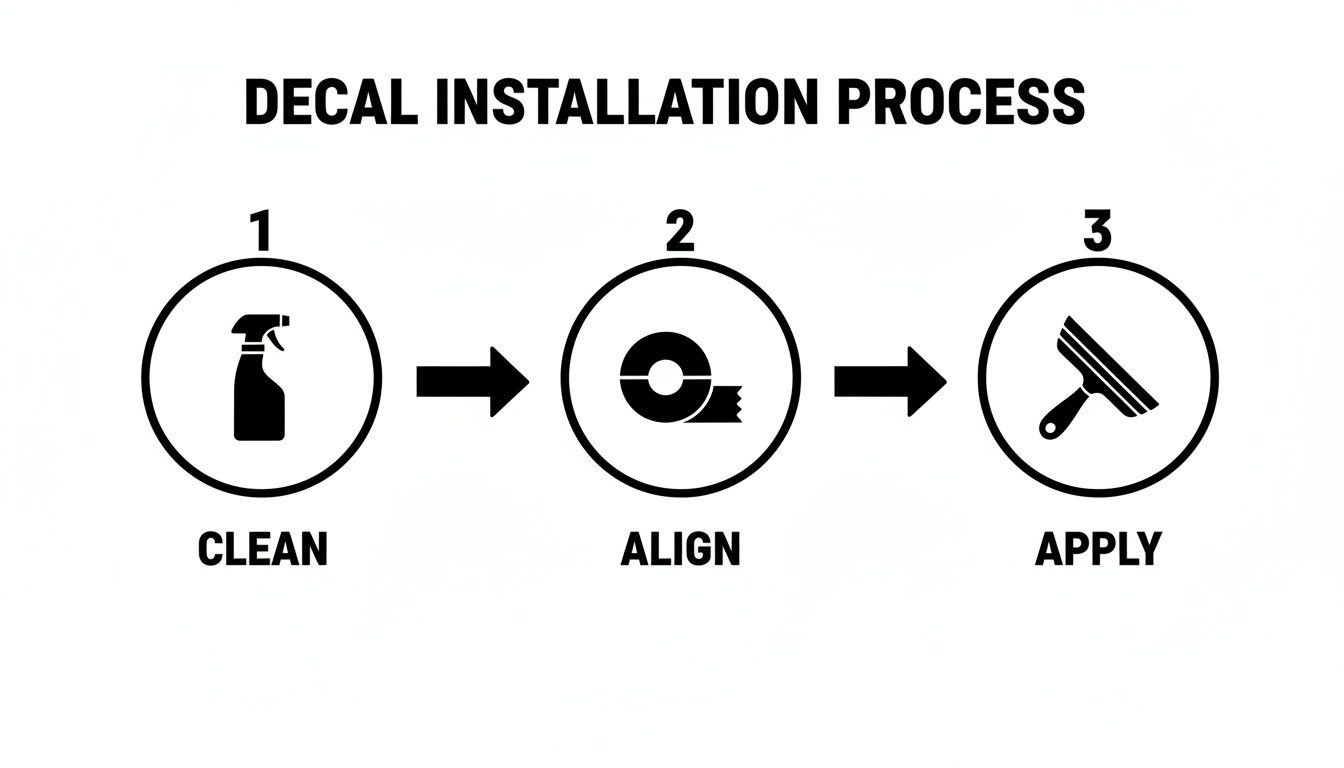
As you can see, a little prep work goes a long way in getting that clean, professional finish that looks like it was painted on.
It's no surprise that vehicle personalization is booming. The global printed vinyl market was valued at a massive $9.53 billion in 2024 and it just keeps growing, especially with the explosion of the DIY community. If you're a numbers person, you can dig into the data in this comprehensive market report.
We build trust through clarity. From pricing and special offers to shipping and payment, you should know exactly what to expect. No hidden fees, ever. Just solid value.
We make the checkout process just as easy and secure, accepting all major payment methods like PayPal, Venmo, Apple Pay, and all major credit cards.
Ready to see how simple it is? Start building your own design with our 7-inch custom text decal builder and see for yourself.
Your Questions About Custom Vinyl Decals Answered
We've covered a lot of ground, but there are always a few lingering questions that pop up right before you hit "order." Let's tackle the most common ones we hear from customers.
Getting these final details clear is the last step to making sure you get a decal that looks great and lasts for years to come.
Are Custom Vinyl Decals Car Wash Safe?
Yes, absolutely. We make our decals from high-quality Oracal vinyl specifically so they can handle the real world, and that includes automated car washes.
The most important rule, though, is patience. You have to give the adhesive 48-72 hours to fully cure and bond with your vehicle's surface. Rushing this step is the number one reason for application failure. After that curing period, you're good to go.
A quick word of advice: while our decals are tough, even the best vinyl has its limits. Try to avoid aiming a high-pressure washer directly at the decal's edges. That kind of focused blast can, over time, work its way underneath and cause lifting. For the absolute longest life, nothing beats a good old-fashioned hand wash.
Can I Put a Vinyl Decal on a Textured Surface?
For a decal to last, it needs a smooth, non-porous surface to grab onto. Think of things like your car's windows, the painted metal on the body, or even smooth, hard interior plastics. These are perfect.
A decal might seem to stick to a lightly textured surface at first, like some unpainted plastic trim on a Jeep or truck. The problem is, it can't get a complete seal. Air gets trapped in all those tiny bumps and grooves, which is a guaranteed recipe for peeling. It might last a week or a month, but it will fail prematurely.
For a professional, "painted-on" look that lasts for years, always stick to a smooth, clean, non-porous application area. It's the secret to durability.
How Long Will My Vinyl Decal Last?
The lifespan of a decal really comes down to two things: the quality of the vinyl and its exposure to the sun. That’s why we only use professional-grade Oracal cast vinyl, which is rated for up to 7 years of outdoor durability.
This material is engineered from the ground up to fight off the elements. It has UV inhibitors to resist fading, it's flexible enough to handle temperature swings without cracking, and its adhesive is made to stand up to rain, snow, and ice. Compare that to the cheap craft-store vinyl you see, which can start to fade, shrink, and crack in as little as a year.
What Is the Difference Between a Decal and a Sticker?
People use these terms interchangeably all the time, but in the world of vehicle graphics, there’s a key difference that really matters. A "sticker" is usually a single piece of material—think of a bumper sticker. It's all one layer that you peel off a backing and slap on.
A custom vinyl decal is different. It’s actually a three-layer system: a paper backing, the vinyl design itself, and a top layer of transfer tape. This is what allows for complex designs with separate pieces, like individual letters or intricate logos. The transfer tape holds everything perfectly in place so you can apply the entire design at once, ensuring perfect spacing and alignment. When you peel it off, you're left with just the vinyl, giving you that clean, professional look that a sticker just can't match.
Ready to bring your vision to life with a decal that truly lasts? At Custom Sticker Shop, we combine American-made quality with designs that let you express your passion. Start creating your own custom vinyl decal today