
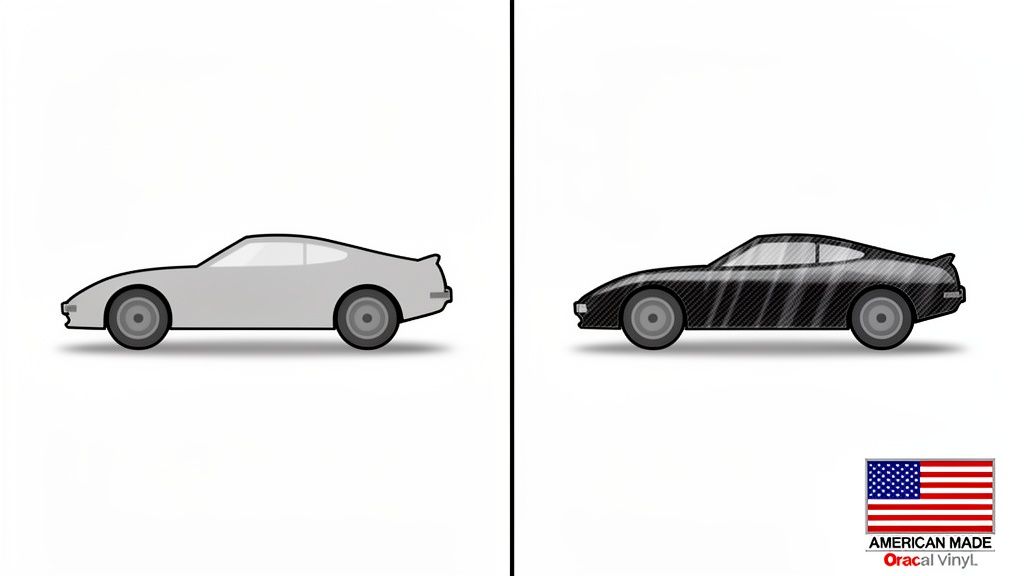
Carbon fiber stripes are high-quality vinyl decals crafted to perfectly mimic the look of real carbon fiber, giving any car, truck, or Jeep an aggressive, high-performance aesthetic. Think of them as a cost-effective and practical alternative to ridiculously expensive carbon fiber body panels. The best part? It’s a significant style upgrade you can install yourself, as long as you use durable, professional-grade materials like Oracal vinyl to ensure the stripes last for years.
Why Carbon Fiber Stripes Are Such a Smart Style Upgrade
Let's get into why so many vehicle owners are turning to carbon fiber stripes. This goes way beyond a simple sticker; it's about capturing the whole vibe of high-performance automotive culture without the insane price tag. Real carbon fiber parts are awesome for shaving weight on a race car, but they are incredibly expensive for daily drivers. Vinyl graphics give you that same coveted woven texture and deep, three-dimensional look for a tiny fraction of the price.
This makes it easy to personalize your ride, adding a custom touch that makes a stock vehicle stand out from the crowd. Whether you're adding subtle fender hash marks or going all-in with bold, full-length racing stripes, the visual impact is immediate and impressive.
Capturing the Performance Look
The appeal of carbon fiber is born from motorsport, where every single ounce matters. This obsession with lightweighting has driven massive industry growth. The global automotive carbon fiber composites market was valued at USD 26.8 billion in 2024 and is projected to skyrocket to USD 67.0 billion by 2034. It makes sense when you learn that a 10% reduction in vehicle weight can improve fuel economy by 6% to 8%.
While real composites are used for structural parts, their look has become a powerful symbol of performance. It’s what makes carbon fiber stripes so appealing—they signal a passion for speed, engineering, and automotive excellence.
More Than Just Looks: Real-World Durability
A common myth is that vinyl decals are a flimsy, temporary mod. That might have been true years ago, but modern materials have completely changed the game. High-quality cast vinyl, like the American-made Oracal 651 or 751 series, offers incredible durability and longevity.
Key Takeaway: Professional-grade vinyl is specifically engineered for outdoor automotive use. It's designed to resist shrinking, fading, and peeling for up to 7 years, even when exposed to harsh sunlight, rain, and snow.
This means your investment doesn't just look great on day one—it holds up to the elements, keeping its color and finish for years. Unlike a cheap sticker that peels after a few car washes, these stripes are a semi-permanent upgrade that adds lasting style.
For anyone looking to add that race-inspired touch, our Chevy Camaro fender hash decals are a perfect example of a simple yet powerful modification. This guide is here to give you the confidence to get a professional, bubble-free finish right in your own garage.
Picking out the right carbon fiber stripes is a big deal. Get it right, and your car looks like it just rolled out of a high-end custom shop. Get it wrong, and… well, it just looks like a cheap sticker. The secret is focusing on three key things: the quality of the vinyl, getting your measurements spot-on, and choosing a style that actually fits your vehicle's lines.
Don't Skimp on the Vinyl: Cast vs. Calendared
This is the most critical part, so listen up. You’ll see two types of vinyl out there: calendared and cast. Calendared film is cheaper, and I see people fall for it all the time trying to save a few bucks. Trust me, it’s a mistake.
I’ve seen it happen more times than I can count. That cheap vinyl starts shrinking, cracking, and peeling off within a single season of sun and heat.
One of the most common pitfalls is grabbing cheap calendared vinyl for a weekend project, only to spend the next weekend scraping brittle, baked-on pieces off your paint. You’ll end up paying twice and doing the work all over again.
For any car, truck, or Jeep, cast vinyl is the only way to go. It's made using a different process where the material is "cast" as a liquid into a super-thin sheet. This creates a premium, stable film that hugs curves beautifully and won't shrink over time.
Brands like Oracal are the gold standard for a reason. Their cast films are engineered for the abuse of daily driving and harsh weather, giving you a lifespan of up to 7 years. That extra upfront cost buys you peace of mind and a look that lasts.
Choosing Your Finish
Not all carbon fiber vinyl looks the same. The finish you choose dramatically affects the final vibe, from subtle and sleek to aggressive and high-tech.
Here’s a quick comparison of the most popular finishes to help you decide which one is right for your build.
Carbon Fiber Vinyl Finish Comparison
| Finish Type | Appearance | Best For | Installation Note |
|---|---|---|---|
| Gloss | High-sheen, wet look that mimics real clear-coated carbon fiber. | Sports cars, luxury vehicles, and accent pieces that need to pop. | Shows surface imperfections more easily; requires a clean, prepped surface. |
| Satin/Matte | Low-sheen, non-reflective finish for a modern, stealthy appearance. | Modern JDM cars, trucks, hood blackouts, and interior trim. | More forgiving on minor surface flaws and easier to maintain. |
| Forged Carbon | A marbled, chopped carbon look instead of a traditional weave. | Exotic cars, high-end builds, or anyone wanting a unique, custom look. | The pattern is non-directional, which can be easier for beginners. |
| Textured/3D | A tactile weave pattern you can feel, offering a more realistic look. | Interior pieces, rocker panels, or anywhere you want a tactile feel. | The texture can make it slightly thicker and stiffer than other films. |
Ultimately, the best finish comes down to personal taste. A gloss finish on a black car delivers a subtle, "ghosted" effect, while a matte finish provides a stark, aggressive contrast.
Measure Twice, Order Once
You’ve heard the old saying, but for vinyl, it's gospel. Taking a few minutes to measure prevents the headache of getting stripes that are too short or just look… off.
Grab a flexible tailor's tape measure—the kind used for sewing—as it's perfect for following the curves of a car body. Here’s what to measure:
- Hood: Run the tape from the base of the windshield (the cowl) straight to the front lip of the hood. Always add a few extra inches for trimming and alignment.
- Roof: Measure from the top edge of the windshield glass to the top of the back glass.
- Trunk or Tailgate: Go from the bottom of the rear window down to the very edge of the trunk or tailgate.
- Rocker Panels: Measure the straight section along the bottom of the vehicle, right between the front and rear wheel wells.
Getting these numbers right is crucial. For truck owners, our universal truck decal stripe kits are cut extra-long to fit most bed and cab combos, but it never hurts to double-check your specific rig.
Matching the Style to the Car
Now for the fun part. The goal is to make the stripes look like they were designed for the car, not just stuck on.
Think about your vehicle’s personality. A muscle car like a Ford Mustang or Chevy Camaro just begs for wide, aggressive racing stripes running bumper-to-bumper. Their powerful body lines can handle a bold statement. On the other hand, a nimble sports car like a Mazda Miata or Subaru BRZ often looks better with thinner, offset pinstripes that highlight its sleek, agile look.
For Jeeps and trucks, stripes can be both tough-looking and functional. Rocker panel stripes add a rugged aesthetic and can even help guard against minor trail rash. Hood blackout decals are another popular mod in the off-road community, cutting down on sun glare while adding an aggressive look.
This trend is bigger than just aesthetics. The carbon fiber reinforced plastic (CFRP) strips market, valued at USD 1.5 billion in 2024, is projected to hit USD 3.2 billion by 2033. That explosive growth shows just how much people crave that high-strength, lightweight style. Quality vinyl stripes are the perfect way to get that same high-end look without the high-end cost.
Your Blueprint for a Flawless Application
Alright, this is where the fun starts. It's time to get your hands dirty and give your ride a whole new personality. We’re going to walk through the wet application method, which is hands-down the best way to get a slick, bubble-free finish that looks like it came from a pro shop.
It might sound a little intimidating, but trust me, it’s actually way more forgiving than trying to slap it on dry. The wet method gives you a window to slide the decal around and nail the positioning perfectly.
Assembling Your Installation Toolkit
First things first, let’s get your gear together. Having everything ready and within arm's reach is half the battle. You don't need a fancy shop, just a few key items.
- Squeegee: Get yourself a good, firm squeegee with a felt edge. That felt tip is clutch—it lets you apply pressure without scratching the hell out of that awesome carbon fiber texture.
- Application Fluid: You can buy a pre-made spray, but a DIY mix is just as good. Grab a spray bottle, fill it with water, and add just a couple of drops of baby shampoo or gentle dish soap. You're looking for a slightly slippery solution, not a bubble bath.
- Masking Tape: This is your secret weapon for alignment. It creates a "hinge" that holds the stripe in place while you work. Simple painter's tape is perfect.
- Microfiber Towels: Have a few clean, lint-free towels on hand. You'll need them for cleaning before you start and for blotting up water at the end.
- Measuring Tape: I like using a flexible tailor's tape for this. It’s great for getting those final placement checks just right before you commit.
The Foundation of Success: Surface Preparation
I can't stress this enough: if the surface isn't perfectly clean, your vinyl will fail. It’s as simple as that. Any spec of dirt, wax, or oil will keep the adhesive from grabbing on, and you’ll end up with peeling corners and bubbles down the road. Don't skip this step.
Start with a good wash using quality car soap to get all the surface gunk off. Once it's dry, wipe down the entire area where the stripe will go with a 70% isopropyl alcohol solution. This cuts through any leftover wax or oils that soap can't touch.
If you really want to do it right, understanding what clay barring a car does for your paint finish is a game-changer. A clay bar pulls out all the tiny, embedded contaminants, leaving the paint as smooth as glass. It's the ultimate prep for a flawless decal application.
Pro Tip: Try to do this in a garage, carport, or at least in the shade. Direct sun heats up the metal, which makes your application fluid evaporate way too fast. It also makes the vinyl super sticky and aggressive, leaving you no room for error. The sweet spot for temperature is between 60°F and 80°F (15°C to 27°C).
This whole process really starts before you even get the vinyl out. Planning is key.
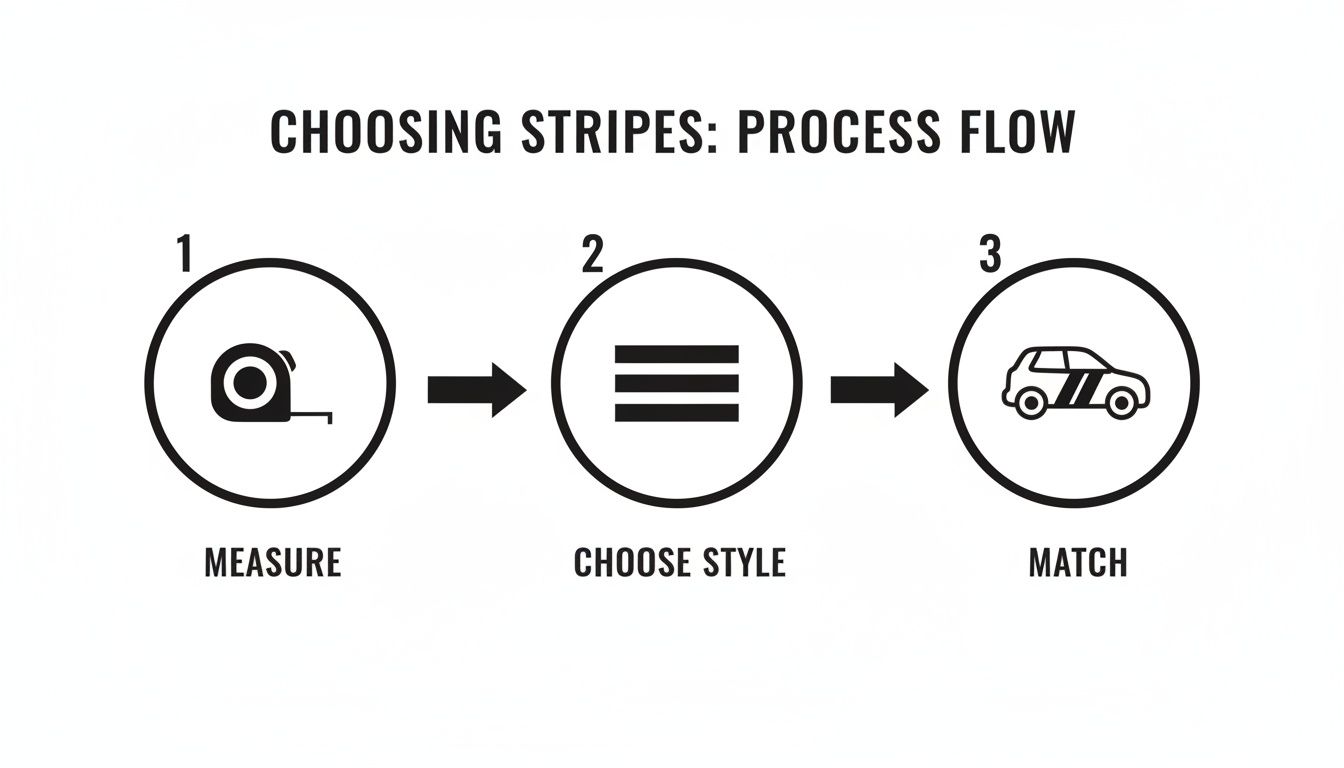
Thinking through the measurement and style beforehand, as shown here, sets you up for a much smoother installation.
Executing the Wet Application
Okay, your surface is prepped and your tools are ready. Let's lay some vinyl. The key here is to take your time and be patient.
First, lay the stripe on the vehicle with both the backing paper and the top transfer tape still on. Use your measuring tape to get it perfectly centered and straight. Once it’s exactly where you want it, run a strip of masking tape along the top or middle of the decal. This is your anchor—your hinge.
Next, flip the decal up on its hinge. Now you can carefully peel the waxy backing paper off, exposing the sticky side of the vinyl. Go slow so you don't tear anything. If the vinyl tries to lift off with the backing paper, just lay it back down, give it a good press, and try peeling again.
With the adhesive exposed, go ahead and spray it down liberally with your soapy water solution. Then, spray the car’s surface where the decal will go. Don't be shy here—you want both surfaces nice and wet. This is the magic that lets you slide it around.
Now, carefully lay the wet decal down onto the car. That fluid gives you a few precious seconds to make small adjustments. Nudge it into its final, perfect position.
The Squeegee and the Grand Finale
Once the stripe is exactly where you want it, it’s time to lock it in. Holding one end of the stripe with just a little tension, grab your squeegee. Start in the center, right below your tape hinge, and work your way out.
Use firm, overlapping strokes at a 45-degree angle. You’re pushing all the water and air bubbles out from under the vinyl, forcing the adhesive to make contact with the paint. We use this same exact method when we walk people through applying Chevy Avalanche stripe kits.
After you've squeegeed the whole thing, you need to wait. Give it 15-30 minutes, depending on the temperature. You’re just giving the water time to evaporate a bit so the adhesive can start to grip.
Finally, the moment of truth. Slowly and carefully, start peeling the top transfer tape off. The trick is to pull it back on itself at a sharp, 180-degree angle. If you see any part of the carbon fiber stripe lifting up with the tape, just lay that section back down and give it another firm squeegee.
Once the tape is off, you can use a microfiber towel to gently blot any water from the edges. Then, step back and admire your work. You did it.
Even when you follow the instructions to a T, vinyl has a way of keeping you on your toes. A tiny speck of dust you swear wasn't there, a sudden temperature drop in the garage, or a tricky body line can throw a wrench in things. Don't sweat it—nearly every common hiccup is fixable if you know the right moves. This is your field guide for turning a good install into a great one.
The most common issues almost always boil down to trapped air, trapped water, or a surface that wasn't quite ready. Figuring out the cause is the first step to a quick fix. Most of these little problems show up right after you squeegee or in the first few hours of curing.
Conquering Air Bubbles and Wrinkles
No matter how meticulous you are with the squeegee, a tiny air bubble can get trapped. It's frustrating, but it’s an easy fix.
Small bubbles that look like hazy or milky spots are usually just trapped application fluid. This is often called "silvering", and it’s perfectly normal. The vinyl will "breathe" it out, and these spots will vanish on their own over a few days.
But if you have a distinct, larger bubble that’s clearly trapped air, you’ll need to step in.
- The Pin Trick: Grab a very fine sewing pin or the sharp tip of an X-Acto knife. Gently prick a tiny hole at the very edge of the bubble, not in the center.
- Push It Out: With your finger or the soft felt side of your squeegee, carefully push the trapped air toward the pinhole. The vinyl’s memory will help it lay down flat once the air is gone.
For small wrinkles, a little bit of heat is your best friend. A standard hairdryer on a low setting is all you need. Avoid using a real heat gun—it's way too powerful and can easily melt or stretch the vinyl beyond repair.
Gently warm the wrinkled area for just a few seconds. This makes the vinyl pliable again. Once it’s soft, use your finger to smooth the wrinkle out completely.
Wrapping Complex Curves and Edges
This is where many first-timers get nervous. Applying stripes over recessed channels, sharp body lines, or panel gaps can be intimidating. The fear is that the vinyl will lift or "tent" over the gap instead of conforming to it. The secret is a combination of technique and a little bit of heat.
When you get to a deep channel or recessed area:
- First, lay the stripe over the area, but don't press it in yet.
- Use your squeegee to firmly secure the vinyl on both flat sides around the channel.
- Now, gently warm the vinyl that’s bridging the gap with your hairdryer.
- Once it's soft and pliable, use your finger or a soft-tipped tool to carefully press the vinyl down into the recess. Always work from the center of the channel outwards.
This exact same heat-and-press method works for wrapping the edges of the stripe around a hood or door. By warming the vinyl, you relax it, allowing it to conform to the curve without wanting to pull back.
Expert Insight: Once you think you're done, you have one more crucial step. Go back over all your edges, seams, and complex curves with the hairdryer one last time. Follow the heat immediately with firm pressure from your finger or a microfiber towel. This is called post-heating, and it essentially locks the vinyl’s memory into its new shape. This single step drastically reduces the chances of corners lifting down the road.
Solving Adhesion Failures
What if your carbon fiber stripes just refuse to stick? This is almost always a sign of a surface problem, not a faulty decal. Adhesion is a chemical bond, and anything that gets in the way will cause it to fail.
Here are the usual suspects and how to deal with them:
- Surface Contamination: This is the #1 cause of adhesion failure. Leftover wax, oils from your fingers, or any kind of ceramic coating will create a barrier the adhesive can't penetrate. The fix is to re-clean the area thoroughly with a 70% isopropyl alcohol solution on a fresh, lint-free cloth before trying again.
- Wrong Temperature: Vinyl adhesive is picky about temperature. If it’s too cold (below 60°F), the adhesive gets rigid and won't bond properly. If it’s too hot (above 80°F), it can become overly sticky and impossible to position. Always try to work in a shaded garage or on a mild day.
If you notice an edge or corner starting to lift after the installation, you can usually save it. Gently peel back the lifting section. Clean both the vehicle's surface and the sticky side of the vinyl with an alcohol wipe. Let it air dry completely, then use a bit of heat from your hairdryer while reapplying firm pressure.
Maintaining and Safely Removing Your Stripes
Alright, so you’ve got your carbon fiber stripes installed, and your ride looks incredible. The job isn’t quite done, though. Now it’s all about keeping that sharp, aggressive look for the long haul. With the right care, high-quality vinyl like the Oracal we use can last up to 7 years outdoors, but if you neglect it, you’ll cut that lifespan way down.
Let’s go over the do's and don'ts for keeping your stripes pristine. We’ll also cover the proper, paint-safe way to take them off when you’re ready for a change.
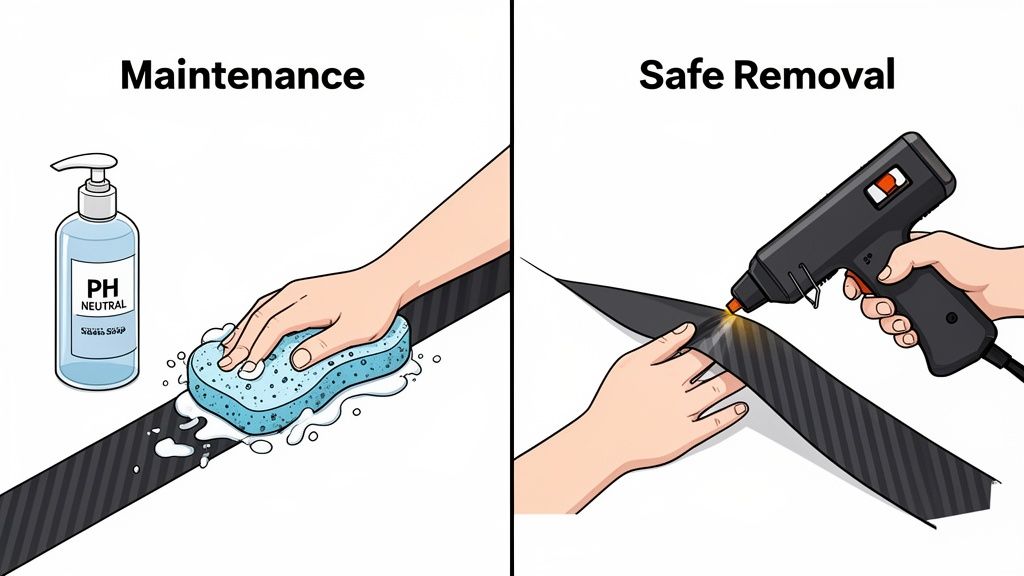
How To Wash Your Stripes The Right Way
Washing a vehicle with vinyl graphics takes a little more finesse than a typical wash. Your goal is to get it clean without lifting the edges or dulling the finish. Harsh chemicals and high pressure are the two biggest enemies of vinyl.
Stick with a pH-neutral car soap. Anything too acidic or alkaline will slowly eat away at the vinyl and its adhesive. The two-bucket wash method is your best friend here—it keeps you from dragging grit across the surface and scratching both your paint and the stripes.
Here are a few things to remember on wash day:
- Go Easy with Pressure Washers: Never point a pressure washer directly at the edges of the stripes. That blast of water can get underneath and start to peel the vinyl right off. If you have to use one, stay at least two feet away and use a wide spray pattern.
- Hand Washing is Best: A soft microfiber mitt gives you total control. Wash with the grain of the stripe, using straight-line motions, not circles.
- Skip the Automatic Brush Washes: Those big, spinning brushes are way too abrasive for vinyl. They'll scratch, dull the finish, and can easily catch an edge and rip your stripe.
While your stripes have specific needs, good overall car care is what makes them last. Learning about safe car washing practices will protect your entire vehicle.
Protecting Your Vinyl From The Elements
Just like your car’s paint, those carbon fiber stripes need protection from the sun. UV rays are the number one cause of fading and cracking over time, but a simple protective layer can add years to the life of your graphics.
A quality ceramic coating can be applied right over the vinyl. It creates a tough, hydrophobic barrier that sheds water, dirt, and blocks UV radiation. You can also find vinyl-specific sealants and detail sprays that are made to nourish the material and keep it looking fresh.
Pro Tip: Apply a vinyl-safe protectant every 3-4 months. Think of it as sunscreen for your stripes. This simple habit will preserve that deep carbon fiber weave and stop it from looking old and tired before its time.
The Right Way to Remove Carbon Fiber Stripes
One of the best parts about vinyl is that it’s not permanent. When you’re ready to sell your car or just want a new look, you can pull the stripes off without hurting the paint—as long as you do it correctly.
The secret ingredient here is heat. Cold vinyl is brittle. It will break off in a million tiny pieces and leave a sticky mess behind. Warming it up makes the vinyl soft and pliable, letting the adhesive release cleanly.
Just follow these steps for a painless removal process:
- Warm It Up: Use a hairdryer or a heat gun on its lowest setting. Keep it moving about 6-8 inches from the stripe to gently warm up a section. You want it warm to the touch, not scorching hot.
- Lift a Corner: Once it’s warm, use your fingernail or a plastic scraper to carefully lift a corner. The key here is gently—you don't want to dig into your paint.
- Peel Slowly and Low: This is the most important part. Pull the vinyl back on itself at a low, sharp angle—almost flat against the car (think close to 180 degrees). Don't pull it straight up. This low angle persuades the adhesive to come off with the vinyl instead of staying on your paint.
- Clean Up the Leftovers: If you have any sticky residue left, a dedicated adhesive remover or some isopropyl alcohol on a microfiber towel will wipe it right off.
This careful approach ensures your paint looks just as good as it did before you applied the stripes, giving you the freedom to change up your style whenever you feel like it.
Your Questions on Carbon Fiber Stripes Answered
Even after you’ve picked a design, a few questions always come up. It's a normal part of any mod. Let's run through some of the most common ones I hear about carbon fiber stripes, so you can feel 100% confident before you click "buy."
Are Carbon Fiber Stripes Actually Real Carbon Fiber?
This is easily the number one question, and it's a good one. The short answer is no, and that’s by design. Our stripes are made from high-quality automotive vinyl that's been specifically engineered to perfectly mimic the look, feel, and depth of real carbon fiber.
Here's the distinction: real carbon fiber is a structural material. It’s used to build incredibly strong and lightweight parts like hoods, spoilers, and even whole car chassis. It's all about performance, and its price tag reflects that.
Our vinyl stripes are a cosmetic upgrade meant to give you that same high-tech, premium aesthetic without the multi-thousand-dollar cost. You get the aggressive look of performance, and modern vinyl captures it beautifully. That desire for the aesthetic is a huge reason the entire carbon fiber industry is booming.
For instance, the North American carbon fiber market is projected to see massive growth, with the automotive sector leading the charge at an 18.05% CAGR between 2026 and 2031. This just shows how much drivers value that performance-oriented style. You can dive deeper into this trend by checking out the full industry analysis on Mordor Intelligence.
Can I Apply These Stripes Over a Ceramic Coating?
I would strongly advise against it. In fact, it's a definite do not. A ceramic coating's whole job is to create an ultra-slick, hydrophobic surface that repels everything—dirt, water, and unfortunately, the adhesive on your new vinyl stripes.
Crucial Tip: For a bond that lasts, your vinyl’s adhesive needs to grab onto the vehicle's clear coat directly. A ceramic coating acts like a shield, preventing that bond and all but guaranteeing your stripes will fail and peel off way too soon.
If your car is already coated, you'll have to remove the coating from the specific area where the stripes will go. This is usually done with a polishing compound to carefully buff the coating away. Once the stripes are on, you can then apply a ceramic coating right over both the paint and the new vinyl for seamless protection.
How Do These Stripes Hold Up in a Car Wash?
This is a big one for any daily driver. The good news is that quality carbon fiber stripes made from cast vinyl like Oracal are built tough enough to handle regular washing. How you wash your vehicle, though, makes all the difference.
- Hand washing is always your best bet. Just use a soft microfiber mitt and a good pH-neutral car soap.
- Touchless car washes are a safe second choice. They use high-pressure water and chemicals, which are generally fine for the vinyl.
- AVOID automatic washes with the big spinning brushes. Those abrasive brushes can easily scratch the vinyl's surface, or worse, catch an edge and cause it to lift or tear.
The golden rule is to be mindful of the edges. If you're using a pressure washer, keep the nozzle at least a couple of feet away from the decal and never spray directly at the edges. A direct blast of high-pressure water is the fastest way to force water underneath the vinyl and start the peeling process.
Follow these simple rules, and your carbon fiber stripes will stay looking sharp for years, easily handling whatever daily driving throws at them.
Ready to give your vehicle a bold, performance-inspired look? At Custom Sticker Shop, we offer hundreds of designs made from premium, American-made Oracal vinyl. Find the perfect carbon fiber stripes for your ride and enjoy an easy, professional-looking installation. Explore our massive collection at https://customstickershop.us.