
Ready to give your Dodge Challenger a look that's one-of-a-kind? Dodge Challenger decals are more than just stickers. They're a statement. They can be aggressive racing stripes that turn heads or sleek, subtle accents that just dial in your car's look. This guide is your complete game plan for personalizing your ride.
A Legacy of Customization
Your Dodge Challenger is a canvas, and decals are the paint. Don't think of them as some cheap add-on, but as a core piece of your car's identity. They're your link to a long and proud history of American muscle customization, where standing out has always been part of the game.
From its very first days, the Challenger has been all about making it your own. That tradition started way before the modern muscle car craze, with factory options that let buyers build a totally unique machine right off the showroom floor.
A History Forged in Vinyl
The Challenger’s story is wrapped in vinyl. The first-generation cars (1970-1974) were a huge hit, kicking off with 76,925 sales in its debut year alone. A big reason for that success was the wild array of options, including special paint and bold vinyl stripe packages.
Fast forward to today, and that spirit is stronger than ever. In 2019, nearly 61,000 modern Challengers were sold, and you can bet a huge number of them were quickly upgraded with stripe kits and custom decals. This heritage is exactly what we're about at Custom Sticker Shop. As a family-run business out of Topeka, Kansas, we've shipped over one million decals worldwide since 2001, helping Challenger owners carry on that tradition.
Why High-Quality Decals Matter
Using professional-grade Dodge Challenger decals is like putting premium fuel in a high-performance engine—it just works better. Settling for cheap stuff is a recipe for disaster. High-quality, American-made vinyl gives you:
- Lasting Durability: Professional vinyl is built to take a beating from sun, rain, and road grime for years without fading, cracking, or peeling off.
- Paint Safety: When you apply and remove them correctly, premium decals won't damage your factory paint. In fact, they act as a protective shield.
- A Flawless Finish: Good materials give you that smooth, paint-like look. You won't see the bubbles, wrinkles, and other junk common with low-grade alternatives.
The right decal transforms your car from just another Challenger on the road into your Challenger. It's a statement of personality, a nod to history, and the final touch that makes it uniquely yours.
This guide will give you the confidence to pick the right materials, figure out the perfect placement, and install your decals like you've been doing it for years. Whether you want to add a subtle pinstripe or go all-out with a full-body graphic, you're in the right place.
Ready to start exploring? Let's dive in. And if you're already picturing your design, you can get started and make your own custom car decal right now.
Choosing The Right Decal Material And Finish
Not all vinyl is created equal. When it comes to Dodge Challenger decals, the material you choose is single-handedly the most important factor for a look that lasts. The quality of the vinyl directly impacts durability, appearance, and even the safety of your car’s paint. It’s the foundation of your whole project.
Think of it like this: you wouldn't use hardware store spray paint for a professional automotive paint job. One is a quick fix that's going to chip and fade, while the other is engineered for a flawless, long-lasting finish that can handle the elements. The exact same principle applies to your decals.
Why Professional Grade Vinyl Is Non-Negotiable
Professional-grade vinyl, like the Oracal 651 and 751 series we use here at Custom Sticker Shop, is made specifically for cars. This isn't the stuff you find in a craft store. It’s a specialized film built to take years of sun, rain, and road grit without falling apart.
This type of material is known as cast vinyl. It's made by pouring a liquid vinyl mixture onto a super-smooth casting sheet and then baking it. This process creates an incredibly thin, flexible, and stable material that won’t shrink or crack over time. The cheaper stuff, called calendered vinyl, is made by rolling and stretching the vinyl, which creates stress in the material. As soon as it gets hot, that stress is released, and the decal shrinks, peels, and cracks.
Opting for professional cast vinyl is an investment in your Challenger's look. It might cost a little more upfront, but it saves you the headache and money of replacing a failed, faded, or peeling decal down the road. It makes sure your design looks as good in year three as it did on day one.
A huge benefit of high-quality vinyl is its paint-safe adhesive. The glue is designed to bond securely to your car's clear coat but can be removed cleanly with a little heat, leaving zero residue or damage behind. In fact, while it's on your car, the decal acts as a shield, protecting the paint underneath from minor scratches and UV rays. This is especially true for bigger graphics like a full hood decal or a Mopar-themed design. You can see how different designs work with options like this Mopar vinyl window decal sticker.
Selecting The Perfect Finish
Beyond the material itself, the finish of your decal plays a massive part in the final look. The finish dictates how the decal interacts with light and your Challenger's existing paint. Each one provides a distinct vibe, letting you fine-tune your car’s personality.
Common Finishes and Their Effects:
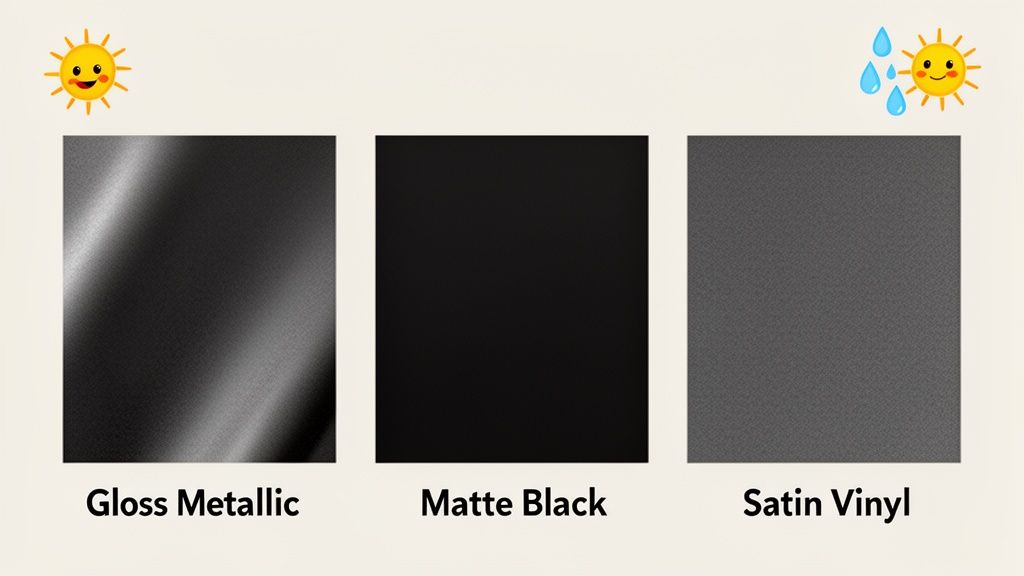
- Gloss Finish: This is the most popular choice because it mimics the look of automotive paint. Gloss decals have a shiny, reflective surface that blends right in with your car’s clear coat, making stripes and graphics look like they came from the factory. It’s perfect for a clean, classic style.
- Matte Finish: A matte finish has a flat, non-reflective surface that just soaks up light. This creates a bold, aggressive look that provides a sharp contrast against glossy paint. A matte black hood decal, for instance, not only looks mean but also cuts down on sun glare.
- Metallic/Satin Finish: These finishes offer a great middle ground. Metallic flakes embedded in the vinyl catch the light to create a vibrant, sparkling effect that adds a pop of energy. Satin offers a subtle sheen—less shiny than gloss but not as flat as matte—for a sophisticated, modern appearance.
Ultimately, the right material and finish come down to the look you want to achieve. A gloss metallic stripe can make your Challenger pop on the street, while a subtle satin decal offers a more refined touch. By choosing professional-grade cast vinyl in the perfect finish, you ensure your Dodge Challenger decals will look incredible and last for years to come.
Mastering Decal Sizing And Placement
Putting the right decal in the wrong spot can completely throw off your Challenger's powerful, muscular lines. Getting the sizing and placement right is an art, but it’s one you can master. It’s the difference between a mod that looks like it came from the factory and one that just looks stuck on.
Think of your Challenger’s body as a sculpted canvas, not just a flat surface. The goal is to use Dodge Challenger decals to follow and highlight its natural curves and aggressive stance. It’s like a pinstripe on a custom suit—it's placed with precision to make the whole thing look sharper, not just stitched on randomly.
Applying Design Principles To Your Challenger
You don’t need a design degree to get a pro-level look. Just borrow a simple trick from photography: the 'rule of thirds.' Instead of sticking everything dead center, imagine breaking up a body panel into a 3×3 grid. Placing a decal along one of those lines or at an intersection almost always looks more dynamic and intentional.
For instance, when you're applying fender hash marks, don't just center them. Nudge them a bit forward or back in that panel's "third." That tiny adjustment adds visual tension and a sense of movement, making the car look faster even when it's parked.
The modern Dodge Challenger, brought back in 2008, carried on the decal tradition with some incredibly rare Mopar editions. The Mopar '14 Challenger (only 100 made) and Mopar '17 Challenger (160 made) had unique stripes and two-tone schemes that sold out instantly. At Custom Sticker Shop, we give you that same exclusive feel with over 1,200+ car designs and custom text, all prepped with transfer tape for a dead-simple install. You can dive deeper into the history of these special Mopar cars on Dodge's official garage blog.
A Lookbook Of Classic Challenger Decal Placements
Let’s get specific with some of the most popular decal styles. Each one plays with the Challenger’s body in a different way, giving you a unique path to personalization.
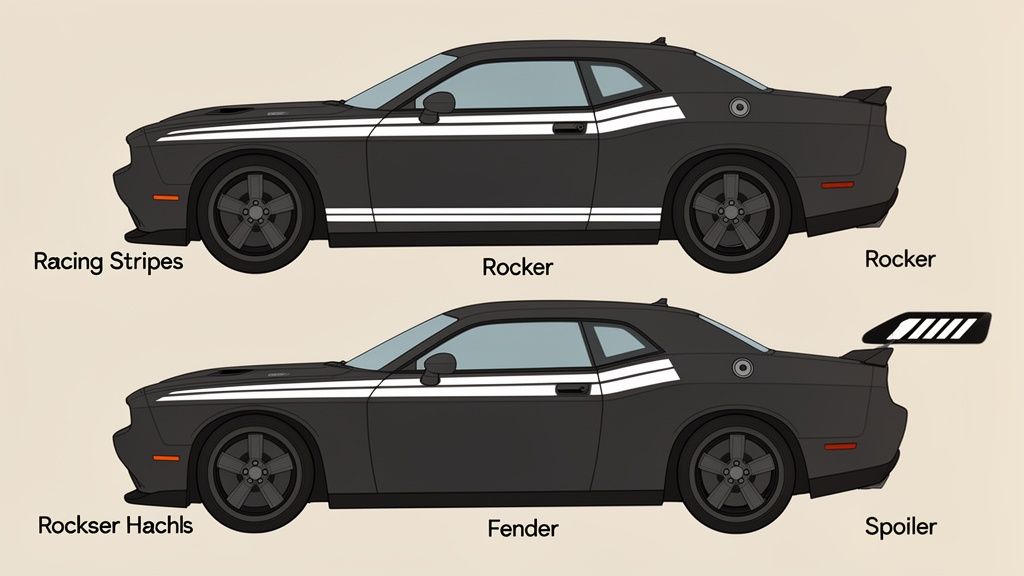
1. Dual Racing Stripes
This is the quintessential muscle car statement. For that timeless look, the stripes need to run straight and centered, from the front bumper, over the hood, roof, and trunk.
- Sizing Tip: Keep it proportional. For a Challenger, 10-inch stripes with a 1- to 2-inch gap between them is a classic, can't-miss ratio.
- Placement Tip: Use the windshield washer nozzles on the hood and the third brake light on the trunk as your center alignment points. It's a simple trick to ensure they run perfectly straight from front to back.
2. Fender Hash Marks
These scream race-inspired performance. They're meant for the front fenders, sitting just behind the wheel arches.
- Sizing Tip: You want them to be noticeable but not overpowering. Aim for marks around 2-3 inches wide and 10-12 inches long.
- Placement Tip: Angle them back at roughly 20-30 degrees. The key is to make them flow with the car's body lines to create that look of speed.
3. Rocker Panel Stripes
Nothing accentuates the Challenger’s low, wide stance better. These stripes run along the very bottom of the car, right between the front and rear wheels.
- Sizing Tip: A solid stripe or one with custom text should be about 3-4 inches tall. This makes it easy to read without cluttering up the side profile.
- Placement Tip: For a clean, factory-style look, align the top edge of the stripe with the main body crease on the lower part of the doors.
By thinking carefully about both size and placement, you turn a simple sticker into a core part of your Challenger's identity. This thoughtful approach makes your custom touch feel both personal and professional—a true tribute to the car's legendary design.
Popular Customization Themes For Your Challenger
Your Challenger is more than just a car; it's a canvas. The Dodge Challenger decals you choose are the brushstrokes that tell its story, giving it a personality that matches its bold, aggressive lines. Moving beyond simple stripes, the right theme can turn a factory-stock model into a one-of-a-kind ride that’s all you.
This isn’t some new trend. When the Challenger first roared onto the scene in 1970, its massive appeal came from an insane level of factory personalization—especially the vinyl decals. You could get iconic 'shaker' hoods with dual racing stripes in wild colors or add subtle fender hash marks. Those premium vinyl graphics started a customization craze that we live and breathe today. Since 2001, we’ve produced over one million decals using tough Oracal vinyl, continuing that legacy. You can read more about the Challenger's rich history on its Wikipedia page.
Military And Veteran Tribute Decals
The Challenger’s tough, all-American spirit makes it the perfect platform for military and veteran tribute decals. These designs are more than just stickers; they're a powerful way to honor service, sacrifice, and patriotism. The car’s muscular build provides a fitting backdrop for graphics that symbolize strength and resilience.
These tribute themes can be as subtle or as bold as you want.
- Service Branch Logos: Displaying the emblem of the Army, Navy, Air Force, Marines, or Coast Guard is a clear and proud statement of your affiliation or support.
- Memorial Graphics: "In Memory Of" decals combined with symbols like the POW/MIA flag or a fallen soldier silhouette create a moving tribute to heroes who made the ultimate sacrifice.
- Unit Insignias and Mottos: For veterans, adding a decal of your specific unit, division, or a meaningful motto connects your vehicle directly to your service history.
A hugely popular choice is a distressed American flag decal draped over the rear side windows. It creates a powerful visual that looks like the flag is waving as you drive, merging patriotism with the car's dynamic lines. We offer over 295 military tribute designs that fit a Challenger perfectly, turning heads while honoring our veterans.
JDM And Tuner Style Graphics
While the Challenger is pure American muscle, applying JDM (Japanese Domestic Market) and tuner-style graphics creates a fascinating and unexpected fusion. This theme is all about celebrating global car culture and giving your muscle car a unique, track-inspired edge that stands out in a sea of traditional stripes.
Think of it as adding a bit of Tokyo Drift flair to Detroit steel. These designs often feature:
- Bold, Angular Graphics: Sharp lines, geometric shapes, and asymmetrical designs that flow along the body panels add a sense of speed and aggression.
- Sponsor-Style Decals: Even if your car isn't actually sponsored, adding logos from famous automotive brands down the rocker panels gives it an authentic race-car look.
- Character and Anime Designs: For those who really want to break the mold, Itasha-style graphics featuring anime characters can turn a Challenger into a rolling piece of pop art.
This theme is perfect for owners who appreciate the artistry of the international tuner scene and want to bring some of that world to their American muscle.
Custom Text And Personalization
Sometimes, the most powerful statement is one you write yourself. Custom text decals are the ultimate form of personalization, letting you put a name, phrase, or message right on your car. This turns your Challenger into a rolling billboard for your personality, your crew, or your sense of humor.
For a classic, clean look, a Dodge Challenger script windshield decal sticker is a great place to start.
From there, the sky's the limit. Add your car's nickname, your car club's name, or even your social media handle on a side window. This is how you make your Challenger uniquely and undeniably yours.
Your Step-By-Step Decal Installation Guide
Putting on your own Dodge Challenger decals might feel like a high-stakes job, but with a little patience and the right prep work, you can get a perfect, pro-level finish right in your own garage. Don't think of it as just slapping on a sticker. Think of it as a small, rewarding project where getting the details right makes all the difference.
The single biggest secret to a lasting, bubble-free application is a completely clean surface. Before you even think about peeling off that backing paper, we need to get your Challenger's paint absolutely spotless. Any speck of dust, wax, or oil will create a bubble or stop the adhesive from getting a solid grip.
Preparing Your Canvas
This is the most critical stage, and it's where most first-timers go wrong by rushing. Take your time here, and the results will speak for themselves.
-
Wash the Area Thoroughly: Start by washing the entire panel where the decal is going. Use a quality car-safe soap and water to get rid of the surface layer of dirt and road grime.
-
Strip Away Residue: After it's washed, wipe the area down with a 50/50 mix of 70% isopropyl alcohol and water. This is the pro step that removes any leftover wax, grease, or detailing spray that soap can’t handle.
-
Dry Completely: Use a fresh, lint-free microfiber cloth to get the surface bone-dry. Pay extra attention to panel gaps and edges where water loves to hide.
A clean, dry, and cool surface is your foundation for success. Never apply decals in direct sunlight or when the car's surface is hot. Heat makes the adhesive extra sticky, making it almost impossible to position the decal correctly if you don't nail it on the first try.
The Hinge Method: A Pro Technique For Perfect Alignment
For larger graphics like racing stripes or hood decals, the hinge method is your best friend. It’s a nearly foolproof way to lock in your alignment before you commit, turning a stressful two-person job into something you can easily handle on your own.
The infographic below shows some of the popular themes you can bring to life on your Challenger, many of which are best installed using this exact method.
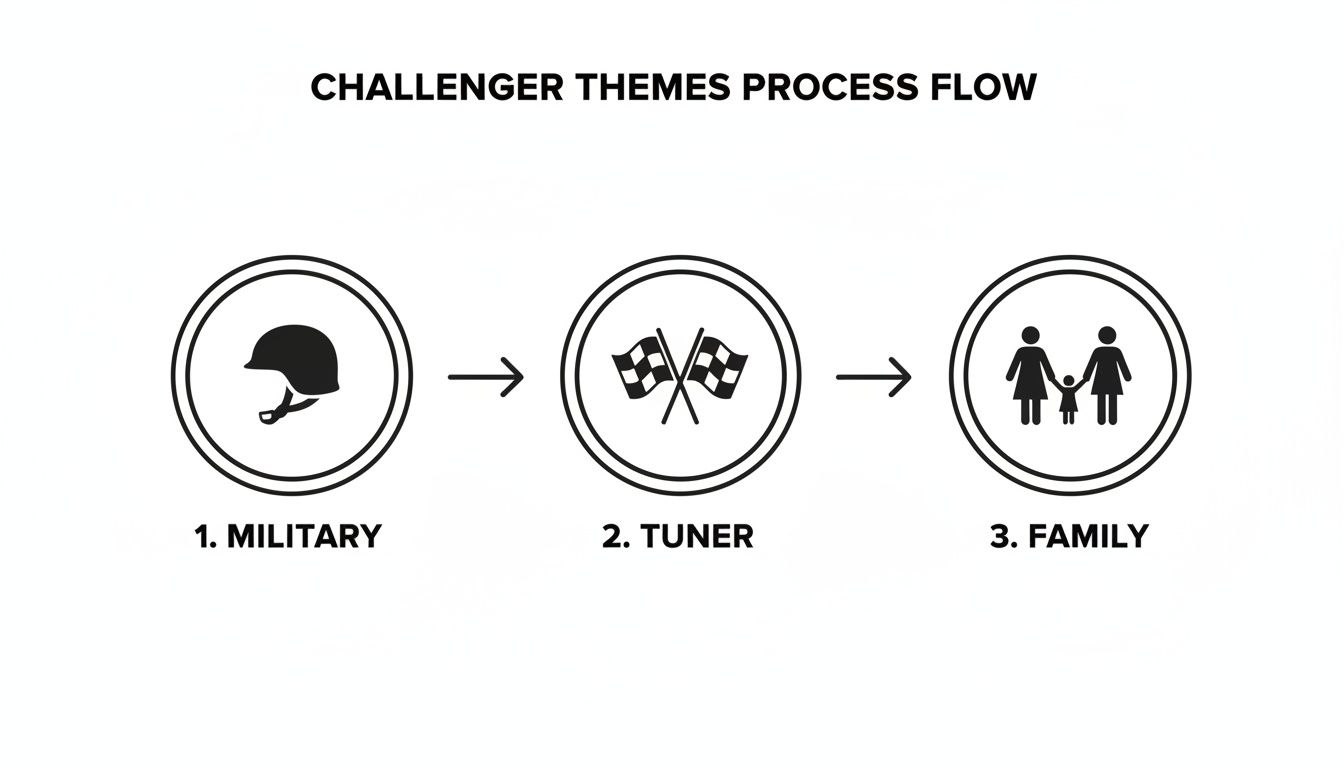
This process flow breaks down how different themes—from Military to Tuner to Family—provide unique paths for telling your car's story.
Here’s how you pull off the hinge method, step-by-step:
-
Step 1: Position the Decal: Leave the backing paper on for now. Carefully place the decal on your car, using a tape measure to get it perfectly straight and centered. Once you're happy with it, run a piece of masking tape horizontally across the middle. This is your "hinge."
-
Step 2: Prepare for Application: Lift one side of the decal and fold it back over the hinge. Now, carefully peel the backing paper away from that exposed half, cutting it off near the hinge.
-
Step 3: Squeegee the First Half: Holding the decal's end away from the car to keep it taut, use a squeegee to lay it down. Start from the center hinge and work your way out with firm, overlapping strokes. This pushes any air out to the edges.
-
Step 4: Repeat on the Other Side: Now you can remove the hinge tape. Lift the other half of the decal, peel off the rest of the backing paper, and squeegee it down just like the first side, working from the center outward.
-
Step 5: Remove the Transfer Tape: After the whole decal is down, slowly peel the top transfer tape off. The key is to pull it back at a sharp 180-degree angle, flat against the surface. This ensures the vinyl decal stays put.
Safe Removal Without Harming Your Paint
When you're ready for a new look, taking off your old Dodge Challenger decals properly is just as important as putting them on. The trick is to soften the adhesive so it lets go without a fight and without damaging your car's clear coat.
All you need is a little bit of heat. A standard hairdryer or a heat gun on its lowest setting is perfect. Gently warm the decal's surface, moving back and forth so the heat is spread evenly. You'll see the vinyl get softer and more flexible.
Once it's warm, you can get a fingernail or a plastic razor blade under an edge and slowly peel the decal back on itself. If you feel any strong resistance, just apply a bit more heat. Any sticky residue left behind can be cleaned up easily with a citrus-based cleaner or a little more isopropyl alcohol.
Answering Your Top Decal Questions
When you’re thinking about personalizing your Challenger, questions are a good thing. It means you’re taking it seriously and want to get the look just right. We get a lot of the same questions from fellow enthusiasts, so we've put them all in one place to give you clear, straight answers.
We want you to feel 100% confident in your choice, knowing you’re getting a high-quality, durable, and paint-safe product for your ride. Let's tackle those final questions.
How Long Do Vinyl Decals Last On A Car?
This is always the first question, and the answer boils down to two things: quality and care. When you go with professional-grade cast vinyl, like the Oracal 651 we use for everything, you're buying durability. This isn't the cheap stuff; it's engineered for the outdoors and rated to last 6 years or even longer.
Of course, your local climate and how you look after your car play a big role. To get the most life out of your Dodge Challenger decals, keeping your ride clean is a must. Knowing how often you should wash your car is key to preventing corrosive gunk from eating away at your graphics and your paint.
Can Decals Damage My Car's Paint?
It's a valid concern, but here's the short answer: a quality vinyl decal will not damage your factory paint. In fact, think of it as a protective layer, guarding the paint underneath from minor scuffs, sun fading, and whatever the road throws at it.
And when you're ready for a change? The removal is simple and safe. A little gentle heat from a regular hairdryer is all you need. It softens the adhesive right up, letting you peel the decal away clean, leaving your paint looking just as good as the day you put the sticker on.
Can I Go Through A Car Wash With Decals?
Absolutely. You can definitely run your Challenger through a car wash after installing decals, but there are a couple of things to keep in mind.
First, give the adhesive time to fully bond. Wait at least 48-72 hours after you apply the decal before that first wash. For the best long-term results, we always steer people toward touchless car washes. Those big, spinning brushes in some automatic washes can be aggressive and might eventually start to lift the edges of the vinyl.
Are The Decals Difficult To Install Myself?
Not at all. We design our decal kits specifically for easy DIY installation, even if you've never put on a sticker bigger than a postage stamp. Every kit arrives pre-masked with transfer tape, which keeps all the letters and design elements perfectly spaced for you.
Our step-by-step guide shows you the 'hinge method'—a simple trick the pros use for perfect alignment. It makes getting a bubble-free, professional-looking result in your own garage totally achievable. There’s a lot of satisfaction in standing back and knowing you did it yourself.
Ready to find the perfect decal that tells your story? Custom Sticker Shop has been helping car enthusiasts personalize their rides since 2001. Explore our massive collection and enjoy our Buy 2, Get 1 Free offer at https://customstickershop.us.