
That empty rear window on your truck isn't just glass—it's a blank canvas. It’s your chance to tell a story. With a custom rear window decal, you can transform that space into a statement, whether you're showing off your military pride, a passion for the outdoors, or just a bit of your family's personality. We've seen it all, and we're here to share some real-world advice on how to choose, design, and install a decal that's genuinely you.
Why Your Truck Needs a Custom Rear Window Decal
Putting your own stamp on a vehicle is a time-honored tradition, and few things offer the same bang for your buck as a quality rear window graphic. It’s an instant upgrade that takes a standard-issue truck and turns it into something that’s one-of-a-kind. It tells the world who you are.
And you’re not alone. The demand for vehicle customization is absolutely booming. The automotive decals and graphics market, which recently hit $7.8 billion, is projected to soar to $13.4 billion by 2033. Passenger vehicles, especially trucks, account for over 55% of that market as more and more owners want graphics that reflect their lifestyle. You can see the full breakdown in this detailed market analysis.
More Than Just a Sticker
Think of it less like a sticker and more like a badge of honor. A well-chosen decal says a lot without you having to say a word. It’s a way to connect with people who get it—people who share your passions or your background.
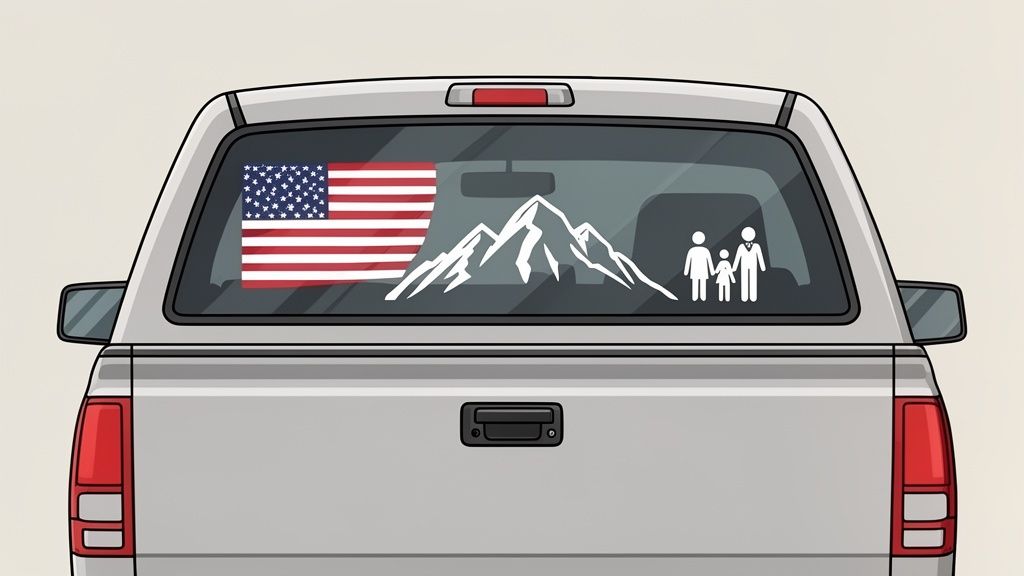
For instance, when we see a USMC decal, we don't just see a graphic. We see a symbol of service and sacrifice that creates an immediate bond with fellow veterans. In the same way, a stick-figure family with your dog's name is a fun, personal nod to what really matters.
Custom rear window decals for trucks can make an impact in so many ways:
- Showcase Your Identity: Rep your favorite team, your go-to outdoor hobby like hunting or fishing, or your patriotic pride.
- Celebrate Your Family: Display custom family stick figures, create an “In Loving Memory Of” tribute, or show off your four-legged friends.
- Support a Cause: Bring awareness to a charity or a movement you believe in.
- Promote Your Business: Your daily commute can become a mobile billboard with a clean, professional logo and contact info.
As a family-run, veteran-friendly business from Topeka, Kansas, we've seen firsthand how a simple decal can forge connections. It’s about more than just decoration; it's about community and expressing what defines you.
Of course, for that statement to last, the material you use is just as crucial as the design itself. That’s why we exclusively use professional-grade Oracal vinyl, an American-made product rated for up to 7 years of outdoor durability. This stuff is engineered to handle brutal sun, harsh winters, and countless car washes without fading, cracking, or peeling. Cheaper options might save you a few bucks upfront, but they fall apart fast, leaving you with a cracked, peeling mess. Investing in quality means your truck will look sharp for years to come.
Choosing the Right Design and Material for Your Decal
Getting a decal you’ll love for years all comes down to the choices you make right now. Your truck's rear window is a big canvas, so you need a design and material that not only look great but can also take a beating from the weather. This is where your personal style meets real-world performance.
So, what’s the story you want to tell? Are you honoring a veteran, showing off your family, or broadcasting your love for the outdoors? We've got a massive library with over 295 military tributes and 165 family-themed options to give you a solid starting point for just about any idea.
Think about your truck, too. A bold, full-color design can pop on a black truck, but a clean, single-color decal might be the perfect touch for a two-tone paint job. If you're looking to represent your business, it's pretty straightforward to turn your logo into a sticker and put your brand to work while you drive.
Finding Your Perfect Design
The best custom rear window decals for trucks don't just sit on the glass—they feel like part of the truck itself. This is your chance to get creative and make it personal.
We see a lot of popular themes come through the shop:
- Patriotic and Military: American flags, branch insignias, and powerful tribute graphics are timeless. These are consistently our most requested designs, and for good reason—they’re full of meaning.
- Hobbies and Lifestyle: Into hunting, fishing, or mudding? A decal is a great way to show it. These graphics often become a nod of recognition to other enthusiasts on the road.
- Family and Memorial: From classic stick-figure families to elegant "In Loving Memory Of" tributes, these decals add a deeply personal touch that honors what matters most.
We’ve seen it all, from intricate mountain landscapes to simple, powerful text. The key is choosing a design that resonates with you personally. A decal you connect with will always look better than one chosen just to fill the space.
For those who want something completely their own, a custom design is the way to go. If you have an idea for your own text-based decal, our guide on creating a custom text oval window decal can help get you started. It’s the ultimate way to blend your own words and style into a one-of-a-kind statement.
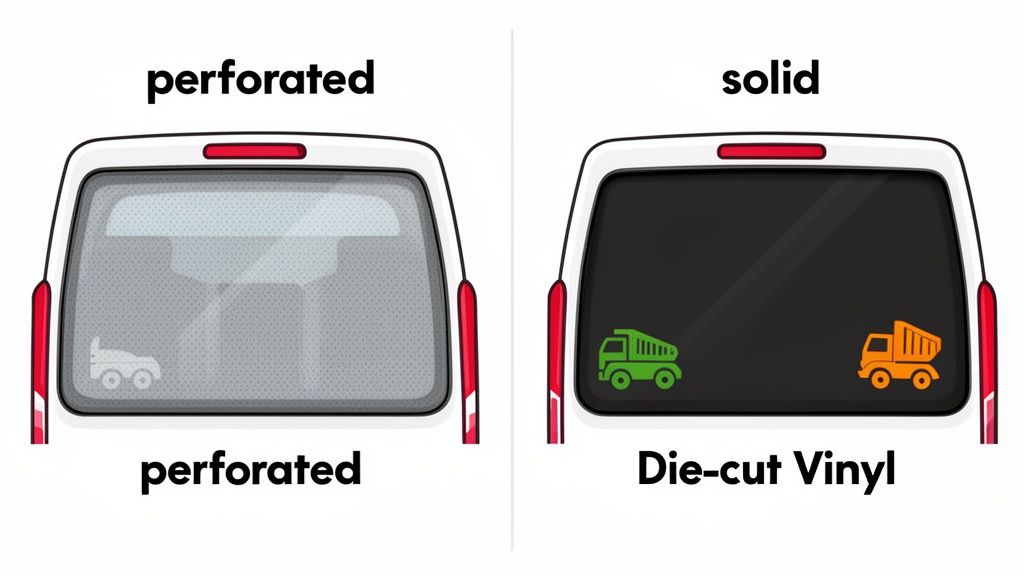
Decal Material Comparison Vinyl vs Perforated
Once you have a design in mind, the next big decision is the material. This choice directly affects both the look of your decal and your visibility from inside the cab. Your two main options are solid die-cut vinyl and perforated window graphics.
To help you decide which is right for your truck, here’s a quick comparison of how they stack up.
| Feature | Solid Vinyl Decals (Die-Cut) | Perforated Window Graphics |
|---|---|---|
| Visibility | Opaque; blocks the view in the area it covers. | One-way vision; you can see out, but others see the graphic. |
| Appearance | Bold, sharp lines and vibrant, solid colors. | Full-color image that can cover the entire window. |
| Best For | Logos, text, and standalone graphics that don't cover the whole window. | Large-scale photos or complex, full-coverage designs. |
| Installation | Generally simpler for smaller decals; often uses a wet method. | Requires more care to ensure a smooth, bubble-free application. |
Ultimately, your choice depends on balancing visual impact with your need for unobstructed rear visibility. For most text, logos, and accent graphics, solid die-cut vinyl is the ideal solution. It’s the classic choice for a reason.
The Unseen Hero: Quality Material
No matter how awesome your design is, it won’t last if it’s made from cheap material. Sun, rain, and car washes will destroy inferior vinyl, causing it to crack, fade, and peel off in less than a year. This is why we’re absolute sticklers about material quality.
We exclusively use professional-grade Oracal vinyl, an American-made product trusted by sign shops and professional installers across the country. This isn't the flimsy craft-store vinyl you'll find elsewhere. It’s engineered specifically for vehicles and is rated for up to 7 years of outdoor durability.
That means your decal will hold its own against harsh UV rays and won’t shrink or crack when the temperature swings. It’s a small investment that ensures your truck looks just as sharp years from now as it did the day you put the decal on.
Measuring and Sizing Your Rear Window Decal
Getting the size right is probably the single most important step to making a decal look like it belongs on your truck. I've seen it a hundred times: a great design completely ruined because it's either way too big and obstructs the view, or so small it just looks lost on the glass.
This part is all about being precise. Let's walk through how to do it right.
Your first move is to grab the right tool for the job. Forget a stiff metal tape measure; it'll fight you on the curved glass. A flexible tailor's tape or a soft vinyl one is what you need. You're looking to measure the total usable area of your rear window, both width and height.
But don't just measure from the absolute edge of the rubber gasket to the other. You need to account for all the stuff that can get in the way.
Accounting for Window Features
Modern truck windows are rarely just a simple pane of glass. They've got sliders, wipers, and curves that you have to work around. Ignoring these is the fastest way to a frustrating installation day.
Pay close attention to these common features:
- Rear Sliding Windows: If you have a center slider, measure the two stationary side panels and the sliding part separately. You have a choice: either put the decal on one of the solid side panes for a clean look (which is what most people do), or span it across the whole window, which means you'll have to make a very careful cut during installation.
- Wiper Paths: Does your truck have a rear wiper? Run it a few times and watch the full sweep of the blade. You need to place your decal completely outside of this path. If you don't, the wiper will eventually catch the vinyl and tear it up.
- Curved Glass: Almost every rear truck window has a curve. Our Oracal vinyl is flexible, but a huge decal on an extreme curve can still look distorted. Make sure you measure along the curve of the glass, not just in a straight line from one point to the other. This gives you the true surface area you have to work with.
Pro Tip: Grab some blue painter's tape and use small pieces to mark out the "safe zone" for your decal. This creates a clear visual box to measure inside, keeping you away from the edges, wipers, or any weird curves.
Once you have your maximum usable dimensions, you can figure out the actual size of your graphic. Remember, you don't have to fill the whole space. Sometimes less is more.
Deciding on Visual Scale and Impact
So, should your decal be a massive statement piece or a subtle personal touch? There's no wrong answer; it just depends on the look you want. A big, aggressive design makes a statement, while a smaller, clean decal can add a touch of class.
Here are a few ways to think about sizing:
- The Full-Width Statement: For a decal that spans most of the window's width—like a landscape scene or a long line of text—you'll want to use about 75-90% of your total measured width. This creates a dominant, can't-miss effect.
- The Centered Accent: A logo, symbol, or a short phrase often looks best when it’s centered with plenty of clean glass around it. For this style, a decal that's around 30-50% of the window's height and width is a great starting point.
- The Corner Tuck: Small decals, like a memorial graphic or a club logo, fit perfectly in the lower-left or lower-right corner. A size in the 4-6 inch range is perfect here—it adds personality without getting in the way.
If you're going with text, you can check out something like a 7-inch wide custom text decal to get a real-world feel for how much space a specific size will take up.
Staying Safe and Legal
Before you pull the trigger on your order, you absolutely have to think about two things: visibility and state laws. It’s tempting to go big, but safety has to be the priority.
Laws about what you can put on your rear window vary a lot from state to state. Some are super strict, others are more relaxed. Generally, a die-cut vinyl decal with lots of open glass space between the letters or design elements is perfectly fine. It's the huge, solid graphics that cover the entire window that can get you a ticket.
Your best bet is to check the website for your local DMV or state police. They'll have the specific rules for your area. When in doubt, play it safe. Keep the decal out of your primary line of sight when you look in the rearview mirror. It’s the smart way to make sure your truck looks awesome and stays 100% legal.
Achieving a Bubble-Free DIY Installation
You don't need to be a professional to get a finish that looks like you hired one. Getting a flawless, bubble-free application on your custom rear window decal is completely doable with a bit of patience and the right technique. Honestly, the secret is all in the prep work and using a method the pros rely on every single day.
We're going to walk through the "wet method," which is a nearly foolproof way to apply your decal. This technique uses a simple soap-and-water solution that lets you slide the decal into the perfect spot before it’s fully stuck. It’s the trick to killing bubbles before they start and making sure your graphic goes on straight.
The whole process is even simpler because all our decals arrive pre-spaced on transfer tape. This means your design, whether it’s detailed lettering or a complex logo, is already perfectly aligned and ready to apply as one solid piece. No fighting with individual letters here.
Essential Surface Preparation
The single biggest mistake we see is people skipping proper surface prep. One tiny speck of dust, oil from a fingerprint, or residue from a glass cleaner can stop the decal’s adhesive from bonding correctly. This is what causes those frustrating bubbles and lifting edges down the road.
Your goal is to get the glass surgically clean. Here’s how you do it:
- Make Your Solution: Mix a few drops of a mild dish soap (like Dawn) with water in a spray bottle. Stay away from harsh, ammonia-based cleaners like Windex—they often leave a film that messes with adhesion.
- Wash the Window: Spray the entire rear window down and wipe it clean with a fresh, lint-free microfiber cloth.
- Rinse and Dry: Give it a final rinse with plain water to get rid of any soap. Then, dry it completely with a new, clean microfiber cloth.
Take your time on this. A perfectly clean surface is the entire foundation for a good install. Even a single fingerprint can create a spot where the decal just won't stick right.
The Game-Changing Wet Application Method
Now for the fun part. The wet method gives you one huge advantage: time. That soapy water creates a temporary, slippery barrier between the vinyl and the glass, letting you nudge it around until it’s exactly where you want it. Once you squeegee the water out, the adhesive makes full contact and creates a powerful, permanent bond.
Here are the tools you’ll want to have ready before you start:
- A spray bottle with your soap-and-water mix
- A plastic squeegee (a credit card works in a pinch)
- Masking tape
- A measuring tape
Your environment matters, too. Try to apply your decal on a calm, overcast day or inside a garage. Direct sun heats up the glass and makes your fluid evaporate too fast, while wind is your enemy—it loves to blow dust right onto your clean surface.
This simple graphic shows the core steps we've talked about for getting the size perfect before you even think about installation.
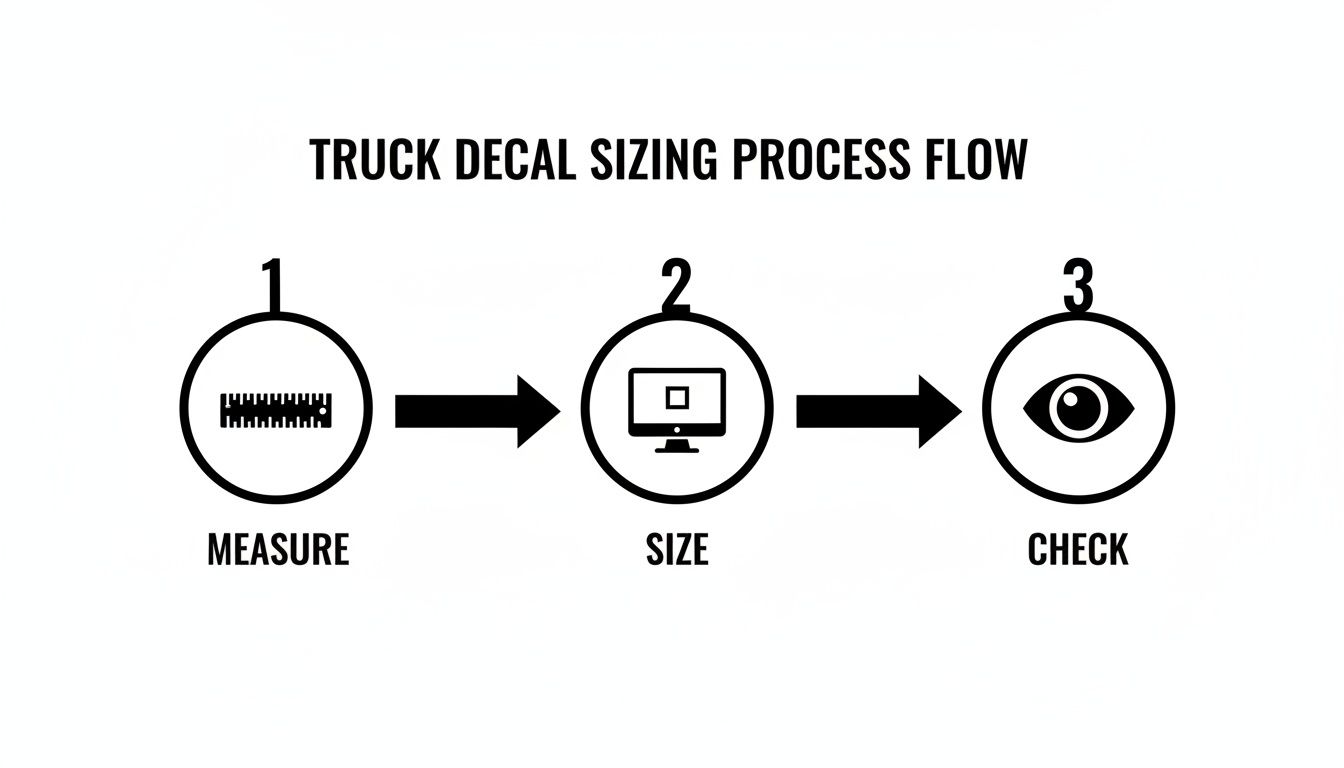
Following this measure, size, and check workflow ensures your custom rear window decals for trucks are perfectly proportioned, setting you up for a smooth install.
Applying Your Transfer-Taped Decal
Alright, your window is clean and your tools are ready. Let's get this decal on.
First, unroll your decal on a flat surface. Take your squeegee and press firmly across the entire decal through the transfer tape. This is called burnishing, and it re-bonds the vinyl to the tape, which can sometimes loosen a bit during shipping.
Next, you'll make a "hinge" with masking tape. Position the decal on the window right where you want it, then run a strip of tape along the top edge to hold it to the glass. This hinge keeps everything perfectly aligned while you work.
Now, flip the decal up and carefully peel the paper backing away, exposing the sticky side of the vinyl. Go slow. If any vinyl tries to stick to the paper, just lay it back down, press firmly on that spot with your squeegee, and try peeling again.
With the adhesive exposed, generously spray both the glass and the sticky side of the decal with your soap-and-water solution. Don't be shy with it—more is better.
Let the decal fall back against the glass. The water will let you slide it slightly for any last-second adjustments. Once it’s perfect, grab your squeegee. Starting from the center and working your way out, use firm, overlapping strokes to push all the water and air out from underneath.
After squeegeeing the whole graphic, give it about 20-30 minutes for the adhesive to start grabbing hold. Then, carefully peel the transfer tape off at a sharp, 180-degree angle, pulling it back over itself. If any vinyl starts to lift, just lay the tape back down, squeegee that spot one more time, and wait a few more minutes before trying again.
Just like that, your stunning, bubble-free decal is in place. This trend of personalization is booming; the global car decal market was valued at $3.8 billion in 2026 and is projected to hit $5.7 billion by 2034. Discover more insights about this growing market on dataintelo.com.
Keeping Your Decal Sharp: Aftercare and Safe Removal
Your new decal is on and it looks fantastic. Now, let's talk about how to keep it that way for years to come and what to do when it’s time for a change.
With just a little routine care, your decal will easily live up to its 7-year outdoor rating. We use premium Oracal vinyl for a reason—it’s built to withstand harsh weather and countless road trips. The number one thing that can shorten its life? High-pressure water.
When you're washing your truck, be mindful of where you're aiming the pressure washer. A direct, concentrated blast can work its way under the vinyl's edge, causing it to lift or peel over time. It’s best to use a regular hose or keep the pressure washer nozzle at a safe distance, aiming away from the decal's edges.
Simple Maintenance for a Long-Lasting Decal
You don't need any special cleaners or fancy products to keep your decal looking crisp. Good old soap and water do the trick perfectly.
Here are a few quick tips for washing day:
- Gentle Soaps Only: A mild car wash soap is ideal. In a pinch, a little dish soap will work too. Stay away from abrasive cleaners or harsh chemicals, as they can wear down the vinyl's finish.
- Hand Wash with Care: When washing by hand, a soft microfiber cloth or sponge is your best friend. Be gentle, especially around fine details and sharp corners, to avoid snagging an edge.
- Pat Dry, Don't Rub: After rinsing, gently pat the area dry with a clean, soft towel. This simple step prevents you from accidentally catching an edge and lifting the vinyl.
The goal is to clean the decal without putting any stress on its edges. Treat it like a high-quality paint job—gentle and consistent care is what guarantees its longevity.
Following these simple habits ensures your custom rear window decal remains a vibrant part of your truck's identity for years.
How to Safely Remove Your Decal
Styles change, and trucks get sold. When the time comes to update your look, knowing how to get the old decal off is key to protecting your glass from scratches. The process is a lot like learning how to safely remove unwanted substances from glass, where having the right tools and a little patience makes all the difference.
The secret ingredient is heat. A bit of warmth softens the adhesive, allowing the vinyl to peel off cleanly without leaving a frustrating, sticky mess behind.
Here’s our tried-and-true method for a clean removal:
- Warm It Up: Grab a hairdryer and set it to a medium heat. Hold it about 6-8 inches from the decal, moving it back and forth to warm the vinyl evenly. You’ll know it’s ready when the material feels soft and flexible to the touch.
- Lift a Corner: Once the decal is warm, use a plastic razor blade or a sturdy credit card to gently get under a corner. Never use a metal blade, as it will permanently scratch your glass.
- Peel Slowly and Low: With a corner lifted, start peeling the decal off the window. Pull it back on itself at a low, sharp angle. If you feel a lot of resistance, just apply a bit more heat to that area.
- Clean Up Any Residue: Most of the time, the decal comes off clean. If any adhesive is left behind, an alcohol-based cleaner or a dedicated adhesive remover will take care of it. Apply some to a soft cloth and wipe the area clean.
It’s Time to Bring Your Vision to Life
You've got the know-how. You know how to choose the right design, measure your window, and get a perfect, bubble-free installation. Now for the fun part: making it happen.
At Custom Sticker Shop, we live for this stuff. We're a family-run, veteran-friendly business based in Topeka, Kansas, and we've put over a million decals on trucks and cars across the globe. That experience goes into every single order that leaves our shop.
What Makes Custom Sticker Shop Different?
When you order from us, you're not just getting a sticker; you're getting a piece of American craftsmanship. We’re committed to using only premium Oracal vinyl, an industry-leading material rated for 7 years of outdoor durability. It’s our promise that your truck’s new look will stand up to sun, snow, and whatever else the road throws at it.
Here’s why truck owners keep coming back to us:
- Massive Selection: Not sure where to start? We have a library of over 1,200 designs, including more than 295 military tributes and 165 family options.
- American-Made Quality: Every single decal is produced right here in the USA. That means top-tier materials and quality control you can trust.
- Real-World Value: Personalizing your truck shouldn't cost a fortune. Our decals start at just $7.99, and our unlimited Buy 2, Get 1 Free deal is perfect for outfitting multiple vehicles.
- Fast, Free Shipping: We ship free in the USA for all orders over $25. Most decals are on your doorstep in just 5-8 days.
We believe getting a high-quality, long-lasting decal should be an easy and accessible experience for everyone. From our secure checkout to our real-person customer service, we’re here to help you nail your project from start to finish.
And you're not alone in wanting to personalize your ride. A well-placed decal is a key part of the $2.3 billion global car decal market, a figure expected to hit $3.4 billion by 2032. With a single wrapped truck capable of generating 600-1,000 impressions per mile, your rear window is prime real estate for making a statement. You can read the full research about these market trends to see just how big this has become.
Ready to Create Something from Scratch?
Feeling inspired to design something that’s 100% you? Our customization tools make it simple. Whether you have a favorite quote, a business logo, or an inside joke, we can bring it to life on durable vinyl.
If you’re ready to build your own, our design tool is the perfect place to start. You can make your own custom sticker by choosing the text, font, and color to create a graphic that’s truly one-of-a-kind. It's the best way to guarantee your truck's new look is as unique as you are.
Our team is passionate about helping you express yourself, honor a loved one, or just add some personality to your vehicle. Your journey to a more personalized truck starts right here, and we're excited to be a part of it.
Ready to transform your truck's rear window into a statement piece? Explore our massive collection or design your own today. At Custom Sticker Shop, we combine premium American-made quality with fast, friendly service to help you make your mark.