
Let's be honest, turning your truck from just another vehicle on the road into your truck is one of the best parts of owning one. A pickup rear window decal isn't just a sticker—it's your canvas. It’s the perfect spot to show off your personality, advertise your business, or rep the things you're passionate about.
It's one of the simplest and most effective ways to make your ride truly yours.
Personalize Your Ride with a Rear Window Decal
![]()
Your truck is more than just a tool to get from A to B; it’s an extension of who you are. Maybe you're a veteran, a die-hard hunter, or a small business owner grinding it out. That rear window is prime real estate to tell your story. A well-designed decal can turn heads, start conversations, and set your truck apart from every other one in the lot.
Think of this guide as your complete roadmap. We'll walk through everything you need to know to pick, design, and slap on the perfect decal—one that looks like a pro did it and lasts for the long haul.
Why Decals Are More Than Just Stickers
A high-quality vinyl decal isn't like the cheap stickers you'd find in a gumball machine. It's designed to have a clean, seamless look that almost seems painted on. These things are built tough, made to communicate a message clearly and stick around for years. The secret is sourcing them from trusted American shops that use premium materials.
And this isn't just a niche hobby anymore. The trend of personalizing vehicles is booming. The global car decal market was valued at USD 3.5 billion and is expected to hit USD 5.8 billion by 2033. That huge jump shows just how many people are looking to customize their rides, with durable vinyl decals leading the way.
A pickup rear window decal transforms your vehicle from a factory model into a personal story on wheels. It’s your chance to share your identity, interests, or brand with the world, one mile at a time.
This guide will break down all the essentials so you can make the right call:
- Popular Styles: From bold patriotic flags to intricate hunting scenes.
- Durable Materials: Why professional-grade vinyl like Oracal is a must-have.
- Perfect Application: Tips for getting a smooth, bubble-free finish every time.
Whether you want to create a custom car decal from the ground up or pick from a library of awesome designs, getting these details right is key. By the time you're done here, you’ll have the confidence to choose and install a decal that perfectly captures your style.
Choosing the Right Decal Material and Type
Picking the right material for your truck's rear window decal is a balancing act. You've got to think about the look you want, how much you need to see out the back, and the level of privacy you’re after. The material choice is everything—it dictates how the design sits on the glass and, more importantly, how well you can see through it.
Think of it like choosing glass for a window in your house. You could go with frosted glass for privacy, clear glass for a perfect view, or even a one-way mirror for a bit of both. Decal materials work on a similar principle. Let's break down the three main players: perforated, die-cut, and clear-background.
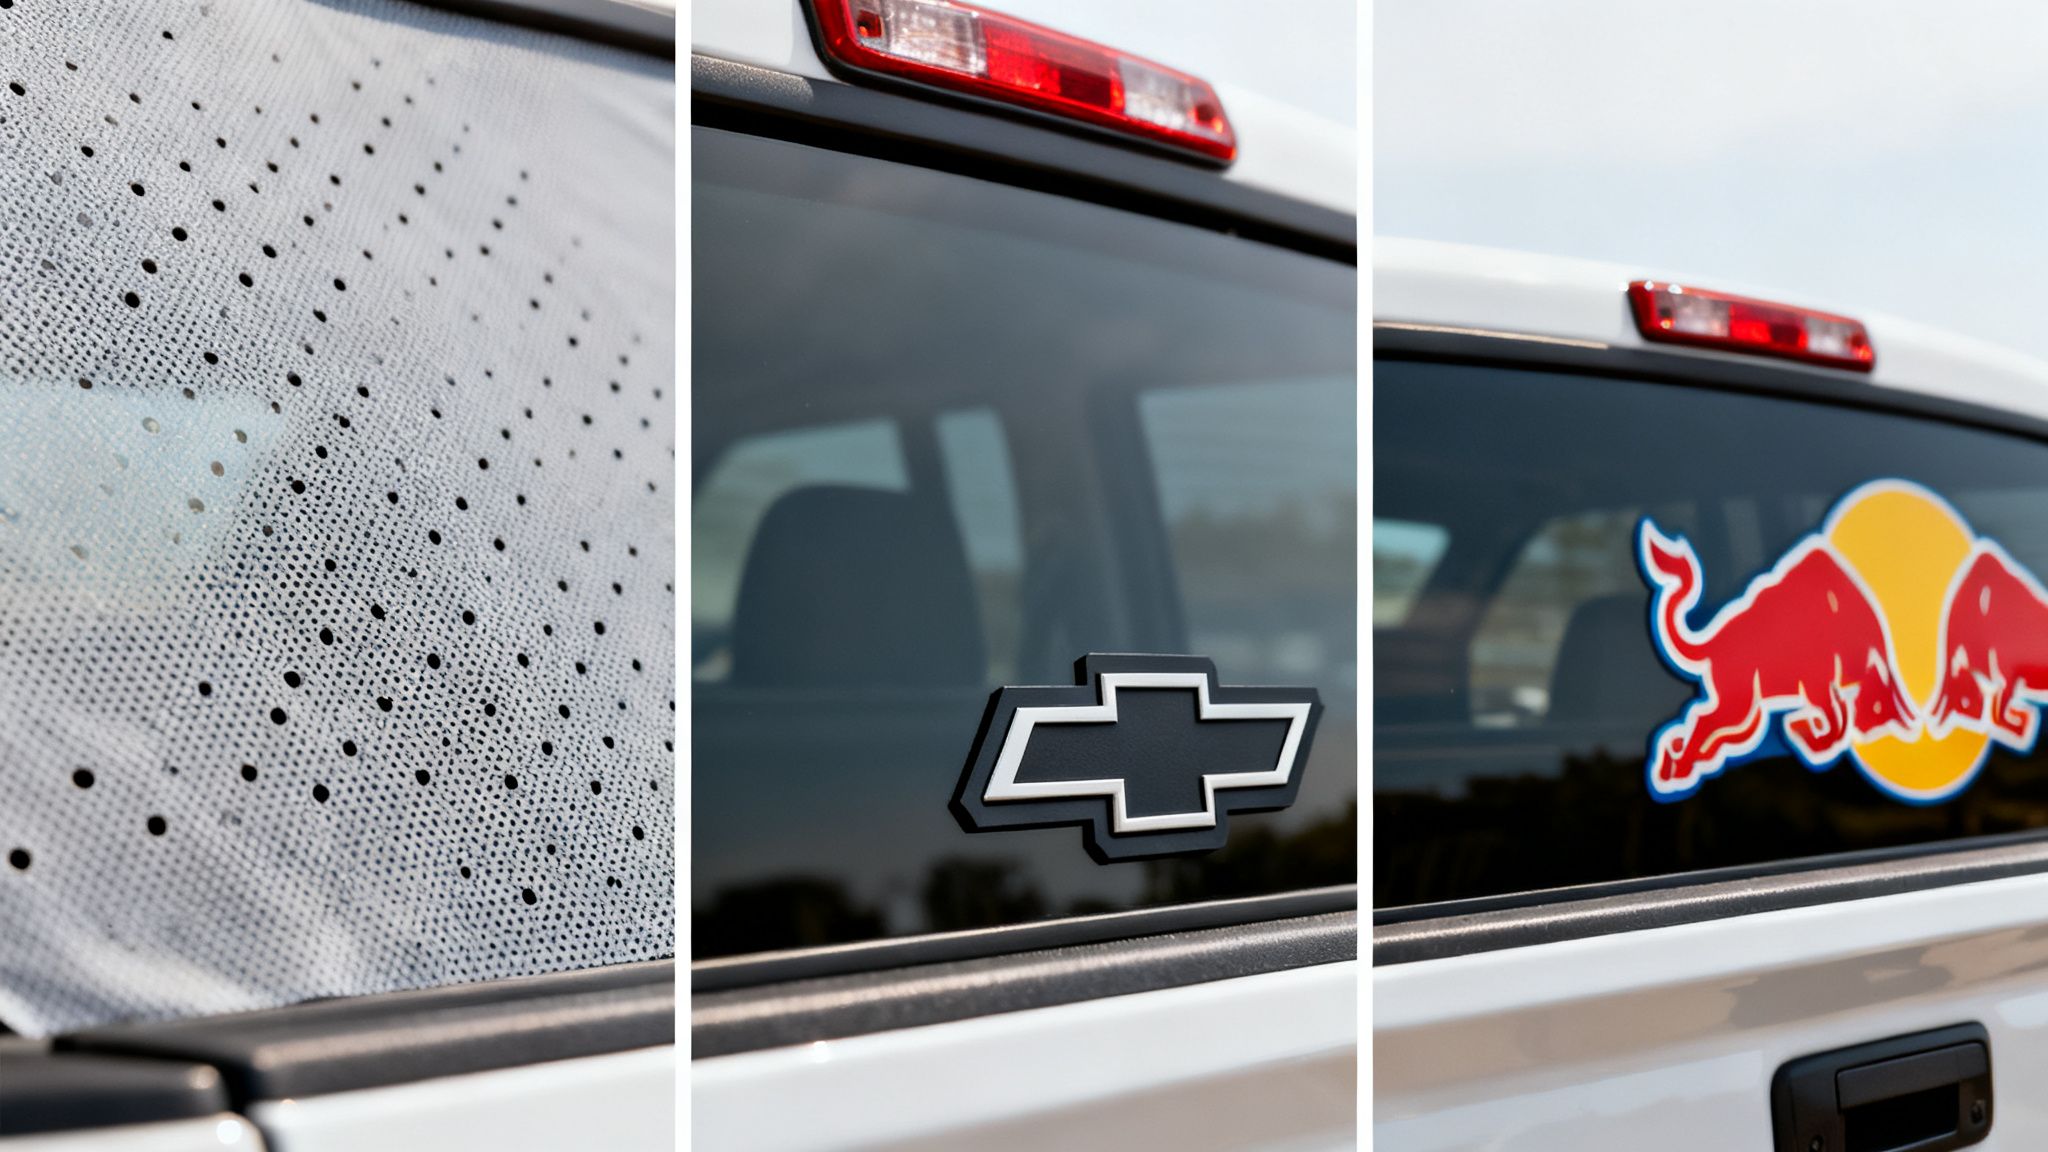
The Magic of Perforated Vinyl
Perforated vinyl is a pretty slick piece of engineering. Picture a solid sheet of vinyl punched with thousands of tiny, uniform holes. From the outside, anyone looking at your truck sees a vibrant, solid graphic because their eyes just naturally fill in the gaps. It's the same stuff you see on city buses with those huge, full-window ads.
But from the inside, it's a different story. The black adhesive side and those little holes let you see right through, giving you a clear view of the road behind you. This clever design keeps up to 50% visibility from the driver's seat while giving you a ton of privacy from prying eyes. It's hands-down the best option if you want a massive design without creating a dangerous blind spot.
This "one-way vision" effect makes it the go-to for sprawling American flags, detailed wildlife scenes, or full-blown company branding that takes over the entire window.
The Clean Look of Die-Cut Decals
If you're aiming for a sharp, minimalist style, die-cut vinyl is your answer. These decals are cut precisely around the edge of the design itself, with no background material left behind. The result is a crisp, clean "painted-on" look that blends right in with your window.
This method is perfect for:
- Text and Lettering: Throwing a favorite quote, business name, or your social media handle on the back.
- Logos and Emblems: Showing off your company's brand, a military insignia, or your club's logo with sharp, defined edges.
- Simple Silhouettes: Think mountain ranges, fishing hooks, or classic deer outlines.
Since there’s no background vinyl, a die-cut decal gives you maximum visibility everywhere around the design. The secret to a great die-cut decal is the quality of the vinyl itself. Stick with premium materials to make sure the edges don't start peeling and the color stays true, even after years of sun and car washes.
Your choice of decal material fundamentally defines its function. Perforated vinyl is for making a bold, full-window statement while maintaining visibility. Die-cut vinyl offers a clean, integrated look for specific text or logos.
The Versatility of Clear-Background Decals
Clear-background decals are the happy medium between the full coverage of perforated vinyl and the clean simplicity of die-cut. With this type, your design—no matter how colorful or detailed—is printed onto a transparent sheet of vinyl. This lets you have complex images with gradients and multiple colors without needing to cut out every last tiny piece.
The big win here is design freedom. You can rock a full-color logo with fine details that would be a nightmare to produce as a die-cut, all while keeping the rest of your window totally transparent. Just keep in mind that the clear vinyl can sometimes catch glare and might show fine scratches more easily than the glass itself over time.
To help you figure out what’s best for your rig, here’s a quick-glance comparison of the three main types.
Comparing Rear Window Decal Types
This table breaks down which decal type is best for visibility, style, and privacy, helping you match the material to your goal.
| Decal Type | Best For | Visibility (From Inside) | Privacy Level | Common Use Case |
|---|---|---|---|---|
| Perforated Vinyl | Full-coverage, detailed graphics | Good, but slightly tinted | High | Business advertising, large flags |
| Die-Cut Vinyl | Text, logos, and simple shapes | Excellent (around design) | Low | Custom text, brand logos |
| Clear-Background | Complex, multi-color designs | Excellent | Low | Detailed logos, intricate artwork |
Ultimately, the best material comes down to what you're trying to achieve. Are you making a big, bold statement? Sending a clean, simple message? Or showcasing a detailed piece of art? Each type gives you a unique way to put your personal stamp on your pickup.
How to Measure for a Perfect Fit
Getting the size of your pickup’s rear window decal just right is the secret to a professional-looking job. A decal that’s too small can look lost and awkward, while one that’s too big might get cut off or not even stick properly. It’s like buying a picture frame—you need the exact dimensions for the art to look its best.
The process itself is pretty straightforward, but you’ve got to be accurate. Grab a flexible measuring tape (the kind used for sewing works great) or a standard tape measure, plus a notepad to jot down the numbers. Let’s walk through the simple steps to make sure your decal is sized perfectly.
Measuring Your Truck's Rear Window
Your first move is to measure the total usable glass area. Don't just measure from one edge of the window to the other. You have to account for that rubber gasket or frame surrounding the glass, because the decal will only stick to the smooth glass surface itself.
Start by measuring the maximum width of the window from inside the frame. After that, measure the maximum height right at the center of the window, again making sure you stay within the glass area.
- For Solid Windows: This is the easy one. Just get the max height and width of the visible glass.
- For Sliding Windows: Measure the entire glass surface as if it were one solid piece. It's also a good idea to measure the stationary panels and the sliding part separately. This is a huge help if you're thinking about placing smaller decals and need to avoid the seams.
- For Multi-Panel Windows: On trucks with three or even four panels, measure each individual pane as well as the overall dimensions. This way, you can place your decal to avoid crossing over those thick rubber dividers.
Pro Tip: Always measure twice. It's a simple habit that prevents costly mistakes. A decal that's even a quarter-inch too big won't fit right, so double-checking your numbers is non-negotiable.
Accounting for Obstructions
Once you have your basic dimensions, it's time to map out the "no-go" zones. Your rear window isn't just a blank canvas; it usually has things that your decal needs to steer clear of.
You’ll need to spot and measure around these key features:
- Rear Wiper Path: If your truck has a rear wiper, turn it on (make sure the window is wet!) and watch its full range of motion. Measure that area and subtract it from your usable space. A decal placed in the wiper's path will get peeled right off over time.
- Defroster Lines: While it's generally safe to apply decals over defroster lines, some people prefer not to. More importantly, you should never use a razor blade to scrape off an old decal over these lines, as you can easily cut the connection and ruin your defroster.
- Third Brake Light: Take note of where that high-mount brake light is located. The last thing you want is for your awesome new graphic to cover up a critical safety feature.
Jot these measurements down on your notepad. This creates a clear map of the perfect placement area for your new decal. This extra step ensures your design doesn't just look great but also doesn't interfere with your truck's functionality. You'll notice many banner-style decals, like those designed for a Ford F-150 windshield, are already shaped to work around these common obstacles.
Understanding Decal Laws and Safety Rules
Before you peel the backing off that awesome new graphic, let's talk about the rules of the road. A pickup rear window decal is a fantastic way to make a statement, but it absolutely has to be safe and legal. Regulations on window obstructions can vary wildly from state to state, so what’s perfectly fine in Texas might get you pulled over in California.
This isn’t about memorizing boring legal codes. Think of it as a common-sense checklist to make sure your truck looks great without creating a hazard. Law enforcement’s main concerns are simple: can you see out, and are your safety features working? Get this right, and you can customize your truck with total peace of mind.
Navigating State and Local Regulations
Most states have specific laws about how much of your rear window you can cover. These rules exist for one reason: to ensure you have a clear line of sight to see traffic creeping up behind you. While there isn't a single federal law that covers this for personal trucks, almost every state rule boils down to a simple principle: your view can't be dangerously blocked.
Some states get really specific, setting exact percentage limits on how much of the window can be covered. Others are more general, leaving it up to an officer’s judgment.
Here are the key things to remember:
- Check Your State's DMV Website: This is your best friend. It's the most reliable place to find the exact rules for window tinting and obstructions where you live.
- Third Brake Light: This is non-negotiable. It is illegal in all states to cover your third brake light (the high-mounted one). Your decal cannot block it, period.
- Side Mirrors Are Key: Many states are more lenient about rear window coverage if your truck has two functional side mirrors—which nearly all modern pickups do.
The golden rule is simple: if your decal makes it hard to see the road behind you, it’s probably not legal. Always put a clear line of sight ahead of aesthetics.
How Perforated Decals Keep You Legal
This is where perforated vinyl is a total game-changer. It was literally engineered to solve this exact problem. The magic is in its vinyl-to-hole ratio, which is usually around 60% printed surface and 40% tiny holes. This pattern creates that "one-way vision" effect, letting you see out clearly while everyone else sees a solid, vibrant image.
This technology is a huge reason why businesses use a pickup rear window decal for mobile advertising. A single truck can generate between 30,000 to 70,000 views a day, offering a massive return on investment compared to old-school ads—all while keeping the driver's view perfectly safe.
For solid, non-perforated graphics like die-cut decals, placement is everything. The goal is to keep them out of your central line of sight. Putting a Don't Tread on Me decal in a lower corner or along the bottom edge of the glass is a perfect way to show your pride without creating a dangerous blind spot. Stick to these guidelines, and your custom touch will be both safe and 100% street-legal.
A Step-by-Step Installation Guide
Getting that perfect, bubble-free finish on your rear window decal is a lot easier than it looks. The secret isn't some special trick—it's just good old-fashioned prep work and a little bit of patience. Think of it like painting a room: the time you spend taping and cleaning is what guarantees a professional-looking result.
We're going to walk through the entire process, from getting your glass spotless to laying the vinyl down like a pro. Follow these steps, and your decal will look like it was put on at the factory.
Gathering Your Installation Tools
Before you even think about peeling the backing off your new decal, get all your supplies together. Having everything ready and within arm's reach makes the job go so much smoother and keeps you from scrambling at a critical moment. You probably have most of this stuff already.
Here’s what you’ll need:
- Cleaning Solution: A 50/50 mix of isopropyl alcohol and water in a spray bottle is perfect. It cleans and degreases without leaving residue.
- Lint-Free Cloths: Microfiber towels are your best friend here. They won't leave behind tiny fibers that can get trapped under the vinyl.
- Squeegee or Credit Card: A proper plastic squeegee is best for applying even pressure, but a sturdy credit card will work just fine in a pinch.
- Masking Tape: This is the key to getting your decal perfectly straight and centered. Don't skip it.
- Measuring Tape: For finding the exact center of your window. No guesswork.
Once your toolkit is ready, it's time to tackle the most important part of the whole job.
Preparing the Glass Surface
You can’t expect a decal to stick to a dirty window. It just won’t happen. Every little speck of dust, oil from your fingers, or leftover grime will create an air bubble or cause the adhesive to fail down the road. You want that glass to be surgically clean.
Start with a basic wash using soap and water to get rid of any heavy dirt or mud. After that, grab your alcohol spray. Mist the entire window and wipe it down with a clean microfiber cloth. The alcohol cuts through any leftover wax, road film, or oils that soap and water might miss.
A perfectly clean surface is the foundation of a long-lasting decal. Even a single fingerprint can compromise the adhesive, so take your time and be thorough during this preparation phase.
Let the window air dry completely. Don't rush it. Trapped moisture is the enemy of a smooth application.
Positioning and Applying the Decal
With a clean, dry window, you're ready for the main event. Most quality die-cut decals arrive with transfer tape already applied over the top. This clear, slightly sticky sheet holds all the separate pieces of your design together, letting you apply it in one clean shot.
- Find Your Center: Use your measuring tape to find the horizontal center of the rear window. Put a small piece of masking tape at the top of the glass to mark the spot.
- Create a Hinge: Line up your decal, making sure it's level and centered on your mark. When it’s exactly where you want it, run a long piece of masking tape across the entire top edge, sticking it to both the decal and the glass. This "hinge" keeps it from moving.
- Peel and Apply: Lift the decal up like it’s on a hinge. Carefully peel the waxy paper backing away from the vinyl, exposing the sticky side. Go slow and make sure all the vinyl pieces stay stuck to the clear transfer tape.
- Squeegee with Precision: While holding the bottom of the decal away from the glass, slowly lower it down. Start squeegeeing from the center of the decal and work your way out to the edges. Use firm, overlapping strokes to push all the air out as you go.
- Remove the Transfer Tape: After the whole decal is pressed down firmly, it's time for the big reveal. Slowly peel the transfer tape back on itself at a sharp 180-degree angle. If a piece of the vinyl tries to lift up, just lay the tape back down, give that spot another good squeegee, and try again.
For a great result every time, it really helps in mastering vinyl transfer paper application techniques. Once the transfer tape is off, you can go over any edges with your finger. If you find a tiny air bubble you missed, you can usually pop it with a pin and press the air out.
This visual guide breaks down the essential safety checks you should perform for any rear window decal.
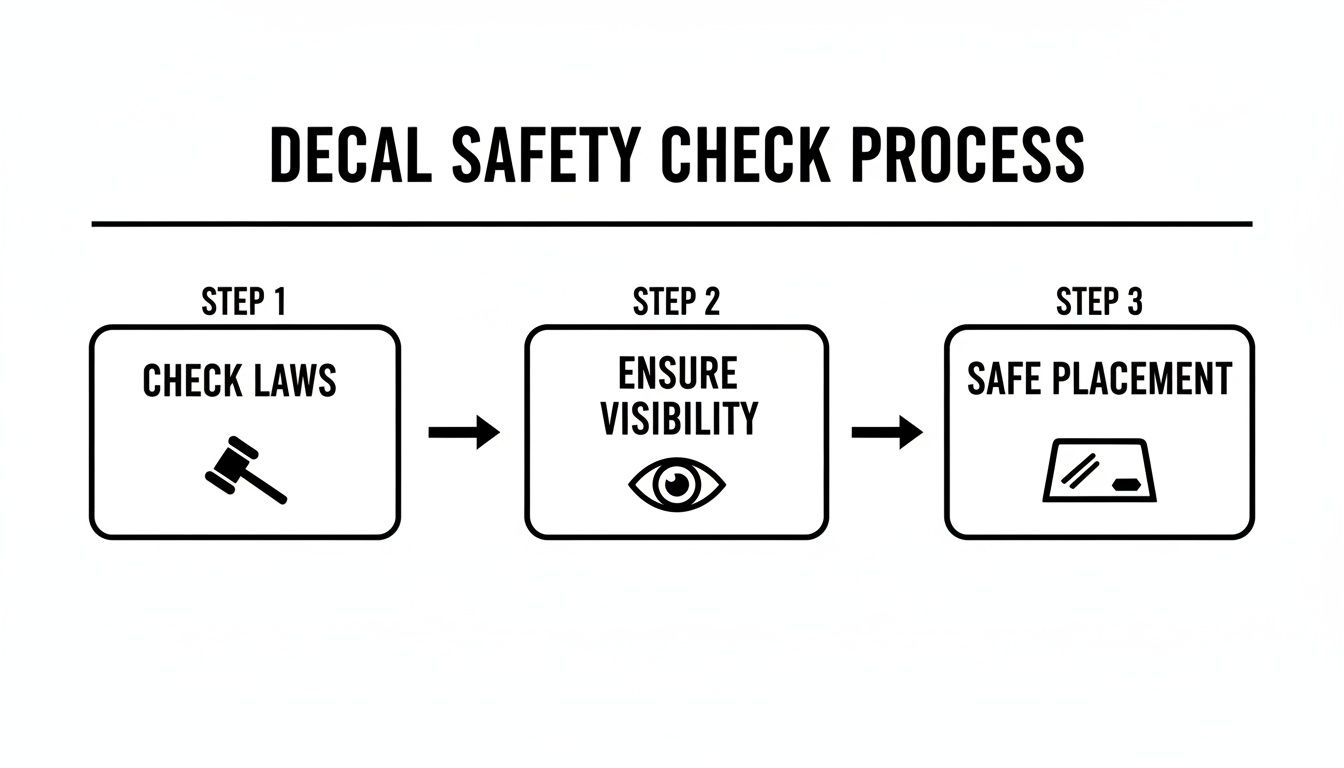
It’s a simple flow that reminds us safety is more than just one step—it’s about checking the law, making sure you can see, and choosing a smart spot on your window.
Caring for Your Decal to Make It Last
Think of your new decal as an investment in your truck's personality. And just like a good paint job, it needs a little care to stay looking sharp for the long haul. A few simple habits are all it takes to protect it from sun, rain, and road grime.
The first 48 hours after you stick it on are the most important. This is the curing period, where the adhesive really grips the glass and forms its strongest bond. During this time, hold off on washing your truck or hitting the rear defroster. Just let it be. Giving it that time to set is the best first step you can take.
After that initial window, the main rule is simple: be gentle. Those high-pressure car washes might be fast, but they can be absolutely brutal on decals. The intense jets of water can sneak under the vinyl's edges, causing it to lift or peel over time.
Smart Washing Techniques
Hand washing is always the way to go when you have a decal. Grab a soft cloth or sponge, mix up a mild soap-and-water solution, and you're set. When you wash over the decal, move gently with the grain of the design instead of scrubbing against any sharp edges or pointy bits.
When it's time to rinse, use a low-pressure stream of water. Don't blast the decal directly with a powerful hose nozzle. Treat it more like you're rinsing a delicate piece of equipment, not pressure-washing a dirty driveway. It's these small adjustments that make a huge difference in how long your graphic lasts.
Choosing the Right Cleaning Agents
What you clean with is just as important as how you clean. Harsh chemicals are the enemy—they can degrade the vinyl, fade the colors, and eat away at the adhesive. To keep your decal looking its best, you need to know which window cleaning chemicals to stay away from.
Here’s a quick list of what to avoid:
- Ammonia-Based Cleaners: Products like Windex are a no-go. Ammonia breaks down the vinyl over time.
- Abrasive Solvents: Keep oil-based cleaners, tar removers, and anything with strong solvents far away from your decal.
- Ice Scrapers: Never, ever use a hard plastic or metal ice scraper on the decal itself. You’ll easily gouge or peel the vinyl. Let your defroster do the heavy lifting to melt the ice.
The rule of thumb is easy: if a cleaner is harsh enough to strip wax off your paint, it's way too harsh for your decal. Stick to mild soap and water or look for cleaners specifically marked as safe for vinyl graphics.
The world of automotive personalization is massive. In the U.S. alone, pickup accessories make up a USD 2.4 billion industry. Your decal is part of that trend, and taking proper care of it ensures you get the full value from your purchase, which can last up to 7 years. Follow these simple tips, and your pickup's rear window decal will look as crisp as the day you put it on.
Got Questions? We’ve Got Answers.
Even after you’ve picked a design, a few last-minute questions always seem to pop up. It’s smart to get those final details sorted before you commit. We've gathered the most common questions from truck owners right here, with straight, no-nonsense answers.
Think of this as your final check-in. We’ll cover how your truck's features play with the decal and what to do when it's time for a change. Let's get these cleared up so you can personalize your ride with total confidence.
Can I Still Use My Rear Defroster with a Decal?
Yes, absolutely. A high-quality vinyl decal, especially one made from professional-grade material like Oracal, is built to handle the gentle heat from a standard defroster. The adhesive is engineered to be stable and won’t melt, peel, or bubble under normal use.
There's just one golden rule: wait at least 48 hours after installation before you fire up the defroster. This gives the adhesive time to fully cure and grab onto the glass, locking your decal in place for the long haul.
How Do I Remove an Old Decal Without Damaging My Window?
Taking off an old decal is simple and won't harm your window if you do it right. The trick is to soften the adhesive first—don't just try to scrape it off cold. A little bit of heat makes all the difference.
Here’s the best way to do it:
- Warm It Up: Use a hairdryer on a low or medium setting, holding it a few inches from the decal. Move it back and forth to warm the vinyl evenly.
- Peel Slowly: Once it's warm to the touch, use a fingernail or a plastic razor blade to lift a corner. Then, pull the decal back on itself at a sharp, slow angle.
- Clean Up: If any sticky stuff is left behind, no problem. A bit of isopropyl alcohol or a citrus-based adhesive remover on a soft microfiber cloth will wipe it clean without scratching the glass.
The biggest mistake people make is grabbing a metal razor blade. It can easily scratch your glass or, worse, slice right through those delicate defroster lines. Always stick to plastic tools and gentle cleaners.
Does a Perforated Decal Affect My Vision at Night or in the Rain?
Perforated decals are designed for awesome daytime visibility, but your view can change a bit with the weather. During a heavy rain, water can fill the tiny holes and slightly blur your vision until it dries or runs off. It's a minor effect that usually clears up fast.
At night, looking through a perforated decal feels a lot like looking through a lightly tinted window. Headlights and other cars are still perfectly visible, but the overall scene is a little dimmer. Most drivers get used to it almost instantly and find it perfectly safe for driving in any condition. For a full-window graphic, it’s a tiny trade-off.
What Is the Difference Between a Decal and a Sticker?
While most people use the words interchangeably, there's a technical difference that really matters for your truck's rear window. A sticker is usually a single piece of printed material you peel off a backing and slap on. Think of a classic bumper sticker.
A decal, however, is transferred from a backing paper to your window using a top layer of transfer tape. This three-layer system (backing, vinyl, transfer tape) is the secret to applying complex designs with separate letters or elements all at once, perfectly spaced. It’s what gives you that clean, professional "painted-on" look that makes a custom graphic pop.
Ready to give your truck a look that’s all you? At Custom Sticker Shop, we craft premium, American-made vinyl decals designed to last. With hundreds of designs and free shipping on orders over $25, you can find the perfect graphic for your ride.
Explore our massive collection of truck decals and start personalizing today!