
Putting a decal on your truck is one of the fastest and most satisfying ways to make it your own. It's a simple DIY project that lets you show off what you're all about, whether that’s off-road pride, military service, or just a unique touch to make your rig stand out from the sea of stock trucks on the road.
Why Decals Are a Truck Owner's Best Upgrade
Let's face it, your truck is more than just a truck—it's a statement. Adding a decal is a powerful way to make that statement loud and clear without dropping thousands on a custom paint job. It's a small change that makes a huge impact, instantly changing the whole vibe of your vehicle.
And you're not alone. The desire to personalize has blown up the car decal market, which is on track to hit $3,345 million by 2025. North America is leading the pack, making up over 37% of that market as more truck owners use their rigs as a canvas for who they are.
More Than Just a Sticker
We're not talking about the cheap, flimsy stickers you'd find in a gumball machine. High-quality vinyl decals are built to last. We use professional-grade, American-made materials engineered to take a beating from the sun, rain, and road grime for years. Your design stays looking sharp for the long haul.
Think about the possibilities:
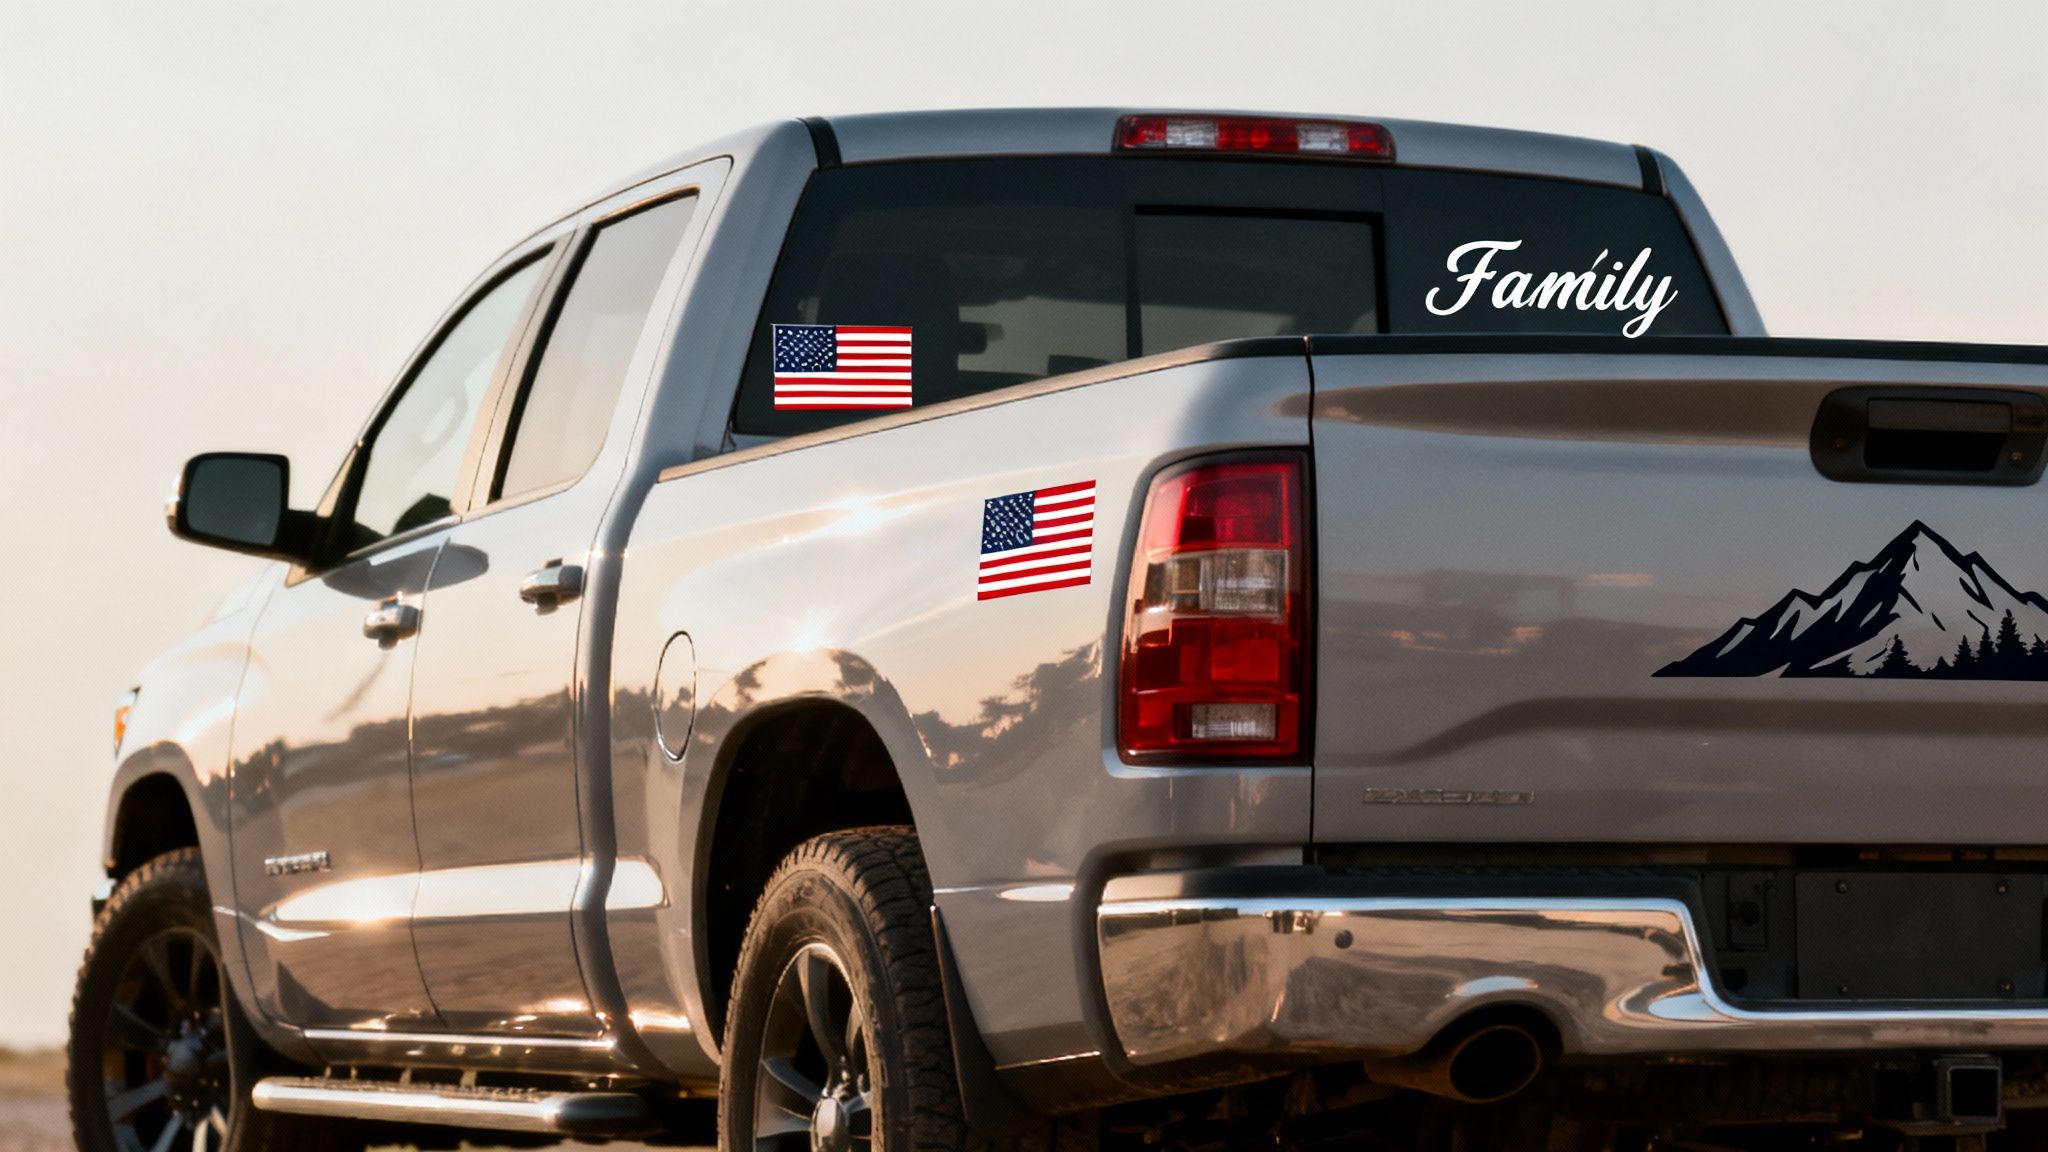
- Show Your Pride: Fly the flag with military tributes, first responder graphics, or patriotic designs.
- Rep Your Passion: Slap on some graphics for hunting, fishing, or your off-roading adventures, like our popular 4×4 bedside decals.
- Represent Your Family: Personalize your truck with your family name or those classic stick-figure designs.
The best part about adding a decal is the instant transformation. In less than an hour, you can take a bone-stock truck and make it feel like it’s truly yours, telling your story without saying a word.
Of course, decals are just one piece of the puzzle. A lot of truck owners pair visual upgrades with functional ones. If you're looking to add more utility, understanding different vehicle roof rack systems is a great next step. Combining style and function is what makes a truck completely versatile.
Choosing The Right Decal For Your Truck
Getting a decal that looks killer and actually lasts comes down to three things: the material it's made from, a design that fits your style, and picking the perfect spot for it on your rig. Nail these three, and your truck's new look will have some serious impact.
The material is everything. It’s the foundation. That’s why we only work with professional-grade Oracal vinyl, which is engineered with a 7-year outdoor rating to stand up to sun, rain, and road grime. This isn't just a sticker; it's a durable film made to bond with your truck's surface without messing up the paint.
When you're choosing your decals on truck modifications, you might be thinking about the overall quality and value of aftermarket car parts. Investing in premium vinyl is a no-brainer—it means you get a professional look that holds up for years.
Finding A Design That Fits Your Style
Here's the fun part. The custom decal market is blowing up, projected to hit $2.5 billion in 2025 and climb toward $4.5 billion by 2033. This whole trend is being driven by truck owners right here in the U.S.—where there are over 70 million registered pickups—turning their rigs into personal statements.
So, what’s your statement? Popular designs usually fall into a few camps:
- Patriotic & Military: American flags, military branch logos, or graphics honoring veterans are always a powerful choice.
- Outdoor & Hobby: Show off what you love, whether it's hunting, fishing, or hitting the trails with some rugged, off-road designs.
- Family & Personal: This is where you make your truck truly yours, from classic stick figure families to custom text banners. A custom vinyl windshield banner for your Ford F-150 is a great way to do this.
Where To Place Your Decal For The Best Look
Once you've got your design, the final piece of the puzzle is deciding where to put it. Placement is huge—it affects both visibility and the whole vibe of your truck. A good tip is to think about contrast. A white decal on a dark tinted window really pops, while a black decal on a silver or grey body panel gives you a more subtle, sleek look.
Your truck essentially gives you three main canvases for decals: the windshield, the back window, and the body panels. Each spot offers a totally different look and level of visibility, so take a minute to think about the effect you're going for before you peel and stick.
Each area comes with its own set of pros and cons, from how easy the decal is to apply to how much attention it's going to grab on the road. To make it easier, let's break down the most common spots.
Comparing Truck Decal Placement Options
This table helps you choose the best spot for your decal by weighing the pros and cons of visibility, application difficulty, and overall impact on different surfaces.
| Placement Area | Visibility Level | Application Difficulty | Best For |
|---|---|---|---|
| Back Window | High | Easy to Moderate | Bold statements, memorial decals, and business logos that need to be seen |
| Windshield | Moderate | Moderate to Difficult | Banners, club names, or subtle branding along the top edge |
| Side Windows | Low to Moderate | Easy | Smaller personal decals, jokes, or unit insignias for a personal touch |
| Tailgate | High | Moderate | Large graphics, patriotic flags, or business branding on a flat surface |
| Body Panels | Varies | Moderate to Difficult | Racing stripes, large-scale graphics, and subtle, tone-on-tone designs |
Ultimately, the best spot is the one that achieves the look you want while fitting the size and style of your decal. Don't be afraid to use a little masking tape to temporarily position your decal and see how it looks before you commit.
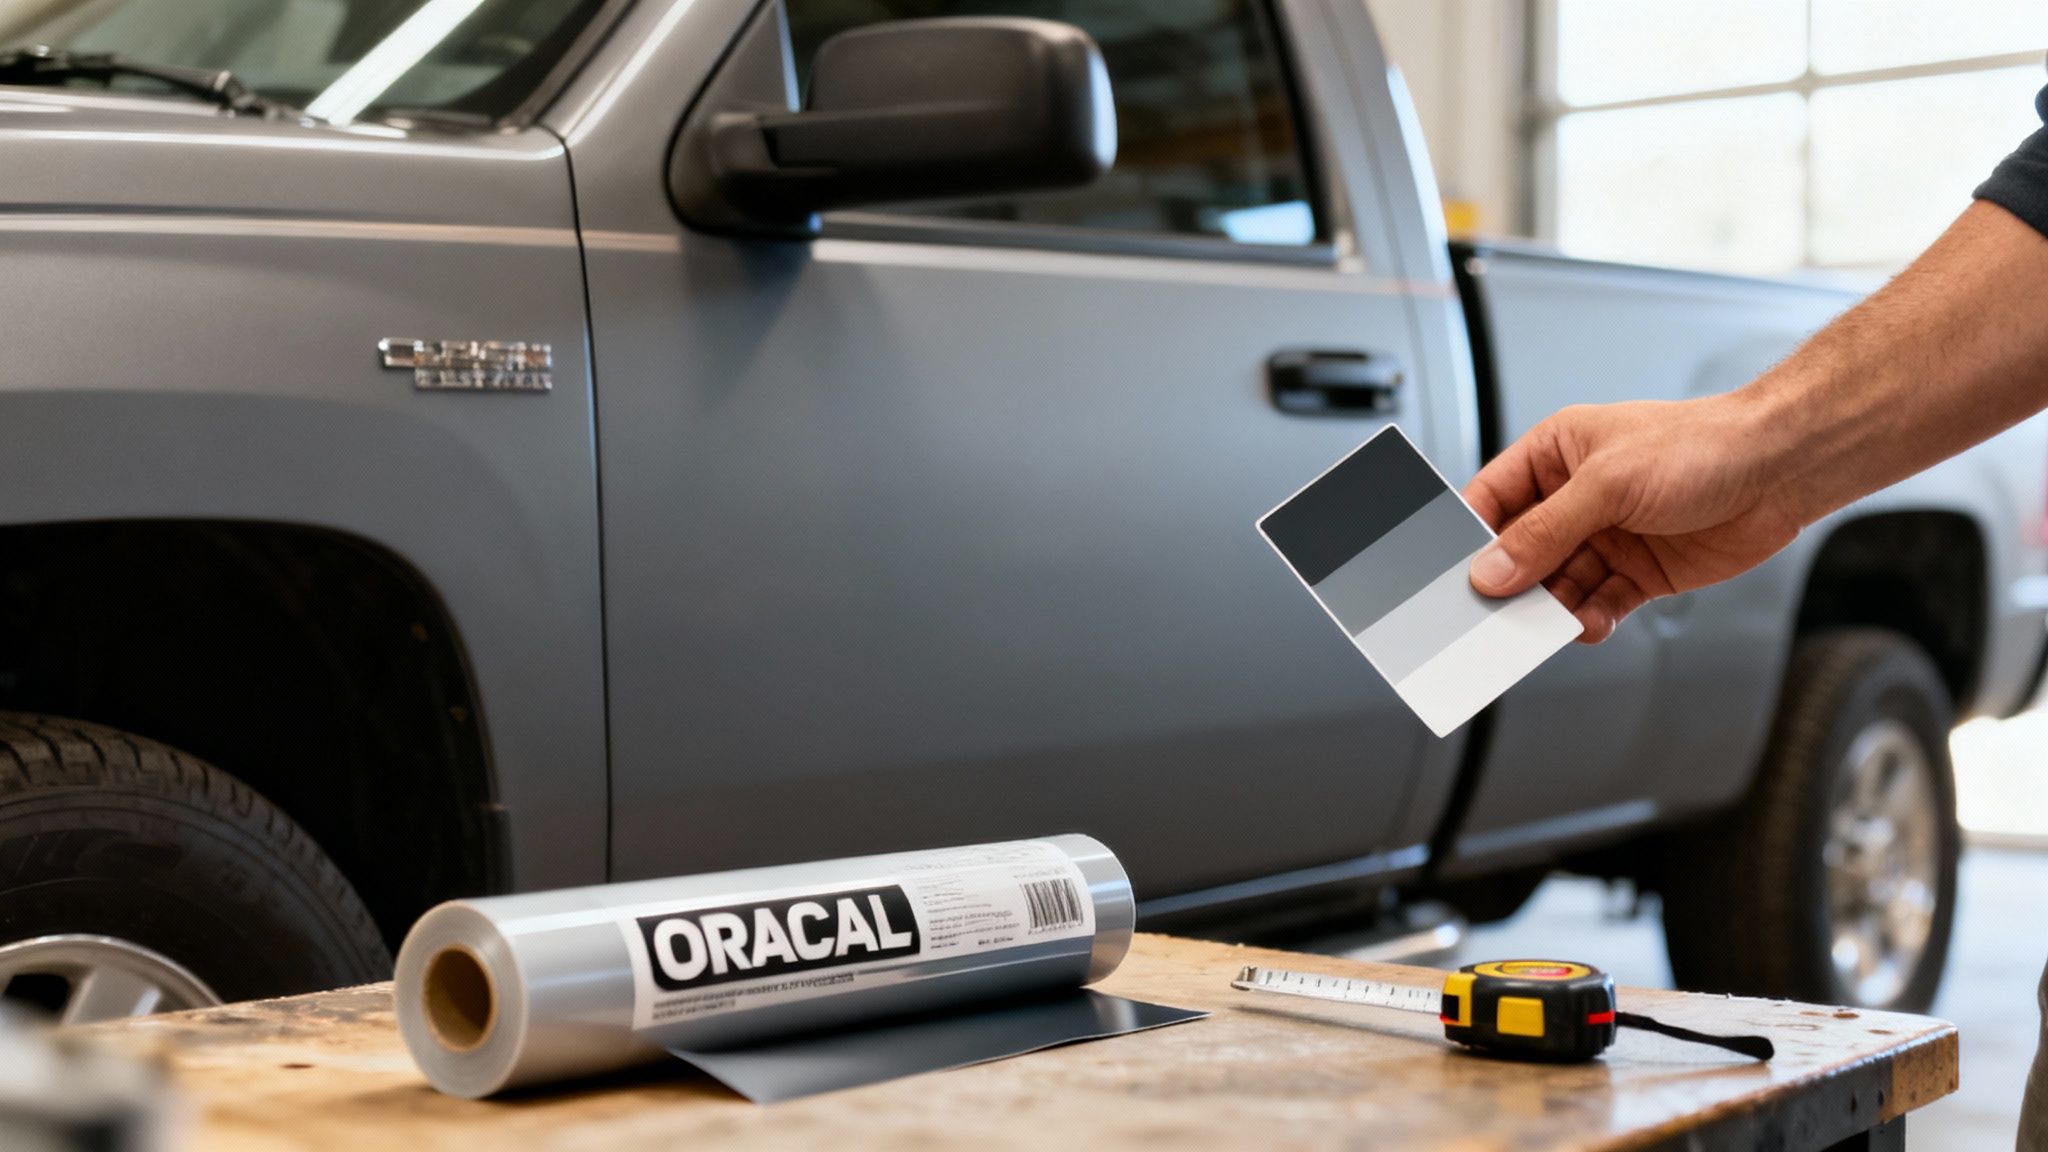
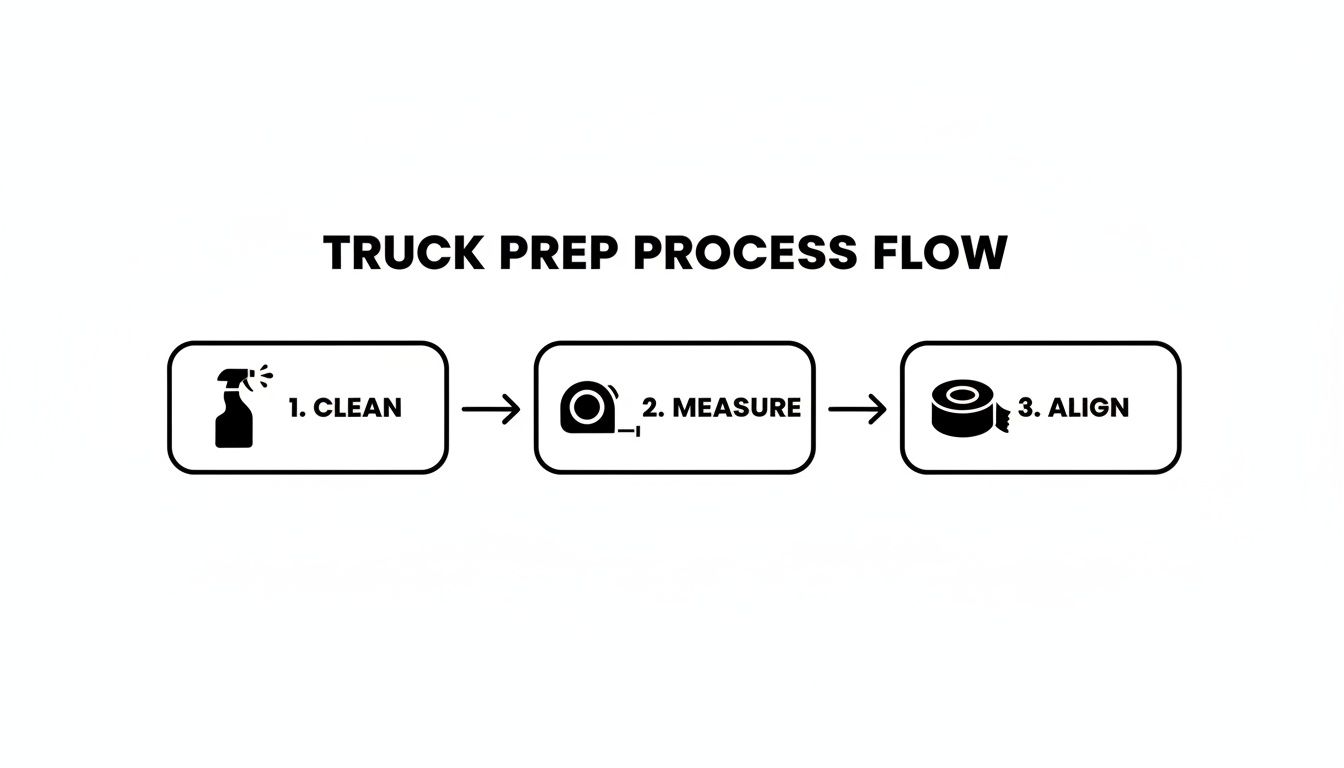
Prepping Your Truck for a Flawless Finish
Even the best vinyl decal on the planet will fail if you slap it on a dirty surface. Seriously, this is the one step you absolutely cannot skip. Think of your truck's paint or window as a canvas—you can't create a masterpiece on something covered in dust and road grime.
Proper prep is the single biggest factor in getting that professional, bubble-free look that actually lasts for years. So many people get excited and rush this part, and that's exactly why you see decals with peeling edges and annoying bubbles. Contaminants like wax, road oils, and even invisible residues create a barrier, stopping the adhesive from getting a solid grip.
The Most Important 5 Minutes: Cleaning
Your first job is to create a perfectly clean slate. A quick trip through the car wash is a decent start, but it's not enough. You have to get rid of everything that could interfere with the adhesive. For this, 70-91% isopropyl alcohol is your absolute best friend.
Get a clean microfiber cloth, wet it with the alcohol, and wipe down the entire area where the decal will go. This simple move dissolves stubborn waxes, oils, and residues that soap and water just can't touch. You’ll feel the difference—the cloth will glide smoothly with no drag when the surface is truly clean.
A huge mistake we see is people using Windex or other glass cleaners on windows. Most of those products leave behind a film that is a nightmare for decal adhesive. Just stick to isopropyl alcohol. It works perfectly every single time.
After you've wiped it down, let the area air-dry completely. Don't rush it. Any moisture left behind will get trapped under the vinyl, leading to bubbles and a weak bond from day one.
Get Your Tools Ready Before You Start
Having the right gear on hand makes the whole process go from frustrating to smooth. You don’t need a pro-level garage, just a few key items to nail the placement and get a perfect finish.
Here's your go-to toolkit:
- Squeegee: This is non-negotiable. A firm but flexible plastic squeegee is what you'll use to press the decal down and push out every last air bubble.
- Measuring Tape: Don't eyeball it. Ever. Use a measuring tape to find your center point and make sure your decal is perfectly level.
- Masking Tape: This is your secret weapon for creating a "hinge." It holds the decal in the perfect spot while you apply it, so there’s zero chance of it shifting.
- Spray Bottle (for wet application): If you're tackling a larger decal, a spray bottle with water and just a tiny drop of dish soap can be a lifesaver. It lets you slide the decal around for perfect positioning.
Watch the Weather
Finally, you have to work with the weather, not against it. Vinyl and its adhesive are surprisingly sensitive to temperature and humidity. Applying your decal in the wrong conditions is a recipe for failure.
The sweet spot for application is between 50°F and 90°F (10°C to 32°C). Never try to apply decals on truck panels that are baking in direct sunlight—the heat makes the adhesive super aggressive and almost impossible to manage. On the flip side, if it's too cold, the adhesive won't cure properly and will never form a strong bond. High humidity is also a problem, so just aim for a clear, dry day.
Mastering the Vinyl Decal Application Process
Alright, this is where the magic happens. Your truck is clean, your tools are laid out, and it's time to turn that careful planning into a professional-looking decal install. We're going to walk through the two best techniques in the business: the dry "hinge" method, which is my go-to for most decals, and the wet method, a lifesaver for bigger graphics that offers a lot more forgiveness.
Choosing the right approach really boils down to the size of your decals on truck. For small to medium-sized graphics, you can't beat the dry hinge method. It’s fast, precise, and clean. But if you're wrangling a massive windshield banner or a full-side graphic, the wet method is your best friend, letting you slide the decal around until it's absolutely perfect.
Before you even think about peeling a backing, though, your prep work is what sets you up for success.
This process is non-negotiable. A flawless application is built on a clean surface, accurate measurements, and perfect alignment. Nail these three things, and the rest is smooth sailing.
The Hinge Method For A Dry Application
The hinge method is what the pros use because it takes all the guesswork out of lining things up. You get it straight the first time, every time.
Start by placing your decal exactly where you want it. Once you're happy, run a strip of masking tape horizontally across the middle, taping it to both the decal and the truck. This tape is your "hinge."
Now, lift one half of the decal up and carefully peel the waxy backing paper away from the clear transfer tape, stopping at the hinge. Cut the loose backing paper off. Grab your squeegee and, starting from the center hinge, press the decal down with firm, overlapping strokes. Work your way outward to the edge, pushing air out as you go.
With one side down, you can remove the hinge tape. Then, just repeat the process for the other side: lift the decal, remove the last piece of backing paper, and squeegee from the center out.
Pro Tip: Always squeegee from the center out. This is the golden rule. It forces any potential air bubbles toward the edges instead of trapping them in the middle, which is the #1 cause of frustration and mistakes.
The Wet Method For Large Decals
When you’re dealing with a big piece of vinyl, the wet application method is a total game-changer. It lets you slide the graphic into position without it grabbing onto the surface prematurely.
Just mix a few drops of dish soap with water in your spray bottle. Give the application area a light misting—you want it damp, not soaking wet.
Carefully remove the entire backing paper from your decal and lay the sticky side down onto the damp surface. That soapy water film gives you a window of time to slide it into the perfect spot. Once it’s exactly where you want it, use your squeegee to push the water out from underneath the vinyl.
Start in the center and work your way out with firm, steady pressure. You're not just removing the water; you're activating the adhesive bond. It's a popular technique for large-scale graphics and wraps, a market that has absolutely exploded.
In fact, pickup trucks and SUVs are the driving force behind the automotive wrap films market. Valued at $12.25 billion globally in 2025, it's projected to skyrocket to an incredible $56.68 billion by 2033. This growth is led by passenger vehicles like trucks, which have the fastest growth rate at 24.1%. North America dominates this market, thanks to the popularity of wrapped trucks for both advertising and personal style.
Finishing The Job Perfectly
Whether you used the wet or dry method, give the entire decal one final pass with the squeegee to make sure you have a solid bond. The last step is to remove the clear transfer tape.
Peel it back slowly at a sharp 180-degree angle, pulling it back flat against itself. Don't pull it straight up and away from the truck, as that can lift the edges of your brand-new vinyl decal. For some ideas on what to tackle next, check out our collection of vinyl decals for GMC trucks.
If you see a few tiny bubbles, don't sweat it. Most will vanish on their own after a few warm, sunny days as the vinyl settles.
Keeping Your New Truck Decal Looking Sharp
You’ve nailed the application, and your new decal looks incredible. The next step is making sure it stays that way for its full, 7-year rated lifespan. The first couple of days are absolutely critical for the adhesive to lock in and form a permanent bond with your truck.
This initial phase is known as the curing period, and there are no shortcuts. For the next 24 to 48 hours, your decal is still setting up. The adhesive is hardening and gripping the surface, so you have to let it do its job without any interference. That means no automatic car washes and definitely no high-pressure sprayers.
Giving it that initial time to cure is the single best thing you can do to guarantee it stays put for years. Resisting the urge to wash your rig right away really pays off.
Long-Term Care And Cleaning Habits
Once your decal is fully cured, maintenance is pretty straightforward. You can wash your truck just like you normally would, but with a few small tweaks to protect your investment. The biggest enemy of any decal is a high-pressure washer aimed directly at the edges.
That concentrated blast of water can sneak underneath the vinyl and start to lift it. When you're washing, always keep the nozzle a good distance away and spray at an angle—never blast the edge of the graphic head-on.
When washing by hand, your best friends are simple:
- Soft Microfiber Cloths: These are gentle on both your truck's paint and the vinyl, so you won't have to worry about scratches.
- Gentle Automotive Soap: Steer clear of harsh detergents or abrasive cleaners that could dull or damage the decal's finish over time.
Think of your decal like a high-quality paint job. You wouldn't take a stiff brush to your truck’s clear coat, so treat your vinyl with that same level of care. Gentle, circular motions with a soft cloth are all you'll ever need.
What About Automatic Car Washes?
Touchless car washes are generally a safe bet for your decals on truck panels and windows. Where you need to be a little careful is with car washes that use those big, aggressive spinning brushes. While our Oracal vinyl is built tough, those heavy bristles can catch a decal's edge over and over, eventually causing it to lift.
If you ever notice an edge starting to peel up slightly, you can often fix it in seconds. On a warm, sunny day, just use your thumb to press the lifted edge firmly back down onto the surface. The heat from the sun helps reactivate the adhesive, creating a fresh bond. This simple trick can stop a tiny lift from becoming a big problem and keep your graphic looking flawless.
Got Questions About Your Truck Decals? We’ve Got Answers.
Even after you’ve planned everything out, a few questions are bound to pop up. It’s completely normal. Getting a decal to lay perfectly on a truck panel or window is a satisfying job, but knowing how to handle the common "what-ifs" will give you that extra bit of confidence.
We've pulled together the most common questions we hear from truck owners just like you. Think of this as your go-to guide for troubleshooting and keeping your graphics looking sharp.
Can I Put a Decal on in Cold Weather?
This is a big one, especially for those of us who don’t live in places with year-round sunshine. The sweet spot for applying vinyl is between 50°F and 90°F (10°C and 32°C). When it gets too cold, the vinyl stiffens up, and the adhesive just doesn't want to grab hold properly. You might get it to stick, but you're risking weak adhesion and peeling down the road.
Now, if you absolutely have to get it done in cooler weather, there’s a workaround. Grab a hairdryer on a low setting and gently warm up the truck's surface first. The key word here is gently. You're just trying to bring the surface temperature into a more cooperative range, not cook the paint or the vinyl itself.
What’s the Best Way to Get Old Decals Off?
Ready for a new look? Taking old vinyl off without messing up your paint is all about patience and the right technique. The whole secret is just softening the adhesive before you start pulling.
Start by heating the old decal with a hairdryer on low—this will loosen the adhesive's grip. Once it’s warm to the touch, you can usually get an edge to lift with a plastic razor blade or even just your fingernail.
From there, it’s pretty straightforward:
- Peel Slowly. Don't just rip it off. Pull the decal back on itself at a sharp, steady angle.
- Handle the Gunk. For any sticky residue left behind, an automotive-grade adhesive remover or some isopropyl alcohol on a microfiber cloth will make short work of it.
- Always Test First. Before you go all-in with a chemical remover, test it on a small, hidden spot just to be safe.
Are There Legal Rules I Should Know About for Window Decals?
Yes, and this is a crucial point. While the specific rules can vary from state to state, there are some common regulations to keep in mind. As a general rule, you can't place decals anywhere on the front windshield that could obstruct the driver's line of sight.
A lot of states also have laws that limit how much of your side and rear windows can be covered by graphics. Before you apply that big window decal, a quick check of your local DMV's regulations is a smart move. It'll keep you compliant, safe, and ticket-free.
How Do I Fix a Small Bubble Under My New Decal?
First off, don't panic if you see a tiny air bubble after you’re done. Small bubbles are super common and, most of the time, they fix themselves. The sun is your best friend here. A few warm days will let the vinyl "breathe" and settle, and you'll probably see those minor bubbles just vanish on their own.
If you’ve got a stubborn bubble that’s still hanging around after a week, there’s a simple pro trick. Take a very fine needle or the tip of a sharp craft knife and poke a tiny hole right in the center of the bubble. Then, just use your finger or a squeegee to gently press the trapped air out through that nearly invisible hole. The vinyl will lay flat, and you’ll never even know the pinprick was there.
At Custom Sticker Shop, we're here to help you get the perfect look for your truck. All our decals are made from premium, American-made vinyl and designed for easy, long-lasting application. Find your next design at https://customstickershop.us.
Crafted with Outrank